
- FREERADIUS WITH MIKROTIK – Part #1 – General Tip’s> YOU ARE HERE
- FREERADIUS WITH MIKROTIK – Part #2 – COA
- FREERADIUS WITH MIKROTIK – Part #3 – Expiration
- FREERADIUS WITH MIKROTIK – Part #4 – Auto Mac Binding
- FREERADIUS WITH MIKROTIK – Part #5 – Stale Sessions
- FREERADIUS WITH MIKROTIK – Part # 6 – External Auth Script & RADPOSTAUTH
- FREERADIUS WITH MIKROTIK – Part #7 – Quota Limit
- FREERADIUS WITH MIKROTIK – Part #8 – RADACCT Trimming & Archiving
- FREERADIUS WITH MIKROTIK – Part #9 – Restrict user auth from allowed VLAN only
- FREERADIUS WITH MIKROTIK – Part #10 – Allow/Deny User Login by Time
- FREERADIUS WITH MIKROTIK – Part #11 – Prepaid Hourly Accounts along-with the mighty COA !
- FREERADIUS WITH MIKROTIK – Part #12 – Happy Hours for Quota based Users
- FREERADIUS WITH MIKROTIK – Part #13 – Detecting user device vendor based on MAC address
- FREERADIUS WITH MIKROTIK – Part #14 – Dynamic Bandwidth Change on the FLY using COA with radclient
- FREERADIUS WITH MIKROTIK – Part #15 – Dynamic NAS Clients
- FREERADIUS WITH MIKROTIK – Part #16 – Loosy workaround to disconnect missing users from the NAS which are not online in FR
- FREERADIUS WITH MIKROTIK – Part #17 -Retrieve User Password via SMS
- FREERADIUS WITH MIKROTIK – Part #18 – MAC Login for Hotspot Users
- FREERADIUS WITH MIKROTIK – Part #19 – Restricting user by Service Type
- FREERADISU WITH MIKROTIK – Part # 20 – Enforcement of lowercase in username
- FREERADISU WITH MIKROTIK – Part # 21 – Weird-trigger-for-duplicate-users
- FREERADISU WITH MIKROTIK – Part # 22 – Create Dynamic Address List using Mikrotik-Address-List Attribute
Disclaimer! This is important!
Every Network is different , so one solution cannot be applied to all. Therefore try to understand logic & create your own solution as per your network scenario. Just dont follow copy paste.
If anybody here thinks I am an expert on this stuff, I am NOT certified in anything Mikrotik/Cisco/Linux or Windows. However I have worked with some core networks and I read , research & try stuff all of the time. So I am not speaking/posting about stuff I am formerly trained in, I pretty much go with experience and what I have learned on my own. And , If I don’t know something then I read & learn all about it.
So , please don’t hold me/my-postings to be always 100 percent correct. I make mistakes just like everybody else. However – I do my best, learn from my mistakes and always try to help others
Regard's
Syed Jahanzaib~
Personnel Note:
This is another post about freeradius. My aim is to let people know that creating your own Radius Billing system is not ROCKET SCIENCE as some PRO in the industry try to pose. You can do it as well, the only thing required is the ultimate passion to achieve the goal. And with the right search, reading, understanding logic’s, you can do all on your own. I strongly encourage to read the FR mailing list and Google
Make your own Billing system in Linux with Freeradius 2.1.10 / MySQL 5.5.47
# Part-1
[This Guide will be updated with many further supporting posts)
The aim of writing this post was that there are number of radius products available on the internet with lots of features, each have some unique features. But this is also true that none of them is 100% perfect for every type of ISP. The reason is that every ISP/Network have different sort of local requirements and billing mode. If you ahve searched on google you will find that there are tons of guides for freeradius implementation, but most of them have either incomplete data , or difficult explanation, or does not meet the practical requirements of Desi ISP. Thats why I started this guide so that info that is not common on the net can be shared here. plus most important you can learn on your own using this baby step.
In this post I have made some quick guide to install a very basic level of billing system by using Freeradius/mysql on UBUNTU 12.4 [32bit]. Mikrotik is being used as NAS to connect user and freeradius will be used for authentication/accounting billing system.
Quick Code to get started.
Radius IP = 101.11.11.245
Mikrotik IP = 101.11.11.255
Let’s Rock …
First Update Ubuntu (12.4 32bit) and install the required modules
# Update Ubuntu First
apt-get update
# Install Required pre requisites modules
apt-get -y install apache2 mc wget make gcc mysql-server mysql-client curl
apt-get -y install phpmyadmin
apt-get install freeradius freeradius-mysql freeradius-utils
This may take some moments as average of 100+MB will be downloaded from the net and will be installed automatically. Sit back and relax.
After update/installation of components done, Proceed to MYSQL configuration below …
TIP: Use phpmyadmin, it will be much easier for you to add/edit/delete records from DB using its GUI …
MYSQL CONFIGURATION:
Create Freeradius Database in MYSQL
Now create Freeradius Database in mySQL.
Login to mysql (use mysql root password that you entered in above steps)
mysql -uroot -pzaib1234
create database radius;
grant all on radius.* to radius@localhost identified by "zaib1234";
Import Freeradius Database Scheme in MYSQL ‘radius’ DB
Insert the freeradius database scheme using the following commands, Make sure to change the password ####
mysql -u root -pzaib1234 radius < /etc/freeradius/sql/mysql/schema.sql
mysql -u root -pzaib1234 radius < /etc/freeradius/sql/mysql/nas.sql

# For Ubuntu 18, use below...
# mysql -u root -pzaib1234 radius < /etc/freeradius/3.0/mods-config/sql/main/mysql/schema.sql
Create new user in MYSQL radius database (For Testing Users)
User id = zaib
Password = zaib
Rate-Limit = 1024k/1024k
mysql -uroot -pzaib1234
use radius;
INSERT INTO radcheck ( id , UserName , Attribute , op , Value ) VALUES ( NULL , 'zaib', 'Cleartext-Password', ':=', 'zaib');
INSERT INTO radreply (username, attribute, op, value) VALUES ('zaib', 'Mikrotik-Rate-Limit', '==', '1024k/1024k');
exit
Note:
You can skip the Framed-IP-Address part or modify it as per required.
FREERADIUS CONFIGURATION:
SQL.CONF
NAS SECTION:
We have to add a NAS entry either in radius NAS table, or in clients.conf so that this NAS will be allowed to send auth request to this freeradius
To enable NAS table via sql, we need to enable it in sql.conf file, follow below method …
Edit following file /etc/freeradius/sql.conf
nano /etc/freeradius/sql.conf file
Change the password to zaib1234 (or whatever you set in mysql if required) and Uncomment the following
readclients = yes
So some portion of the file may look like following, after modifications
# Connection info:
server = "localhost"
#port = 3306
login = "radius"
password = "zaib1234"
readclients = yes
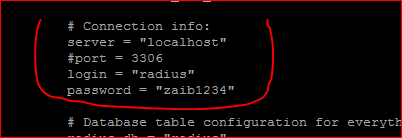
Save and Exit the file
/etc/freeradius/sites-enabled/default
Now edit the /etc/freeradius/sites-enabled/default
nano /etc/freeradius/sites-enabled/default
Uncomment the sql option in the following sections
accounting
# See “Authorization Queries” in sql.conf
sql
session
# See “Authorization Queries” in sql.conf
sql
Post-Auth-Type
# See “Authorization Queries” in sql.conf
sql
[/sourcecode]
Save and Exit the file
RADIUSD.CONF
Now edit /etc/freeradius/radiusd.conf file
nano /etc/freeradius/radiusd.conf
#Uncomment the following option
$INCLUDE sql.conf
Save and exit the file
/etc/freeradius/sites-available/default
Last but no least , edit /etc/freeradius/sites-available/default
nano /etc/freeradius/sites-available/default
Search for LINE
# See “Authorization Queries” in sql.conf
and UN-COMMENT the SQL word below it.
Example After modification
# See “Authorization Queries” in sql.conf
sql
Save and exit.
ADDING ‘NAS’ [Mikrotik] in CLIENTS.CONF
To accept connectivity of Mikrotik with the Freeradius, we need to add the mikrotik IP and shared secret in clients.conf
Edit /etc/freeradius/clients.conf
nano /etc/freeradius/clients.conf
and add following lines at bottom
client 101.11.11.255 {
secret          = 12345
shortname       = Mikrotik
}
Note: Change the IP /Secret according to your Mikrotik Network Scheme.
after any changes either to clients.conf or NAS table, you must restart the freeradius service in order to take changes effect, its a security measure
Last but not least, download mikrotik dictionary from
https://wiki.mikrotik.com/wiki/Manual:RADIUS_Client/vendor_dictionary
and copy it in /usr/share/freeradius folder
If freeradius is already running, stop it and restart it.
TESTING USER AUTHENTICATION ON FREERADIUS:
Now stop the free radius server
/etc/init.d/freeradius stop
and start in DEBUG mode so that we can monitor for any errors etc
freeradius -X
Now OPEN another TERMINAL/CONSOLE window and issue following command to TEST USER AUTHENTICATION
radtest zaib zaib localhost 1812 testing123
and you should ACCESS-ACCEPT MESSAGE as below …
root@ubuntu:~#  radtest zaib zaib localhost 1812 testing123

Sending Access-Request of id 38 to 127.0.0.1 port 1812
User-Name = "zaib"
User-Password = "zaib"
NAS-IP-Address = 101.11.11.245
NAS-Port = 1812
rad_recv: Access-Accept packet from host 127.0.0.1 port 1812, id=38, length=39
Mikrotik-Rate-Limit = "1024k/1024k"

Another method
echo "User-Name = zaib, Password = zaib, Calling-Station-Id =00:0C:29:35:F8:2F" | radclient -s localhost:1812 auth testing123
root@apnaradius:~# echo "User-Name = zaib, Password = zaib, Calling-Station-Id =00:0C:29:35:F8:2F" | radclient -s localhost:1812 auth testing123
Received response ID 101, code 3, length = 56
Reply-Message = "zaib - Your account has expired. \r\n"

Total approved auths: 0
Total denied auths: 1
Total lost auths: 0
:~) Alhamdolillah
MIKROTIK SECTION:
I assumed you already have pppoe server configured and running.
Add Radius Entry as showed in the images below …


TEST FROM CLIENT WINDOWS PC:
Create pppoe dialer at client end, and test the user ID created in earlier steps.

Once it will be connected, you can see entries in Mikrotik LOG / Active Users Session.
As showed in the image below …

and dynamic queue of 1mb will also be created (that we added in attributes section in radius/mysql)

DISCONNECT Active ppp USER : COMMAND FROM RADIUS
If you want to disconnect a single active connected user , use following command (many other methods available as well)
echo user-name=zaib | radclient -x 101.11.11.255:1700 disconnect 12345
Result


Another Method to disconnect ppp user on mikrotik via radclient with account session ID
First check active user Accounting Session ID in RADACCT table.
mysql -uroot -pzaib1234 -s --skip-column-names -e "use radius; select acctsessionid from radacct where username ='zaib' AND acctstoptime is NULL;"
this way you will get account session id from radacct table,
Now issue disconnect command [You may fill up variables with actual values, following is an example only]
echo user-name=$USERNAME,Acct-Session-Id=$ACCTSESID | radclient -x $NAS disconnect $RADSECRET
Disconnect HOTSPOT user with acct session id and framed ip
#!/bin/bash
#set -x
SQLUSER="root"
SQLPASS="PASSWORD"
SQLHOST="localhost"
SQLPORT="3306"
DB="radius"
CMD="mysql -u$SQLUSER -p$SQLPASS -h$SQLHOST --port=$SQLPORT --skip-column-names -e"
NAS_IP=`$CMD "use $DB; select nasipaddress from radacct where username ='$USR' AND acctstoptime is NULL;"`
NAS_SECRET=`$CMD "use $DB; select secret from nas where nasname = '$NAS_IP' ;"`
NAS_COA_PORT="1700"
ACCTSESID=`$CMD "use $DB; select acctsessionid from radacct where username ='$USR' AND acctstoptime is NULL;"`
FRAMEDIP=`$CMD "use $DB; select framedipaddress from radacct where username ='$USR' AND acctstoptime is NULL;"`
echo user-name=$USR,Acct-Session-Id=$ACCTSESID,Framed-IP-Address="$FRAMEDIP" | /usr/local/bin/radclient -x $NAS_IP:$NAS_COA_PORT disconnect $NAS_SECRET > /dev/null
Preventing Simultaneous Use by using simultaneous-Use attribute
To LIMIT USER SIMULTANEOUS SESSION: [command is phpMyadmin base format]
INSERT INTO radcheck (username,attribute,op,value) VALUES ('zaib', 'Simultaneous-Use', ':=', '1');
NOTE: For sim-use i had to disable (comment) the “radutmp” entry in /etc/freeradius/sites-enabled/default .
ACCOUNTING SECTION
SESSION SECTION
Now modify the /etc/freeradius/sql/mysql/dialup.conf file
nano /etc/freeradius/sql/mysql/dialup.conf
& UNCOMMENT following
# Uncomment simul_count_query to enable simultaneous use checking
simul_count_query = "SELECT COUNT(*) \
FROM ${acct_table1} \
WHERE username = '%{SQL-User-Name}' \
AND acctstoptime IS NULL"
NOTE:
YOU MUST RESTART FREERADIUS SERVER IN ORDER TO TAKE CHANGES EFFECT. SO DO IT.
Result of above attributes:

Add Calling-Station-Id attribute to restrict mac CALLED ID
If we want to restrict bind user name with specific mac address, first edit
nano /etc/freeradius/sites-enabled/default
and un comment following attribute “checkval“, Example is below …
 save and restart radius.
Now login to mysql , select radius database, and use below command to add user, with mac address.
INSERT INTO `radius`.`radcheck` (`id` ,`username` ,`attribute` ,`op` ,`value`)
VALUES (
NULL , 'zaib', 'Calling-Station-Id', ':=', '12:34:56:78:70:00'
);
If user uses different station to connect with this ID he will be rejected as showed in the image below …


Add Static IP Address and Pool in radreply group.
To Assign user FIX IP Address, use following …
INSERT INTO radreply ( id , UserName , Attribute , op , Value ) VALUES (NULL , 'zaib', 'Framed-IP-Address', '==', '1.2.3.4');
To Assign user IP from POOL, use following …
INSERT INTO radreply ( id , UserName , Attribute , op , Value ) VALUES (NULL , 'zaib', 'Framed-Pool', '==', '512k-pool');
Adding Expiration Date for user
If you want to Expire the Account after XX days, you can use following
INSERT INTO radcheck ( id , UserName , Attribute , op , Value ) VALUES (NULL , 'zaib', 'Expiration', ':=', '13 Mar 2016');
In above Example User will expires on 13th March, 2016 at 00:00 [Midnight].
If you want to EXPIRE user at some other specific Time, use following format in time
INSERT INTO radcheck ( id , UserName , Attribute , op , Value ) VALUES (NULL , 'zaib', 'Expiration', ':=', '13 Mar 2016 08:00');
ZAIB 🙂 GOT IT
Limit User Total Online time (Access by Period) Started from first login
If you want to start user online time (like in hours) but it should be calculated from first access, then use following.
edit the file /etc/freeradius/sites-enabled/default
nano /etc/freeradius/sites-enabled/default
and add following under “authorize {“ section
accessperiod
so that it may look like below …

now edit file /etc/freeradius/modules/sqlcounter_expire_on_login
nano /etc/freeradius/modules/sqlcounter_expire_on_login
and add following
sqlcounter accessperiod {
counter-name = Max-Access-Period-Time
check-name = Access-Period
sqlmod-inst = sql
key = User-Name
reset = never
query = "SELECT IF(COUNT(radacctid>=1),(UNIX_TIMESTAMP() - IFNULL(UNIX_TIMESTAMP(AcctStartTime),0)),0) FROM radacct WHERE UserName = '%{%k}' AND AcctSessionTime >= 1 ORDER BY AcctStartTime LIMIT 1"
}
now add user attribute in radchceck table (Following is 1 hour Uptime limit example, and it will start after first login)
INSERT INTO radcheck ( id , UserName , Attribute , op , Value ) VALUES (NULL , 'zaib', 'Access-Period', '=', '3600');
Once the time period is over, user will be disconnected.
Limit User Total Online time , Example one hour, which can be used in parts as well.
If we want to allow user one hour which user can use in parts as well, like ten minutes now, then next day he can use rest of his available time. Use following
edit the file /etc/freeradius/sites-enabled/default
nano /etc/freeradius/sites-enabled/default
and add following under “authorize {“ section
Max-All-Session
now edit file /etc/freeradius/modules/sqlcounter_expire_on_login
nano /etc/freeradius/modules/sqlcounter_expire_on_login
and add following
sqlcounter timelimit {
counter-name = Max-All-Session-Time
check-name = Max-All-Session
sqlmod-inst = sql
key = User-Name
reset = never
query = "SELECT SUM(AcctSessionTime) FROM radacct where UserName='%{%k}'"
}
Save and Exit.
Now add user attribute in radchceck table (Following is 1 hour Uptime limit example, which can be used in parts as well no first login applied here)
INSERT INTO radcheck ( id , UserName , Attribute , op , Value ) VALUES (NULL , 'zaib', 'Max-All-Session', ':=', '3600');
QUOTA LIMIT FOR USER with CUSTOM MEANINGFUL REJECT REPLY MESSAGE
To limit user data volume limit (either daily, weekly or monthly) use below code.
edit the file /etc/freeradius/sites-enabled/default
nano /etc/freeradius/sites-enabled/default
and add following under “authorize {“ section
totalbytecounter{
reject = 1
}
if(reject){
update reply {
Reply-Message := 'ZAIB-RADIUS-REPLY - You have reached your bandwidth limit'
}
reject
}
now edit file /etc/freeradius/modules/sqlcounter_expire_on_login
nano /etc/freeradius/modules/sqlcounter_expire_on_login
and add following
sqlcounter totalbytecounter {
                counter-name = Mikrotik-Total-Limit
                check-name = Mikrotik-Total-Limit
                reply-name = Mikrotik-Total-Limit
                sqlmod-inst = sql
                key = User-Name
                reset = never
                query = "SELECT ((SUM(AcctInputOctets)+SUM(AcctOutputOctets))) FROM radacct WHERE UserName='%{%k}'"
}
Save and Exit.
Now add user attribute in radchceck table (Following is 1 MB total data limit example, which can be used in parts as well )
Note: Value is in bytes, so use it accordingly
INSERT INTO radcheck ( id , UserName , Attribute , op , Value ) VALUES (NULL , 'zaib', 'Mikrotik-Total-Limit', ':=', '1000000');
Once the user quota over, he will get access deny message, and in radius log, you can see following 🙂

Note:
There is a problem with above attribute. Radius will not AUTO disconnect user once he reaches his limit. he will continue to use his account. he will only be denied further login on his next login attempt.
[later I found that if you will add expiration check in radcheck section, NAS will auto DC the user, no need to disconnect the user manually 🙂 ) Look the next article which have EXPIRATION post.
Following is an workaround for it.
Make the following bash script. It will check for online users, and will check if those users have quota limit using ‘Mikrotik-Total-Limit’ attribute. Then it will check there usage against quota limit. If it will found above quota, it will simply disconnect users, else ignore. You can add this script in crontab to run every X minutes.
#!/bin/bash
#set -x
# HEADER -----------
# SCRIPT to fetch data of active radius users into file, then check there quota limit against there usage.
# if quota is over , disconnect them.
# Syed Jahanzaib / aacable@hotmail.com / https://aacable.wordpress.com
# 17-MAR-2016

# Setting FILE Variables
TMPFILE="/tmp/activeusers"
FINALFILE="/tmp/finalfile"

# Make list of ONLINE USERS using radwho command, very handy 🙂
radwho  | awk '{print $2}' | sed '1d' > $TMPFILE
# if you fail to configure radwho, then use following
# mysql -uroot -pSQLPASS --skip-column-names -e "use radius; SELECT username FROM radacct WHERE acctstoptime IS NULL;" | cut -f1 -d/

# Mikrotik NAS Details
NAS="101.11.11.255"
NASPORT="1700"
SECRET="12345"
CURDATE=`date`

# MYSQL user credentials
SQLUSER="root"
SQLPASS="zaib1234"

# Apply Formula to get QUOTA limit data for each user in $FINALFILE (EXCLUDING USER WHO DONT HAVE ANY QUOTA LIMIT USING MIKROTIK-TOTAL-LIMIT ATTRIBUTE)
num=0
cat $TMPFILE | while read users
do
num=$[$num+1]
ACTIVEID=`echo $users | awk '{print $1}'`
mysql -u$SQLUSER -p$SQLPASS --skip-column-names -e "use radius; SELECT username,value FROM radcheck WHERE attribute='Mikrotik-Total-Limit' AND username='$ACTIVEID';" > $FINALFILE
done

# Apply Formula to get username and QUOTA LIMIT from $FINALFILE and check there usage againts assigned quota
num=0
cat $FINALFILE | while read users
do
num=$[$num+1]
username=`echo $users | awk '{print $1}'`
QLIMIT=`echo $users | awk '{print $2}'`
QUSED=`mysql -u$SQLUSER -p$SQLPASS --skip-column-names -e "use radius; SELECT ((SUM(AcctInputOctets)+SUM(AcctOutputOctets))) FROM radacct WHERE UserName='$username'"`

# PRINT GENERAL INFO
echo "------ $CURDATE"
echo "$username QUOTA LIMIT= $QLIMIT"
echo "$username QUOTA USED= $QUSED"

# IF QUOTA IS ABOVE LIMIT, DISCONNECT USER USING RADCLIENT OR YOU CAN CHANGE THE USER SERVICE AS WELL 🙂 / zaib
if [ $QUSED -gt $QLIMIT ]
then
echo "QUOTA REACHED! Disconnecting $username from NAS $NAS"
echo user-name=$username | radclient -x $NAS:$NASPORT disconnect $SECRET

# ELSE JUST SHOW USER USED DATA WHICH IS IN LIMIT AT A MOMENT / zaib
else
echo "$username quote is under Limit"
echo "------"
fi
done

> $TMPFILE
> $FINALFILE
# SCRIPT END / Syed Jahanzaib

Allah Shuker 🙂
BANDWIDTH CHANGE ON THE FLY – CHANGE OF AUTHORITY (COA) _for pppoe_
To change bandwidth speed for already connected users ON THE FLY , means without disconnecting him. Use following code. Its well tested with Freeradius 2.x and Mikrotik 6.34.2
Change the User Name / Rate Limit/ Mikrotik IP and PORT/SECRET as per network.
echo User-Name := "zaib", Mikrotik-Rate-Limit = 512k/512k | radclient -x 101.11.11.255:1700 coa 12345

CHANGE BANDWIDTH PACKAGE TO LOWER AFTER DAILY QUOTA REACH
If you want to enforce FUP (fair usage policy) like if 1mb speed allowed user consumed X MB in a day, then his bandwidth package should DROP to lower speed, e.g: 512k for that day.
Add the COUNTER for daily counting
nano /etc/freeradius/modules/sqlcounter_expire_on_login
counter-name = Mikrotik-Total-Limit
check-name = Mikrotik-Total-Limit
reply-name = Mikrotik-Total-Limit
sqlmod-inst = sql
key = User-Name
reset = daily
query = "SELECT SUM(AcctInputOctets)+SUM(AcctOutputOctets) FROM radacct WHERE UserName='%{%k}'"
}
Now add the action for the above counter in sites-available (or enable) file
nano /etc/freeradius/sites-available/default
dailyquota {
reject = 1
}
if (reject) {
ok
update reply {
Mikrotik-Rate-Limit := "512k/512k"
Reply-Message := "You have reached your transfer limit. Limited bandwidth"
}
}
Get Online User Names
mysql -uroot -pSQLPASS --skip-column-names -e "use radius; SELECT username FROM radacct WHERE acctstoptime IS NULL;" | cut -f1 -d/ | sort | uniq -d
Sample of sites-enabled/default file
authorize {
### ZAIB Section-1 Start Here ##
preprocess
chap
mschap
digest
# If user name not found, print error
sql{
notfound = 1
}
if(notfound){
update reply {
Reply-Message = 'Username not found'
}
reject
}

# Check mac, if invalid, then give this user ip from expired-pool
checkval{
reject = 1
}
if(reject){
ok
update reply {
Reply-Message := "Incorrect MAC!"
Framed-Pool := "expired-pool"
Mikrotik-Rate-Limit := "1k/1k"
}
}

# If user is expired by date, then provide him from expired pool
expiration{
userlock = 1
}
if(userlock){
ok
update reply {
Reply-Message := 'Exp-Mod-Reply: Your account has expired.'
Framed-Pool := "expired-pool"
Mikrotik-Rate-Limit := "1k/1k"
}
pap
}
}

authenticate {
Auth-Type PAP {
pap
}
Auth-Type CHAP {
chap
}
Auth-Type MS-CHAP {
mschap
}
digest
unix
}

preacct {
preprocess
acct_unique
suffix
}

accounting {
detail
unix
sql
exec

}
session {
sql
}

### ZAIB Section-2 Start Here ## Default error
post-auth {
exec
Post-Auth-Type REJECT {
update reply {
Reply-Message = 'Wrong Password'
}
sql
attr_filter.access_reject
}
}
### ZAIB Section-2 ENDS Here ##

pre-proxy {
}

post-proxy {
eap
}
USERS file
DEFAULT Auth-Type := PAP
SIMULTANOUS-USE is ignored
in NAS type, make sure you select nas type to other if you are using Mikrotik, or else sim-use will not be checked on user login.
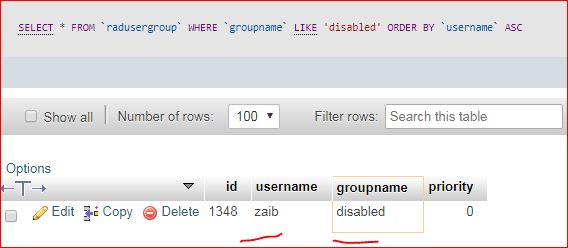
Reject Authentication based on RADGROUP
Create group name entry like disabled in radgroupcheck table,

now tag user name with this group name in radusergroup
Regard’s
Syed Jahanzaib

Nice..
Sent from Yahoo Mail on Android
LikeLike
Comment by surambili — March 11, 2016 @ 3:45 PM
Always Awesome Post
LikeLike
Comment by Abid Ali — March 11, 2016 @ 6:03 PM
AOA Syed Jahanzaib bahi kesay hain ap sir mere pass ubuntu 12.04 LTS installed hai aik pc par us par lusca head install hai proxy cache server banaya howa hai kia main usi pc mein freeradius server bhi install kar k chala sakta hoo billing system k liye ya is k liye alag se pc lagana hoga ?
LikeLiked by 1 person
Comment by Javed Hussain — March 12, 2016 @ 6:02 PM
Thank you for you tutorial, it is very clearly and fully. I’m looking forward to the second part of your
LikeLike
Comment by DP — March 25, 2016 @ 6:34 AM
Updated.
LikeLike
Comment by Syed Jahanzaib / Pinochio~:) — March 26, 2016 @ 4:58 PM
[…] To Read Previous Post on Freeradius with Mikrotik, read this > FR with Mikrotik / Part-1 […]
LikeLike
Pingback by Mikrotik with Freeradius/mySQL – Change on the FLY with COA # Part-2 | Syed Jahanzaib Personal Blog to Share Knowledge ! — March 25, 2016 @ 4:58 PM
[…] FREERADIUS WITH MIKROTIK – Part #1 […]
LikeLike
Pingback by Mikrotik with Freeradius/mySQL – Change IP Pool After Expiration # Part-3 | Syed Jahanzaib Personal Blog to Share Knowledge ! — March 28, 2016 @ 4:19 PM
Thats excellent document. Thanks for that. All exact steps worked for me also, however ‘Mikrotik-Rate-Limit’ is not giving expected result. Even if value set is 1024k user actually getting more than the set value.Is any other setting required here?
LikeLike
Comment by HM — June 20, 2016 @ 4:34 PM
Hi Syed. First of all, this three posts about freeradius saved my life. I’m trying to integrate freeradius with fortigate but your example was very helpful.
I want to know if that I want to achieve it’s possible using freeradius, if you can help me.
I’m using freeradius to validate users in captive portal to give to our clients free Internet access, but we ask to the clients an valid email. I developed a php page that send an email with a link and validate whan that user click the link.
What I need to do with the freeradius server is give access to the clients when they complete the form to give them the opportunity to reach their mail service to click the link. If in the first hour they don’t confirm the email address i want to drop the connection.
I planned to give to the users 15 days of internet access and if they don’t confirm the email in the first hour then drop the connection.
But when the fortigate stablish the connectio takes the max connection time from radius and I don’t know how to modify to reduce it and send a Coa disconnect when the user reach the expire time. I don’t understand how radius trigger the coa messages. I saw your examples with the sql querys but I don’t know exactly how radius use it to triiger the disconnect message.
Thanks in advance.
LikeLike
Comment by miquelangeld — August 11, 2016 @ 2:57 PM
In fact I want to know if I change the user expiry time or max-time after the user logon, radius can check that new condition and be able to throw a Coa disconnect message to the fw.
LikeLike
Comment by miquelangeld — August 11, 2016 @ 2:59 PM
Thanks for your wonderful tutorials, would it be possible to shed some light on how to change user bandwidth automatically for night hours? e.g User zaib has 1Mbps for daytime and 2Mbps for night from 8pm to 6am? Thanks.
LikeLike
Comment by Danish — August 29, 2016 @ 2:02 PM
Syed Jahanzaib nice blog dear i have some query can u share your mail
LikeLike
Comment by siddhartha — September 6, 2016 @ 6:15 PM
aacable [at] hotmail [dot] com
LikeLike
Comment by Syed Jahanzaib / Pinochio~:) — September 18, 2016 @ 4:11 PM
Its very helpful.
How can I reach you to get more help?
LikeLike
Comment by Arif — September 27, 2016 @ 9:49 AM
Use the EMAIL.
LikeLike
Comment by Syed Jahanzaib / Pinochio~:) — September 27, 2016 @ 11:06 AM
totalbytecounter is not working in both freeradius 2 and 3
LikeLiked by 1 person
Comment by Imdadali — February 22, 2017 @ 6:32 PM
centos 7 raddb totalbytecounter is not working radius 3
LikeLike
Comment by denisshockwave — May 7, 2017 @ 2:28 AM
i have not tried it with radius3.
LikeLike
Comment by Syed Jahanzaib / Pinochio~:) — May 10, 2017 @ 8:27 AM
thank you very much mr syed
I want to integerate radius server with mysql for fortigate captive portal but is this tutorial which you integerated for mikrotik working with fortigate?
LikeLike
Comment by starking123eng — May 22, 2017 @ 7:24 PM
I am not sure if fortigate is compatible with freeradius.
LikeLike
Comment by Syed Jahanzaib / Pinochio~:) — May 26, 2017 @ 12:17 PM
thank you very much mr sayed about your perfect course but I have one question
I configured freeradius with mysql and every thing go fine and I using your batch file to disconnect exceeded limit users but when I run this batch there is no any thing happen and the activeusers and finalusers files still empty there is no any data was inserted
I field to configure radwho so I using mysql command instead
pleas help me
LikeLike
Comment by starking123eng — June 29, 2017 @ 1:40 PM
Hello sir, i’ve tried with the above daily FUP policy. But, in my case…..radacct table is empty…..however, my hotspot is working fine. my router showing a log, ” axe (10.1.0.1): RADIUS accounting request not sent: no response”…..could you help me on this. Thanks in advance.
LikeLike
Comment by Akshay N — July 10, 2017 @ 7:19 PM
[…] FREERADIUS WITH MIKROTIK – Part #1 […]
LikeLike
Pingback by Mikrotik with Freeradius/mySQL – Auto MAC Binding on 1st Login – Part 4 | Syed Jahanzaib Personal Blog to Share Knowledge ! — October 31, 2017 @ 3:30 PM
[…] FREERADIUS WITH MIKROTIK – Part #1 […]
LikeLike
Pingback by Mikrotik with Freeradius/mySQL – Dealing with STALE sessions in FR – Part 5 | Syed Jahanzaib Personal Blog to Share Knowledge ! — November 1, 2017 @ 1:26 PM
[…] FREERADIUS WITH MIKROTIK – Part #1 […]
LikeLike
Pingback by Freeradius External Authentication Script & logging request in radpostauth with customized message | Syed Jahanzaib Personal Blog to Share Knowledge ! — December 26, 2017 @ 4:26 PM
[…] FREERADIUS WITH MIKROTIK – Part #1 – General Tip’s […]
LikeLike
Pingback by Mikrotik with Freeradius/mySQL – Quota Limit # Part-7 | Syed Jahanzaib Personal Blog to Share Knowledge ! — January 8, 2018 @ 11:37 AM
[…] FREERADIUS WITH MIKROTIK – Part #1 – General Tip’s> […]
LikeLike
Pingback by Mikrotik with Freeradius/mySQL – Trimming & Archiving RADACCT # Part-8 | Syed Jahanzaib Personal Blog to Share Knowledge ! — January 15, 2018 @ 2:40 PM
[…] FREERADIUS WITH MIKROTIK – Part #1 – General Tip’s> […]
LikeLike
Pingback by FREERADIUS WITH MIKROTIK – Part #9 – Restrict user auth from allowed VLAN only | Syed Jahanzaib Personal Blog to Share Knowledge ! — January 18, 2018 @ 8:48 AM
[…] FREERADIUS WITH MIKROTIK – Part #1 – General Tip’s Click here to read more on FR tutorials … […]
LikeLike
Pingback by FREERADIUS WITH MIKROTIK – Part #10 – Allow/Deny User Login by Time | Syed Jahanzaib Personal Blog to Share Knowledge ! — January 24, 2018 @ 1:40 PM
[…] FREERADIUS WITH MIKROTIK – Part #1 – General Tip’s Click here to read more on FR tutorials … […]
LikeLike
Pingback by FREERADIUS WITH MIKROTIK – Part #11 – Prepaid Hourly Accounts along-with the mighty COA ! | Syed Jahanzaib Personal Blog to Share Knowledge ! — January 30, 2018 @ 3:28 PM
[…] FREERADIUS WITH MIKROTIK – Part #1 – General Tip’s Click here to read more on FR tutorials … […]
LikeLike
Pingback by FREERADIUS WITH MIKROTIK – Part #12 – Happy Hours ! | Syed Jahanzaib Personal Blog to Share Knowledge ! — February 19, 2018 @ 11:40 AM
[…] FREERADIUS WITH MIKROTIK – Part #1 – General Tip’s Click here to read more on FR tutorials … […]
LikeLike
Pingback by FREERADIUS WITH MIKROTIK – Part #13 – Detecting user device vendor based on MAC address | Syed Jahanzaib Personal Blog to Share Knowledge ! — February 20, 2018 @ 11:52 AM
Hi, I got an error on Mikrotik-Total-Limit when implementing totalbytecounter with freeradius 3 running on ubuntu server 16.04, it says Mikrotik-Total-Limit MUST be integer64, I’ve been searching the solution for weeks and I found nothing. I hope you can give me some enlightenment to solve this problem. Thank you, I like reading your blog very much.
LikeLike
Comment by Reza Kurniawan — February 22, 2018 @ 4:07 PM
It is more clear for those who want setup Freeradius server. As a common man, he need some Linux system knowledge to understand this.
Great effort.
There is a ready made software package for ISP called neuCRM (http://neucrm.com) for RADIUS AAA Function, CRM, Billing, User Management on Web front GUI, customer web-selfcare portal, SMS & Email Alerts, Reseller business model. As an ISP you do not require any technical knowledge to use this Software package. It comes with pre installed and pre configured for ISP requirements as a Virtual Machine.
LikeLike
Comment by neu CRM — April 7, 2018 @ 11:27 PM
hello , how can i limit freeradius to accept only 1000 concurrent online users ?
LikeLike
Comment by Walid Alassaad — May 22, 2018 @ 7:22 AM
why not limit at NAS end?
LikeLike
Comment by Syed Jahanzaib / Pinochio~:) — June 1, 2018 @ 10:13 AM
you can add unlag query in freeradius so that it will first check online sessions, and if it found it above threshold it will give error to client.
LikeLike
Comment by Syed Jahanzaib / Pinochio~:) — June 6, 2018 @ 7:08 PM
thanks for your replay , can you please show me how i m not that good with freeradius
LikeLike
Comment by Walid Alassaad — June 7, 2018 @ 1:42 AM
read this.
https://serverfault.com/questions/588793/freeradius-server-radgroupreply-attribute-for-maximum-connected-users
LikeLiked by 1 person
Comment by Syed Jahanzaib / Pinochio~:) — June 1, 2018 @ 10:17 AM
well i have tried this example i found that this should work on freeradius v3.x but didnt work
LikeLike
Comment by Walid Alassaad — June 1, 2018 @ 4:27 PM
[…] FREERADIUS WITH MIKROTIK – Part #1 – General Tip’s Click here to read more on FR tutorials … […]
LikeLike
Pingback by FREERADIUS WITH MIKROTIK – Part #14 – Dynamic Bandwidth Change on the FLY using COA with radclient | Syed Jahanzaib Personal Blog to Share Knowledge ! — June 27, 2018 @ 1:34 PM
[…] FREERADIUS WITH MIKROTIK – Part #1 – General Tip’s Click here to read more on FR tutorials … […]
LikeLike
Pingback by FREERADIUS WITH MIKROTIK – Part #15 – Dynamic NAS Clients | Syed Jahanzaib Personal Blog to Share Knowledge ! — June 29, 2018 @ 3:22 PM
[…] FREERADIUS WITH MIKROTIK – Part #1 – General Tip’s Click here to read more on FR tutorials … […]
LikeLike
Pingback by FREERADIUS WITH MIKROTIK – Part #16 – Loosy workaround to disconnect missing users from the NAS | Syed Jahanzaib Personal Blog to Share Knowledge ! — July 12, 2018 @ 9:03 AM
[…] FREERADIUS WITH MIKROTIK – Part #1 – General Tip’s Click here to read more on FR tutorials … […]
LikeLike
Pingback by FREERADIUS WITH MIKROTIK – Part #17 -Retrieve User Password via SMS | Syed Jahanzaib Personal Blog to Share Knowledge ! — July 17, 2018 @ 4:58 PM
[…] FREERADIUS WITH MIKROTIK – Part #1 – General Tip’s Click here to read more on FR tutorials … […]
LikeLike
Pingback by FREERADIUS WITH MIKROTIK – Part #18 – MAC Login for Hotspot Users | Syed Jahanzaib Personal Blog to Share Knowledge ! — July 24, 2018 @ 12:59 PM
[…] FREERADIUS WITH MIKROTIK – Part #1 – General Tip’s Click here to read more on FR tutorials … […]
LikeLike
Pingback by FREERADIUS WITH MIKROTIK – Part #19 – Restricting user by Service Type | Syed Jahanzaib Personal Blog to Share Knowledge ! — July 24, 2018 @ 2:31 PM
how to operate and create BW profile, user etc.. through web base…?
LikeLike
Comment by Ahad — August 1, 2018 @ 4:28 PM
Hello, why mikrotik-total-limit is set max to 3,9GB how to increase it ? Thanks
LikeLike
Comment by Jovica Vidoevski — August 20, 2018 @ 3:09 AM
how can i access this readius server through the web GUI?
LikeLike
Comment by ahad — August 24, 2018 @ 12:40 PM
[…] FREERADIUS WITH MIKROTIK – Part #1 – General Tip’s Click here to read more on FR tutorials … […]
LikeLike
Pingback by FREERADIUS WITH MIKROTIK – Part #20 – Enforcement of lowercase in username | Syed Jahanzaib Personal Blog to Share Knowledge ! — September 24, 2018 @ 9:43 AM
[…] FREERADIUS WITH MIKROTIK – Part #1 – General Tip’s> […]
LikeLike
Pingback by Mikrotik with Freeradius/mySQL # Part-21 – Weird Trigger for Duplicate Users | Syed Jahanzaib Personal Blog to Share Knowledge ! — March 25, 2019 @ 11:13 AM
[…] FREERADIUS WITH MIKROTIK – Part #1 – General Tip’s> […]
LikeLike
Pingback by Mikrotik with Freeradius/mySQL # Part-22 – Create Dynamic Address List using Mikrotik-Address-List Attribute | Syed Jahanzaib Personal Blog to Share Knowledge ! — April 5, 2019 @ 12:28 PM
[…] https://aacable.wordpress.com/2016/03/11/mikrotik-with-freeradiusmysql-part-1/ […]
LikeLike
Pingback by Freeradius 3 with Mikrotik – Part-1 # Time to upgrade | Syed Jahanzaib Personal Blog to Share Knowledge ! — November 8, 2019 @ 11:25 AM