


This post was made for self reference purposes, so that I can find the configs easily from this page when needed again.
This post describes possible methods of creating ethernet interfaces bonding between Mikrotik to Cisco (etherchannel) or Mikrotik to Mikrotik to achieve load balancing & failover to achieve higher speed from multiple ethernet interfaces. Bonding is a technology that allows aggregation of multiple Ethernet-like interfaces into a single virtual link, thus getting Maximum Throughput and providing failover. You can use this technique to create bonding between WAN Cisco switch/R to User Mikrotik, then from User mikrotik to User distribution vlan switch. lots of combinations you can create in this regard.
Possible Scenarios:
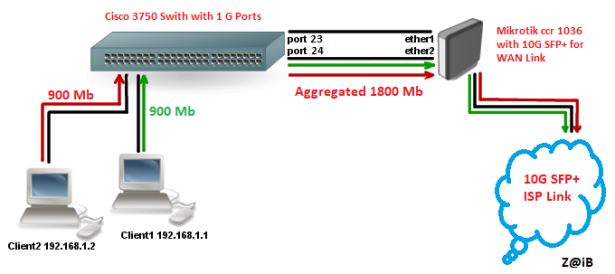
OP have Mikrotik CCR1036 routerboard with SFP+. ISP have given OP with 10G of SFP+ connectivity on OP WAN Mikrotik router. but on user side router OP have simple CCR1036 with 1G ports only. So the wan link from 1036-wan to 1036-LAN is choking at 1G. Proper solution is to have back to back 10G connectivity between all routers, but since it requires cash investment, therefore the OP sometimes chooses workaround to fulfill the requirements for the time being. BONDING is one of that workaround that can be chosen. although I try to avoid using it as much as possible & always look for 10/25G solutions.
Hardware Used in this post
- Mikrotik: RB2011
- Cisco 36450 24 Ports Switch
- In general you can use upto 8 ports Bonding, should be of same type/speed.
- All ports should be enabled before adding them to bond.
Option-1# Mikrotik to Cisco Bonding (using 1Gx2 interfaces to achieve failover / load balancing / higher speed)
Using any two interfaces, we are creating 2 port Bonding interface. Example from Mikrotik Port 9 & 10 we will connect two cables connected to Cisco Switch port 23 & 24.
#Mikrotik Example Code , using port 9 & 10
/interface bonding
add link-monitoring=none mode=802.3ad name=bonding1-lan slaves=ether9,ether10 transmit-hash-policy=layer-2-and-3
# Cisco Switch Example Code, suing port 23 & 24
configure terminal
inter range gigabitEthernet 1/0/23-24
channel-group 1 mode active
channel-protocol lacp
#on newer IOS you dont need following CMD
#switchport trunk encapsulation dot1q
switchport mode trunk
Note: If you are doing Cisco to Cisco Port Bonding , then you need to repeat above code on 2nd switch too
Option-2# Mikrotik to Mikrotik Bonding
Its very simple. Just issue below command on both mikrotik and connect the cables from designated interfaces, assign IP, and you are good to go …
/interface bonding
add name=bonding1-to-ppp slaves=ether1,ether2
Some Helpful CMD’s related to etherchannel on Cisco switch …
show etherchannel summary
show etherchannel 1 port-channel
show interfaces etherchannel
Note: Before you connect both cable, make sure to add the config on Mikrotik & Cisco side, Else cisco port will get shut dueto STP protection to avoid loop.
*May 13 04:58:33.710: %ETC-5-L3DONTBNDL2: Gi1/0/23 suspended: LACP currently not enabled on the remote port.
Configuring EtherChannel Load Balancing
To view etherchannel load balancing setting, use the show command …
enable
show etherchannel load-balance
To configure load balancing, use the following commands:
enable
configure terminal
port-channel load-balance dst-mac
do wr
Regard’s
Syed Jahanzaib
