FRIST ! Some DRY Theory …
What is a Single Label Domain (SLD)? This is a term that Microsoft uses to describe domains which have only a single name, and no suffix such as “.local” or “.com.” For example, your Active Directory domain might have a name like “company.local,” but if it were Single Label, it might be just “company.”
The problem is, Single Label Domains fall into a grey area of Microsoft support. SLD will cause multiple issues when integrating with other applications, and even when performing something simple like joining a new computer (windows 10 for example) to the domain & you need to modify the registry as well. SKype for business will not work SLD and the long list goes on.
What is the Active Directory Migration Tool (ADMT)?
The Active Directory Migration Tool (ADMT) is a Microsoft software application that helps you manage and perform the necessary operations to move AD objects. You can move objects within the same domain forest (intraforest) or to a different forest (interforest).
Our Story!
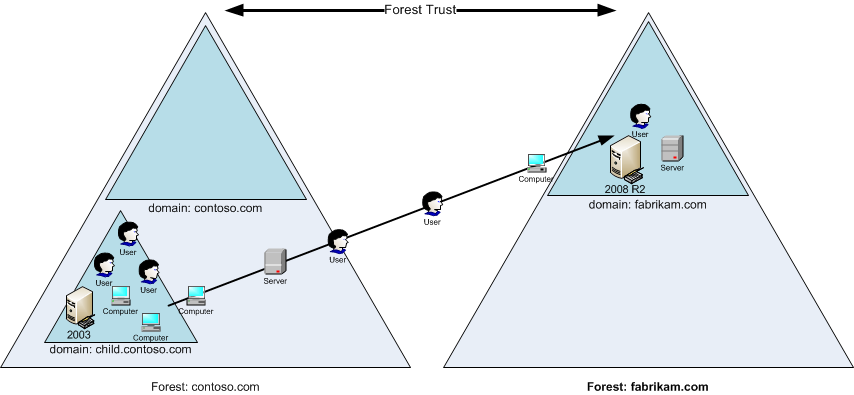
Recently we migrated our active directory domain users from Single Label Domain SLD to FQDN. It was cross forest migration & both forest were on same LAN. We were using Lotus Domino Email server on premises & wanted to migrate on Exchange Online (office 365 cloud). To perform the migration , it was strongly recommended by the Microsoft to migrate SLD to FQDN. Our SLD AD domain was running from past 16-17 years started with windows 2000 to 2003 to 2008 to 2012 to 2016, therefore after much planning , we planned the migration , tested it multiple times in virtual labs. There are multiple 3rd party tools available for the smooth migration but for our number of users the estimated cost for tool acquisition was 4 Million+ PkR which was a huge amount, therefore we used the Microsoft free tool called ADMT, which is quite old , BUT still it did the job for us.
I may not be able to write down all details because internet is full of such step by step video tutorials, I will try to provide you details only related to some customization we applied for smoother transition.
Specs used in this guide & few tips to follow before doing ADMT execution
- Source Domain : SLD with Windows Server 2016
- Target Domain : FQDN on Windows Server 2019
- Workstations : Mostly Windows 10 PRO with multiple builds including v 1909 – OS build 18363.1556 | W10 20H2 OS build 19042.1348
Note ADMT 3.2 Only support the migration of Operating Systems up to Windows 7, (that doesn’t mean Windows 8 and Windows 10 wont work, it just means they are not supported). Migrating Windows 8 and 10 throws a lot of security translation errors, because of the way it treats ‘Apps’, so I’d recommend you do a LOT of testing before carrying out a live migration. - ADMT tool version 3.2 : Installed on Target DC
- SQL Server 2008 R2 Express / Version 10.52.4000.0 installed on Target DC
- PSTOOLS library installed on both DC for ease of CMD execution on remote WorkStations/servers
- To migrate machines, the ADMT Admin user needs “Local” administrative access on all the source machines. The easiest way to do this is via group policy, using ‘Restricted Groups’. This allows you to take a group (or user) and put put them on the local groups (including administrators) of the targeted machines.
In the OLD domain, create a group and put the ADMT Admin from the target domain in it. (I put the domain admin from the target domain in it as well, to be on the safe side, but that’s up to you).
It can be done iva opening group policy and navigate to
Computer Configuration > Policies >Windows Settings > Security Settings > Restricted Groups
Add a new one, select the group you have just created > and add it to ‘Administrators’. - ADMT doesn’t have a rollback function. Be sure before you migrate the objects
- Make sure you have documented all the domain related stuff very well in sheets, Also Ensure you perform at least 1-2 test labs in isolated virtual environments
- If you want to make life easier during migration, DISABLE windows FIREWALL. To perform computer migrations, (and security translations), ADMT needs to deploy an ‘agent’ to the machines in the OLD domain. The local firewall (if enabled) can stop this, I simply disable the users local firewall via GPO to avoid any inconvenience
It can be done by opening group policy and navigate to
Computer Configuration >Policies > Administrative Templates > Network > Network Connections > Windows Firewall > Domain Profile
Locate the “Windows Firewall protect all network connections‘ and set it to disabled. - Enable Remote Registry Key Service on users workstation via GPO. I have also seen the agent fail to deploy if the ‘Remote Registry Service’ is not running on the target machines, (it’s disabled by default in newer version of windows). So I use the GPO policy to turn that on as well on all workstations
It can be done by opening group policy and navigate to
Computer Configuration > Polices > Windows Settings > Security Settings > System Services
Locate the ‘Remote Registry’ service, and set it’s startup to automatic. - It is recommended to Disable Sleep and Hibernation via GPO
Step by Step ADMT
Note: Details can be found over internet as so many guides have already been written & shared
It is assumed that new domain controller is installed along with proper DNS working.
- Supported Operating System : Source/Target must be running Windows Server 2008 or above
- ADMT requires a SQL server to store data, Download & install SQL Express on Target DC > Download Link for SQL Express
- Download & install ADMT tool on Target DC > Microsoft Download Link for ADMT
- Download & install Password Export Service on Source DC > PSE Download Link from Microsoft
* Create the encryption key for password migration on the source DC and copy it to the target DC. (user password migration) | Install ADMT PW Migration DLL & reboot source DC could be required - Prepare Active Directory for the migration process. There are two main things to prepare, DNS & a domain trust
* Create DNS CONDITIONAL FORWARDERS on source/target DC pointing to each other / Add the DNS suffixes for each domain via GPO. The old domain needs to be able to resolve names in the new domain, and the new domain needs to be able to resolve names in the old domain. To achieve this you need to setup ‘Conditional Forwarding’ in each domain for the other one
* In addition, we want all machines (in both domains) to set their primary DNS Suffix, to their own domain, and their DNS suffix search list to look for their own domain first, then the other domain. The easiest way to do that is via group policy. On a domain controller > Administrative Tools > Group Policy Management Console, NAVIGATE To
Computer Configuration > Policies > Administrative Templates > Network > DNS Client
Setting: DNS Suffix Search List: Set to current domain ‘comma‘ other domain , Example olddomain.com,newdomain.com
> Repeat the procedure in the new domain, (but the domain names will be the opposite way round) - Using, Active Directory Domains and Trusts Tool on source/target DC’s, create two way TRUST
* You can use below guides to do so , Link#1 – Link#2 - Using ADMT on Target DC, start migrating in following numbering
a) Migrate AD Groups
> There is a sequence for doing this though, there are three types of security groups and they HAVE TO be migrated in the correct order,
First: Universal Groups
Second: Global Groups
Third: Domain Local Groups
b) Migrate AD Users Account
c) Migrate Security translation of COMPUTER
Real World Note ons SID migration: This can take a while, (up to an hour for some machines, Luckily our users had most advance laptops/desktops with SSD’s Flash storage so ma time we saw was 20-25 mnts for heavy data user) and it’s best done without anyone being logged in (to prevent any profiles, or registry hives being locked). So take time to plan when this is done – rush it and you will have problems, and the very users who are too busy to be interrupted, are the very ones that shout the loudest if there’s a problem post migration.
d) Migrate COMPUTER objects in the end which will reboot the client PC upon completion, & then after reboot user can login to NEW domain (its a manual process to select OTHER USERS to see the NEW domain in the list, this is one time & next time windows will remember the last sign_IN, to avoid this manual thing, you can read the full guide in the end)
Following are few Tips & tricks that we followed or created on the case basis …
Force users to login to NEW domain by using OTHER USER login as by default login option
Once you migrate the user / sid translation & computer migration to new Domain & user PC gets reboot, on next Login user will still see his old domain login screen. In order to login to NEW domain, user have to click on OTHER USER option . This is because windows remembers last signed in USER. [In companies where IT Dept have strong hold on users or management its very easier to just inform all the users via email/contact or other means, but in company were your boss is kind of dept. head is afraid of informing users about change, then you have to follow the long route & in our case we had to do it too.]
- in Source/Target ADUC, we create new OU named “Pre-Migration-Temporary-OU“
- in Source/Target DC, we created new GPO named “Pre-Migration-GPO” in which we set following setting
Computer Configuration > Policies > Windows Settings > Security Settings > Security Options
on right pane, we modified below setting
“Interactive logon: Don’t display last signed-in” >set it to> *ENABLED* - On source DC, we moved the user COMPUTER object to “Pre-Migration-Temporary-OU“. AS you know that it generally takes 90 minutes or more on user computer to auto refresh the Gpupdate, therefore for instant update we used PSTOOLs command PSEXEC. Using it we executed cmd “gpupdate /force” on target user PC.PSEXEC sample CMD:
PsExec.exe \\USER1-PC -u DOMAIN\ADMINISTRATOR -p ADMINPASSWORD cmd "/c gpupdate /force"
- Then on Target NEW DC, using ADMT console, we first moved his user account / SID translation to new DC. Finally we migrated his COMPUTER to NEW DC in “Pre-Migration-Temporary-OU” as target
- Once his Computer migrated & rebooted, the user is now seeing OTHER USER login window (which is by default NEW DOMAIN) , once he logged IN using his username / password to new DOMAIN & he is able to see old settings desktop etc, we then moved his COMPUTER from Pre-Migration-Temporary-OU to COMPUTERS OU on the NEW DC
Disabling User Must change password After Next Logon
After the user account was migrated to new domain, it had the following option ENABLED by default
- User must change password after next logon
This was creating problem for us because every user will change password, & as a result he have to change his Lotus Notes / SameTime chat app / Mobile app password too, because lotus notes have SINGLE LOGON option which syncs password from active directory. At the time of migration with hundreds of users & with very limited IT resource, we used following scheduled script to get rid of ti temporarily basis till the migration lasted.
Wrap below CMD in any batch file and schedule it to run every minute
powershell.exe -inputformat none -command "Get-ADUser -Filter * -SearchBase 'OU=MYMAINOU,DC=mydomain,DC=local' | Set-ADUser -ChangePasswordAtLogon:$False"
Few issues & there resolutions after user migration
We Observed few limitations in the migration process
- IBM SAMETIME Password wiped: Not all 3rd party applications settings can be fully migrated, this includes some apps saved password. Example we are using IBM lotus SAMETIME lan chat app, its SAVED password didn’t migrated & user have to open and enter his password & tick on remember/auto login option
- Google chrome settings are not migrated as well. Good part is If the user is logged in to google chrome using his GMAIL account. he can re login & all of his settings will be synced back. but if the user was google chrome as GUEST, then his settings will not be migrated
Missing Profile Problem after user is migrated via ADMT
In some cases, once the user is migrated, his account was showing disabled on NEW DC, (which we didn’t noticed) and once all settings migrated, and user logged in to his PC, his profile was empty like fresh. This created very much hurdles for some executive level users.
If for some reason, if a migrated user gets a NEW FRESH profile (or in other words lost the old profile) you can use the following procedure to re-assign the old profile back to the target account
- Run Regedit on USER computer
- Go to HKEY_LOCAL_MACHINE\Software\Microsoft\Windows NT\CurrentVersion\ProfileList
- Go through the ProfileList and identify the Source account (OLD PROFILE example user.old.domain). Copy the value from the ProfileImagePath key
- Again go through the Profile list and identify the Target account example user.new.domain). Paste the ProfileImagePath key value there
- Restart the user workstation
The ProfileImagePath key will be same value for both Source and Target user accounts. This ensures both source and target users will receive the same profile which is stored under C:\Documents and Settings\UserName. or c:\users\xyz (in new version of windows)
Calculator was missing from windows 10 pc
First try this
Option#1
Reset Calculator’s data
Get-AppXPackage -AllUsers | Foreach {Add-AppxPackage -DisableDevelopmentMode -Register "$($_.InstallLocation)\AppXManifest.xml"}

DISM /Online /Cleanup-Image /RestoreHealth
Option#2
Type the following 2 commands at the CMD prompt:
powershell
- get-appxpackage *Microsoft.WindowsCalculator* | remove-appxpackage
Close the CMD window. - Now you can install the Calculator from Windows store or from the below link:
https://www.microsoft.com/en-us/store/apps/windows-calculator/9wzdncrfhvn5
Always Wait for the Network link during Login
During the migration we observed that our users desktop/laptops had modern hardware with new generation i7 / SSD-Flash storage & they boots in just few seconds, & user logged in quickly ever before the ethernet/wifi gets IP from the DHCP. This was creating problems in MAPPED NETWORK DRIVE & new group policy implication , which was necessary for the migration & backup process as well in network drive, therefore we enabled the “Always wait for the network at computer startup and logon” using group policy & applied to all users OU’s.
It was located under
- Computer Configuration — Policies — Administrative Templates — System — Logon
This solved our drive mapping issue along with domain WELCOME login script as well which executed few other commands as well like NTP sync, Sangfor Login Script, customized login entry in our central location etc.
When the “Always wait for network at computer startup and logon” policy is enabled, it then refers to the policy for how long it should wait for network connectivity, before dumping the policies and logging the user on with cached credentials. If the “Startup policy processing wait time” is not specified, the default is 30 seconds. If the network is already connected, the computer would log in without waiting further , but would take about 30 seconds if there was no network connectivity (or no DC available).
I set it to to wait 50 seconds for network then continue logging in “GPO Processing wait time”. Default with the setting on is 30 seconds which seemed too short.
