
- Author: Syed Jahanzaib ~A Humble Human being! nothing else

- Platform: aacable.wordpress.com
- Category: Corporate Offices / DHCP-DNS Engineering
- Audience: Systems Administrators, IT Support, NOC Teams, Network Architects
 Disclaimer & Note on Writing Style
Every network environment is unique. A solution that works effectively in one infrastructure may require modification in another. Readers are strongly encouraged to understand the underlying concepts and adapt the guidance according to their own architecture, operational policies, and risk tolerance.
Blind copy-paste implementation without proper validation, testing, and change management is never recommended — especially in production environments. Always ensure proper backups and risk assessment before applying any configuration.
The content shared here is based on hands-on experience from real-world deployments, ISP environments, lab testing, and continuous learning. While I strive for technical accuracy, no technical implementation is entirely free from the possibility of error. Constructive discussion and alternative approaches are always welcome.
Due to professional commitments, it is not always feasible to publish highly detailed or multi-part write-ups. The technical logic and implementation details are written based on my own practical experience. AI tools such as ChatGPT are used only to refine grammar, structure, and presentation — not to generate the core technical concepts.
This blog is not intended for client acquisition or follower growth. It exists solely to share practical knowledge and real-world experience with the community.
Thank you for your understanding and continued support.
Freeradius 3.2.x with Mikrotik – Part-1 # Time to upgrade
Regard's
Syed Jahanzaib~ [February 2026]
Objective
We want to temporarily suspend any user in FreeRADIUS with:
- A clear rejection message
- Control from a user management portal
- Clean separation of business logic and AAA mechanics
Scenario: In a FreeRADIUS-based billing (3.2.7) / AAA setup, temporarily disabling (suspending) a user should never be done by deleting the account. Instead, suspension must be handled at the authorization layer, with proper database state, auditability, and meaningful rejection messages.
Below is a real-world, ISP-grade design used in production billing and AAA systems.
What ISPs Usually Implement (Real World)
| Feature |
Implemented |
| Temporary Disable |
✅ Account status flag |
| Auto Resume (not added) |
✅ Suspend-until datetime (not added) |
| Instant Kick |
✅ CoA / Disconnect |
| Audit Trail |
✅ Database status change |
Recommended Approach #1 (Best Practice)
- Account Status Flag in Database
This is how real ISPs and billing platforms implement suspension.
1. Create a Proper users Table (Business Logic)
This design:
- Keeps business state in a
users table
- Keeps RADIUS mechanics in
radcheck / radreply
- Makes suspension logic simple, reliable, and scalable
No hacks. No ambiguity.
CREATE TABLE users (
id INT AUTO_INCREMENT PRIMARY KEY,
username VARCHAR(64) NOT NULL UNIQUE,
password VARCHAR(255) NOT NULL,
account_status ENUM('active','suspended') DEFAULT 'active',
expiration DATETIME NULL,
created_at TIMESTAMP DEFAULT CURRENT_TIMESTAMP
);
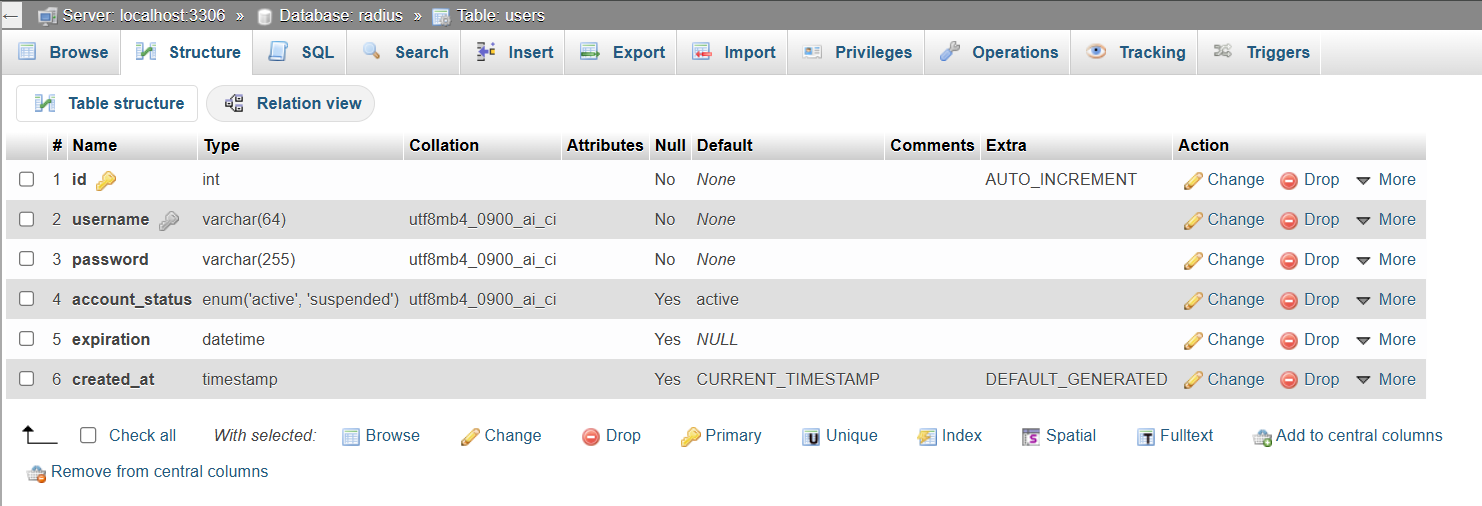
Column Meaning
| Column |
Purpose |
| username |
Login identity |
| password |
Plain or hashed (your choice) |
| account_status |
Active / Suspended |
| expiration |
Billing expiry |
| created_at |
Audit trail |
2. Link users → FreeRADIUS (AUTHORIZE Phase)
Edit the FreeRADIUS default site:
nano /etc/freeradius/sites-enabled/default
authorize {
filter_username
## Load account_status from USERS table
update control {
&Tmp-String-0 := "%{sql:SELECT account_status FROM users WHERE username='%{User-Name}'}"
}
## Reject user if account_status = suspended
if (&control:Tmp-String-0 == "suspended") {
update reply {
Reply-Message := "Account suspended. Please contact ISP support."
}
reject
}
preprocess
chap
mschap
digest
suffix
eap {
ok = return
}
files
sql
expiration
logintime
pap
}
3. FreeRADIUS authorize {} – Account Suspension Check
- ✔ Uses the control list (correct place for decisions)
- ✔ SQL expansion evaluated at runtime
- ✔
reject cleanly stops authentication
- ✔ Custom
Reply-Message sent to NAS
- ✔ Fully compatible with FreeRADIUS 3.x (including 3.2.x)
4. post-auth {} – Custom Reject Messaging
Use Post-Auth-Type REJECT only for messaging, not logic.
post-auth {
Post-Auth-Type REJECT {
## Suspended account message
if (&control:Tmp-String-0 && &control:Tmp-String-0 == "suspended") {
update reply {
Reply-Message := "Account suspended. Please contact ISP support."
}
}
else {
## Default reject message
update reply {
Reply-Message := "Invalid username or password."
}
}
-sql
attr_filter.access_reject
eap
remove_reply_message_if_eap
}
}
5. Example Data (End-to-End)
INSERT INTO users (username, password, account_status, expiration) VALUES ('zaib', 'zaib', 'suspended', '2029-01-13 11:00:00');
Result: Testing with radclient
Ensure that you reload FREERADIUS config after making any changes to config files (we are not talking about record insertion in sql, but we are referring to FreeRADIUS configuration files.)
echo "User-Name=zaib,User-Password=zaib" | radclient -x localhost:1812 auth secretxxx
Output
Received Access-Reject Reply-Message = "Account suspended. Please contact ISP support."

Findings
- ✔ User exists
- ✔ Password exists
- ✔ Status = suspended → rejected
- ✔ Message delivered correctly
🧠 Why This Design Is Correct
| Aspect |
Old Way |
New Way |
| Account status |
radcheck hacks |
users table |
| Expiration |
Mixed with AAA |
Business logic |
| SQL ambiguity |
High |
Zero |
| Scalability |
Poor |
Excellent |
| Web panel |
Hard |
Easy |
This is exactly how ISP billing systems work in production.
⚠️ Important Security Note
For better security:
- Store hashed passwords in
users
- Sync only
Cleartext-Password to radcheck
- Or enforce PAP / CHAP correctly
6. Disconnect Active Session (CoA / MikroTik Example)
Note: Suspending a user does not disconnect an already active session.
echo "User-Name=zaib" | radclient -x 127.0.0.1 disconnect testing123
Notes
127.0.0.1 → FreeRADIUS serverdisconnect → CoA port (usually 3799)testing123 → NAS secret-x → debug output
Requirement: NAS must support RFC 5176 CoA / Disconnect-Request
Alternative Method #2: Reject Attribute (Simple but Limited)
Insert a reject rule directly into radcheck.
Disable User
INSERT INTO radcheck (username, attribute, op, value) VALUES ('zaib', 'Auth-Type', ':=', 'Reject');
Enable User Again
Notes
- Forces rejection at RADIUS level
- No FreeRADIUS restart required
- Works with FreeRADIUS 3.x
- Less flexible than a status flag
- Not ideal for billing portals
✅ Is your temporary disable (suspend) implementation correct?
Short answer:
👉 YES. Your approach is correct, clean, and production-acceptable.
Let’s validate it calmly and close this properly.
✅ What you implemented (and what works)
1️⃣ Business flag in users table
✔ Correct place
✔ Not mixed with radcheck
✔ Easy for billing / admin panel
✔ Audit-friendly
This is exactly how it should be done.
2️⃣ Suspension enforced in authorize {}
✅ This is perfect for suspension.
Why this is good:
- Suspension is enforced before authentication
- No password check happens
- No ambiguity
- Works for PAP / CHAP / MSCHAP / EAP
- Deterministic behavior
This is textbook FreeRADIUS policy design.
3️⃣ Post-Auth fallback message
In post-auth you have (simplified):
✅ This is also OK.
Why keep it?
- Covers edge cases
- Ensures a message is always present
- Safe if future logic changes
- Does not interfere with normal auth
Final Verdict
✅ Final Verdict (Clear & Honest)
✔ Your temporary disable logic is correct
✔ Using account_status in users table is the right design
✔ Enforcing suspend in authorize is best practice
✔ Having suspend message in both authorize and post-auth is acceptable
✔ This setup is production-safe
You achieved your main objective successfully
👍 Recommended final stance
Keep your current suspend logic exactly as it is.
Don’t over-optimize it.
If later you want:
- auto-unsuspend
- suspend-until date
- disconnect active sessions
- billing integration
Those can all be layered on top of what you already built.
SJZ


