QOS With Mikrotik
Following are few scenarios for some examples : I will add more soon.
Post#1 – PCQ base Bandwidth Management with different bandwidth for DAY / NIGHT / DAYS using TIME feature in Mikrotik
Scenario:
We are using Mikrotik CCR1036 ver 6.43.7 , acting as PPPoE NAS, Free-radius (DMA) is providing authentication for users account & also its informing NAS about from which POOL users should get IP address , based on the profile. Example 1mb user gets IP from 1mb pool from NAS.
We require following bandwidth plan:
1 mb user bandwidth plan
- From 10am till 5pm > 1mb
- From 5pm till 10am next morning > 2mb
- Saturday + Sunday Full Time > 2mb
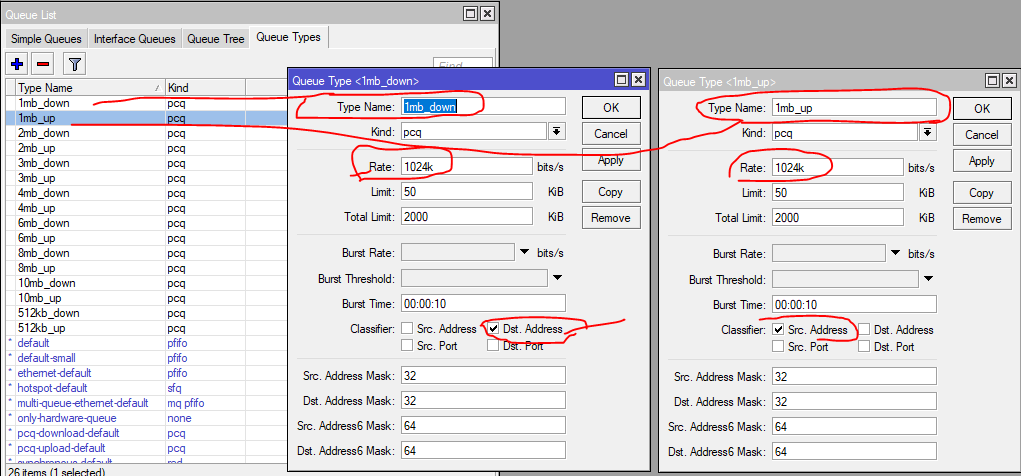
/ip pool
add name=512kb ranges=172.16.114.1-172.16.115.255
add name=2mb ranges=172.16.102.1-172.16.103.255
add name=3mb ranges=172.16.104.1-172.16.105.255
add name=4mb ranges=172.16.106.1-172.16.107.255
add name=6mb ranges=172.16.108.1-172.16.109.255
add name=8mb ranges=172.16.110.1-172.16.111.255
add name=10mb ranges=172.16.112.1-172.16.113.255
add name=1mb ranges=172.16.100.1-172.16.101.255

/queue type
add kind=pcq name=1mb_down pcq-classifier=dst-address pcq-dst-address6-mask=64 pcq-rate=1024k pcq-src-address6-mask=64
add kind=pcq name=2mb_up pcq-classifier=src-address pcq-dst-address6-mask=64 pcq-rate=2048k pcq-src-address6-mask=64
add kind=pcq name=3mb_up pcq-classifier=src-address pcq-dst-address6-mask=64 pcq-rate=3072k pcq-src-address6-mask=64
add kind=pcq name=4mb_up pcq-classifier=src-address pcq-dst-address6-mask=64 pcq-rate=4096k pcq-src-address6-mask=64
add kind=pcq name=6mb_up pcq-classifier=src-address pcq-dst-address6-mask=64 pcq-rate=6144k pcq-src-address6-mask=64
add kind=pcq name=8mb_up pcq-classifier=src-address pcq-dst-address6-mask=64 pcq-rate=8192k pcq-src-address6-mask=64
add kind=pcq name=10mb_up pcq-classifier=src-address pcq-dst-address6-mask=64 pcq-rate=10240k pcq-src-address6-mask=64
add kind=pcq name=512kb_up pcq-classifier=src-address pcq-dst-address6-mask=64 pcq-rate=512k pcq-src-address6-mask=64
add kind=pcq name=2mb_down pcq-classifier=dst-address pcq-dst-address6-mask=64 pcq-rate=2048k pcq-src-address6-mask=64
add kind=pcq name=3mb_down pcq-classifier=dst-address pcq-dst-address6-mask=64 pcq-rate=3072k pcq-src-address6-mask=64
add kind=pcq name=4mb_down pcq-classifier=dst-address pcq-dst-address6-mask=64 pcq-rate=4096k pcq-src-address6-mask=64
add kind=pcq name=6mb_down pcq-classifier=dst-address pcq-dst-address6-mask=64 pcq-rate=6144k pcq-src-address6-mask=64
add kind=pcq name=8mb_down pcq-classifier=dst-address pcq-dst-address6-mask=64 pcq-rate=8192k pcq-src-address6-mask=64
add kind=pcq name=10mb_down pcq-classifier=dst-address pcq-dst-address6-mask=64 pcq-rate=10240k pcq-src-address6-mask=64
add kind=pcq name=512kb_down pcq-classifier=dst-address pcq-dst-address6-mask=64 pcq-rate=512k pcq-src-address6-mask=64
add kind=pcq name=1mb_up pcq-classifier=src-address pcq-dst-address6-mask=64 pcq-rate=1024k pcq-src-address6-mask=64

/queue simple
add max-limit=10M/10M name="Google DNS High Priority 1" priority=1/1 target=8.8.8.8/32
add max-limit=10M/10M name="Google DNS High Priority 2" priority=1/1 target=8.8.4.4/32
add name="1mb pcq day - 10 am till 5 pm" queue=1mb_up/1mb_down target=172.16.100.0/23 time=10h-16h59m59s,mon,tue,wed,thu,fri
add name="1mb pcq & 2mb double up night - 5pm till 10 am" queue=2mb_up/2mb_down target=172.16.100.0/23 time=17h-9h59m59s,mon,tue,wed,thu,fri
add name="1mb pcq & 2mb double up - saturday & sunday - 24 hours" queue=2mb_up/2mb_down target=172.16.100.0/23 time=0s-23h59m59s,sun,sat
add name="2mb pcq day - 10 am till 5 pm" queue=2mb_up/2mb_down target=172.16.102.0/23 time=10h-16h59m59s,mon,tue,wed,thu,fri
add name="2mb pcq & 3mb double up night - 5pm till 10 am " queue=3mb_up/3mb_down target=172.16.102.0/23 time=17h-9h59m59s,mon,tue,wed,thu,fri
add name="2mb pcq double up - saturday & sunday - 24 hours" queue=3mb_up/3mb_down target=172.16.102.0/23 time=0s-23h59m59s,sun,sat
add name="3mb pcq day - 10 am till 5 pm" queue=3mb_up/3mb_down target=172.16.104.0/23 time=10h-16h59m59s,mon,tue,wed,thu,fri
add name="3mb pcq & 6mb double up night -  5pm till 10 am " queue=6mb_up/6mb_down target=172.16.104.0/23 time=17h-9h59m59s,mon,tue,wed,thu,fri
add name="3mb pcq & 6mb double up - saturday & sunday - 24 hours" queue=6mb_up/6mb_down target=172.16.104.0/23 time=0s-23h59m59s,sun,sat
add name="4mb pcq - 24 hours" queue=4mb_up/4mb_down target=172.16.106.0/23 time=0s-1d,sun,mon,tue,wed,thu,fri,sat
add name="6mb pcq - 24 hours" queue=6mb_up/6mb_down target=172.16.108.0/23 time=0s-1d,sun,mon,tue,wed,thu,fri,sat
add name="8mb pcq - 24 hours" queue=8mb_up/8mb_down target=172.16.110.0/23 time=0s-1d,sun,mon,tue,wed,thu,fri,sat
add name="10mb pcq - 24 hours" queue=10mb_up/10mb_down target=172.16.112.0/23 time=0s-1d,sun,mon,tue,wed,thu,fri,sat
add name="512kb pcq day - 10 am till 5 pm" queue=512kb_up/512kb_down target=172.16.114.0/23 time=10h-16h59m59s,mon,tue,wed,thu,fri
add name="512kb pcq & 1mb double up night - 5 pm till10 am" queue=1mb_up/1mb_down target=172.16.114.0/23 time=17h-9h59m59s,mon,tue,wed,thu,fri
add name="512kb pcq & 1mb double up - saturday & sunday - 24 hours" queue=1mb_up/1mb_down target=172.16.114.0/23 time=0s-23h59m59s,sun,sat
add name="512kb for UKNOWN users IF any by zaib  - 24 hours" queue=512kb_up/512kb_down target=172.16.0.0/16 time=0s-23h59m59s,sun,mon,tue,wed,thu,fri,sat
in User PPP Profile, I have added following line
/queue simple remove [find dynamic]
This line will remove any Dynamic Queue that will be created by DMA.
Done.
Screenshots …
PCQ base simple Queues with TIME settings, each queue will be enabled as per time


Remove DYNAMIC Queue by Script command
Its useful when you are using PCQ base queueus , and your raidus still sends dynamic queues, you can add this in pppoe profile startups script section, so any dynamic queue will be removed whenever any user logins
/queue simple remove [find dynamic]
Post#2 – Limit user traffic using PCQ (also useful for Hotspot Bypassed MAC address)
To limit all users 192.168.1.0/24 to 512kb epr user, using PCQ, use following script.
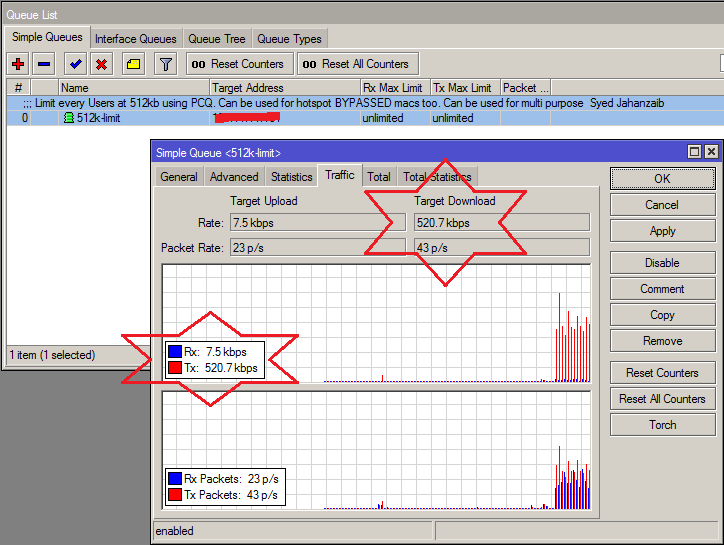
/queue type
add kind=pcq name=download-512kb pcq-burst-rate=0 pcq-burst-threshold=0 pcq-burst-time=10s pcq-classifier=dst-address pcq-dst-address-mask=32 pcq-dst-address6-mask=64 pcq-limit=50 pcq-rate=524288 \
pcq-src-address-mask=32 pcq-src-address6-mask=64 pcq-total-limit=2000

add kind=pcq name=upload-512kb pcq-burst-rate=0 pcq-burst-threshold=0 pcq-burst-time=10s pcq-classifier=src-address pcq-dst-address-mask=32 pcq-dst-address6-mask=64 pcq-limit=50 pcq-rate=524288 \
pcq-src-address-mask=32 pcq-src-address6-mask=64 pcq-total-limit=2000

/queue simple
add burst-limit=0/0 burst-threshold=0/0 burst-time=0s/0s comment="Limit every Users at 512kb using PCQ. Can be used for hotspot BYPASSED macs too. Can be used for multi purpose  Syed Jahanzaib" \
direction=both disabled=no interface=all limit-at=0/0 max-limit=0/0 name=512k-limit packet-marks="" parent=none priority=8 queue=upload-512kb/download-512kb target-addresses=192.168.1.0/24 \
total-queue=default-small
Change the Bandwidth and Target IP addresses to meet your local requirements.
Bandwidth example:
512k = 524288
1mb = 1048576
2mb = 2097152
4mb = 4194304
↓
Result as showed in the image below . . .
↓
↓
Post#3 – Allowing specific extension Low Priority over other traffic
In this example we are marking traffic via mangle rules. .iso extension is marked as low priority traffic , and all other traffic is marked as hi priority traffic.
For example We have 256kb internet bandwidth in total. and we want that when users are downloading any .iso file, it gets low priority over other traffic i.e browsing etc. Use the following.
/ip firewall mangle
add action=mark-connection chain=postrouting comment="Mark Conn for .iso Ext" content=iso disabled=no new-connection-mark=iso-conn passthrough=yes
add action=mark-packet chain=postrouting comment="Mark Pkts for iso-conn Ext" connection-mark=iso-conn disabled=no new-packet-mark=lo-prio-traffic-pkts passthrough=no
add action=mark-connection chain=postrouting comment="Mark Conn for all other traffic" content=!iso disabled=no new-connection-mark=hi-prio-traffic-conn passthrough=yes
add action=mark-packet chain=postrouting comment="Mark Pkts for all other traffic" connection-mark=hi-prio-traffic-conn disabled=no new-packet-mark=hi-prio-traffic-pkts passthrough=no
/queue simple add name=wan_conn_limit interface=ether1 max-limit=256k/256k
/queue simple add name=hi-prio-traffic interface=ether1 parent=wan_conn_limit packet-marks=hi-prio-traffic-pkts priority=1
/queue simple add name=lo-prio-traffic packet-marks=lo-prio-traffic-pkts interface=ether1 parent=wan_conn_limit priority=8
▼
4# Allowing Specific File Extensions High / Limited / Unlimited Bandwidth
For example, You have a network and every user have there bandwidth limited at 256kb. Now you want that if a user is downloading .FLV video file , He can view/download it at unlimited speed regardless of his allowed speed limit, i.e 256kb package, Use the following.
First mark all packets with .flv extention.
/ip firewall mangle
add action=mark-connection chain=postrouting comment="Mark Conn for .flv Ext" content=flv disabled=no new-connection-mark=flv-conn passthrough=yes

add action=mark-packet chain=postrouting comment="Mark Pkts for flv-conn Ext" connection-mark=flv-conn disabled=no new-packet-mark=flv passthrough=no
Now Create a Queue Tree and Set Unlimited or Limited Bandwidth (OR As per your requirements if you want to allot specific amount, set it) to Marked Packets
/queue tree
add burst-limit=0 burst-threshold=0 burst-time=0s disabled=no limit-at=100M max-limit=100M name=Unlimited-Speed-4-Marked-Pkts packet-mark=flv parent=global-out priority=1 queue=defaul
You can use the same in reverse to limit specific extension type bandwidth usage.
▼
5# Allowing Specific Ports High Priority over other traffic
First we need to mark protocols. (In this example we are using SMTP port 25 )
/ip firewall mangle add chain=prerouting protocol=tcp port=25 connection-state=new action=mark-connection new-connection-mark=hi_prio_conn
/ip firewall mangle add chain=prerouting connection-mark=hi_prio_conn action=mark-packet new-packet-mark=hi_prio_conn_pkts
Now we will create Simple Queue and give high priority to marked packets and other packets low priority. (In this example we have 2Mb WAN connection)
/queue simple add name=wan_conn_limit interface=ether1 max-limit=2M/2M
/queue simple add name=prio interface=ether1 parent=wan_conn_limit packet-marks=hi_prio_conn_pkts priority=1
/queue simple add name=other interface=ether1 parent=Internet priority=8
Now SMTP traffic will get higher priority over other traffic.
▼
6# Equal Distribution of Bandwidth for a number of users using PCQ
If you have a 512 kbps WAN connection and you want to share this equally among your users but if only one pc is active it should have the full 512 kbps, if 2 pcs are active 256 kbps each and vise versa.
As shown in the image below . . .

Use the following:
/queue type add name="PCQ_download" kind=pcq pcq-rate=512k pcq-classifier=dst-address
/queue type add name="PCQ_upload" kind=pcq pcq-rate=512k pcq-classifier=src-address

/queue simple add queue=PCQ_upload/PCQ_download target-addresses=192.168.2.0/24
▼
7# Limiting Single User Bandwidth via Simple QUEUE (Lookout for order number)
/queue simple add name="Limiting Zaib to 256kb" target-addresses=192.168.2.6 max-limit=256k/256k
▼
8# Simple Queue with BURST
Following simple queue with BURST
– Limit user at 64kb in general.
– When the user will download at full 64kbps speed, he will be able to burst upto 256kb for 5 seconds. after 5 seconds , user will fall to 64kb again for next 5 seconds.
In short 5 seconds on load 256kbps, and next 5 seconds, 64kbp.
/queue simple
add burst-limit=256k/256k burst-threshold=128k/128k burst-time=20s/20s direction=both disabled=no interface=all limit-at=0/0 max-limit=64k/64k name=queue1 \
packet-marks="" parent=none priority=8 queue=default-small/default-small target-addresses=172.16.0.10/32 total-queue=default-small
9# Give specific web site assigned Bandwidth on per user basis [updated: 14th April, 2014]
For example you want to limit bandwidth on per user basis for SPECIFIC WEBSITE ONLY. Let’s say 4mb per user for facebook.com
The logic is simple.
1- First create a script that adds the web site ip to an address list.
2- Add scheduler that runs above script after every 5 minutes so that even if the web site ip gets changes, it will update accordingly.
3- Now mark connection and packets for above created address list.
4- Add PCQ queue type (Bandwidth that will be distributed on per user basis using single simple queue)
5- Finally add a simple queue that will distribute bandwidth for marked packets using PCQ for per user basis.
/system script
add name=facebook-list policy=ftp,reboot,read,write,policy,test,winbox,password,sniff,sensitive,api source="# Script to add Facebook DNS IP addressess \r\
\n# Syed Jahanzaib / aacable@hotmail.com\r\
\n:log warning \"Script Started ... Adding Facebook DNS ip's to address list name   facebook_dns_ips\"\r\
\n:foreach i in=[/ip dns cache find] do={\r\
\n:local bNew \"true\";\r\
\n:local cacheName [/ip dns cache all get \$i name] ;\r\
\n:if ([:find \$cacheName \"facebook\"] != 0) do={\r\
\n:local tmpAddress [/ip dns cache get \$i address] ;\r\
\n:put \$tmpAddress;\r\
\n:if ( [/ip firewall address-list find ] = \"\") do={\r\
\n:log info (\"added entry: \$[/ip dns cache get \$i name] IP \$tmpAddress\");\r\
\n/ip firewall address-list add address=\$tmpAddress list=facebook_dns_ips comment=\$cacheName;\r\
\n} else={\r\
\n:foreach j in=[/ip firewall address-list find ] do={\r\
\n:if ( [/ip firewall address-list get \$j address] = \$tmpAddress ) do={\r\
\n:set bNew \"false\";\r\
\n}\r\
\n}\r\
\n:if ( \$bNew = \"true\" ) do={\r\
\n:log info (\"added entry: \$[/ip dns cache get \$i name] IP \$tmpAddress\");\r\
\n/ip firewall address-list add address=\$tmpAddress list=facebook_dns_ips comment=\$cacheName;\r\
\n}\r\
\n}\r\
\n}\r\
\n}\r\
\n# Script Ended..."

/system scheduler
add comment="Add Facebook IP's to address list name facebook-list after every 5 minutes / zaib" disabled=no interval=5m name=add_fb_to_list_scheduler_every_5mnts on-event=facebook-list policy=\
ftp,reboot,read,write,policy,test,winbox,password,sniff,sensitive,api start-date=feb/11/2014 start-time=00:00:00

/ip firewall mangle
add action=mark-connection chain=postrouting comment="Mark Conn for FB Site / zaib" disabled=no dst-address-list=facebook_dns_ips new-connection-mark=FB-conn passthrough=yes
add action=mark-packet chain=postrouting comment="Mark Packtes for FB-CONN / zaib" connection-mark=FB-conn disabled=no new-packet-mark=FB_Packets passthrough=no

/queue type
add kind=pcq name=Download-4mb pcq-burst-rate=0 pcq-burst-threshold=0 pcq-burst-time=10s pcq-classifier=dst-address pcq-dst-address-mask=32 pcq-dst-address6-mask=64 pcq-limit=50 pcq-rate=4194304 \
pcq-src-address-mask=32 pcq-src-address6-mask=64 pcq-total-limit=2000
add kind=pcq name=Upload-4mb pcq-burst-rate=0 pcq-burst-threshold=0 pcq-burst-time=10s pcq-classifier=src-address pcq-dst-address-mask=32 pcq-dst-address6-mask=64 pcq-limit=50 pcq-rate=4194304 \
pcq-src-address-mask=32 pcq-src-address6-mask=64 pcq-total-limit=2000

/queue simple
add burst-limit=0/0 burst-threshold=0/0 burst-time=0s/0s comment="Limit FB speed 4mb per user using PCQ  / Syed Jahanzaib" direction=both disabled=no interface=all limit-at=0/0 max-limit=0/0 name=\
4mb_Limit_For_FB_Per_User packet-marks=FB_Packets parent=none priority=8 queue=Upload-4mb/Download-4mb target-addresses="" total-queue=default-small
Do remember, its just an example to show you how you can twist things, You can modify it as per your requirements 🙂
↓
Some Notes:
The target-address is used to specify the host that you want to shape… target-address is the address of (for example) your client who’s speed you are about to limit.
Destination-address is for more advanced shaping… for example to shape someone’s access to a specific server dst-address is the server to which this client will connect (if you like to limit his speed only when he connects to this one specific server)
Syed Jahanzaib


