
On a Lighter Note ! To summon it Up in single image !

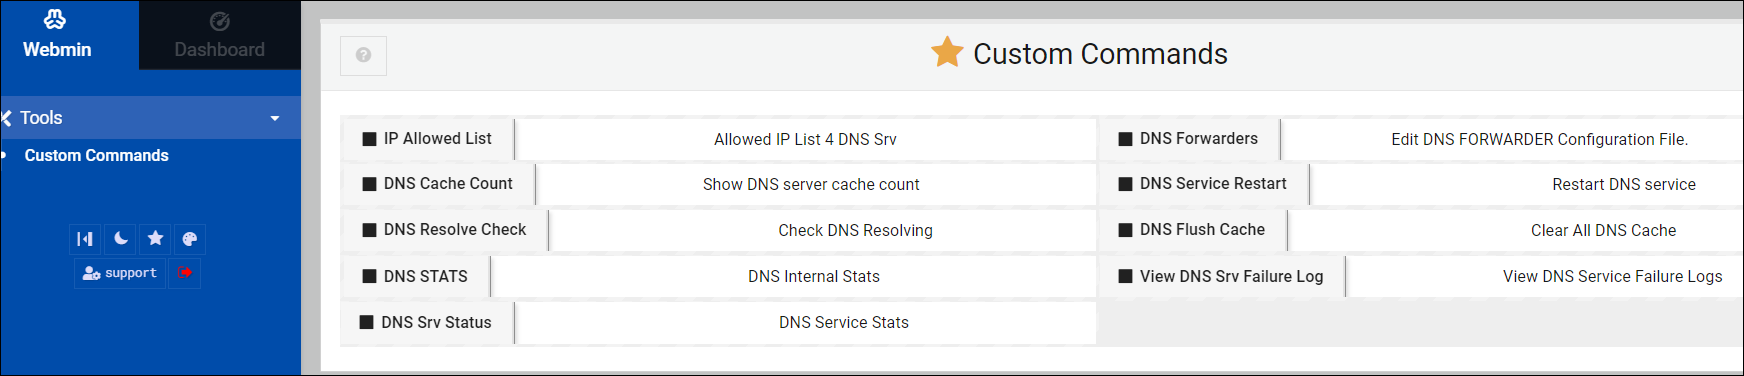
Customized Panel To manage DNS Configuration via WEBMIN ! (SJZ)
Unbound is a secure DNS resolver. It can be a caching resolver, a recursive resolver, and both, suitable for offices/ISP’s. It is designed to be fast and lean and incorporates modern features based on open standards..
Installation of UNBOUND dns server for local network is fairly simple but I encountered some hurdles setting it up with Ubuntu 18 therefore I took notes on how I resolved it in this post for reference purposes. I am more comfrotable setting it up on Ubuntu 16!
After fresh installation of Ubuntu, It’s a good idea to keep your system TIME with any NTP source.
apt-get -y install ntp ntpdate
# Change timezone as per your local
cp /usr/share/zoneinfo/Asia/Karachi /etc/localtime
sudo /etc/init.d/ntp restart
Install UNBOUND DNS Server on Ubuntu
Step #1
apt-get install -y unbound
If you are using Ubuntu 18 or later, you may read this ,else skip this section#2
Step # 2
#Additional notes for Ubuntu 18 version only
The problem with Ubuntu 18.04 is the systemd-resolved service which is listening on port 53 and therefore conflicts with unbound service
Edit the file /etc/systemd/resolved.conf
nano /etc/systemd/resolved.conf
& modify this
DNSStubListener=no
Now reboot
shutdown -r now
You can now confirm if 53 port is now free up
netstat -tulpn | grep :53
Some housekeeping stuff for Ubuntu 18 & +
sudo service systemd-resolved stop
sudo rm -f /etc/resolv.conf
sudo ln -s /run/systemd/resolve/resolv.conf /etc/resolv.conf
sudo service systemd-resolved start
Step#4
Edit the existing UNBOUND configuration file for customization…
nano /etc/unbound/unbound.conf
Example of unbound.conf
# Unbound configuration file for Debian.
server:
# Use the root servers key for DNSSEC
#auto-trust-anchor-file: "/var/lib/unbound/root.key"
# Enable logs
chroot: ""
#verbosity (log level from 0 to 4, 4 is debug)
#verbosity: 1
#logfile: /var/log/unbound/unbound.log
#log-queries: yes
#use-syslog: (do not write logs in syslog file in ubuntu /var/log/syslog -zaib)
use-syslog: no
#interface (interfaces on which Unbound will be launched and requests will be listened to)
# Respond to DNS requests on all interfaces
interface: 0.0.0.0
# DNS request port, IP and protocol
port: 53
do-ip4: yes
do-ip6: no
do-udp: yes
do-tcp: yes

# Authorized IPs to access the DNS Server / access-control (determines whose requests are allowed to be processed)
# if you want to allow all ip pools, uncomment following (make sure you have good firewall for it)
# access-control: 0.0.0.0/0 allow
access-control: 127.0.0.0/8 allow
access-control: 10.0.0.0/8 allow
access-control: 172.16.0.0/16 allow
access-control: 192.168.0.0/16 allow
access-control: 101.0.0.0/8 allow

# Root servers information (To download here: ftp://ftp.internic.net/domain/named.cache)
#root-hints: "/var/lib/unbound/root.hints"

# Hide DNS Server info
hide-identity: yes
hide-version: yes

# Improve the security of your DNS Server (Limit DNS Fraud and use DNSSEC)
harden-glue: yes
harden-dnssec-stripped: yes

# Rewrite URLs written in CAPS
use-caps-for-id: yes

# PERFORMANCE RELATED TUNING - USE IT WITH CARE - TTL Min (Seconds, I set it to 7 days)
cache-min-ttl: 604800
# PERFORMANCE RELATED TUNING - USE IT WITH CARE - TTL Max (Seconds, I set it to 14 days)
cache-max-ttl: 1209600
# Enable the prefetch
prefetch: yes

# Number of maximum threads CORES to use / zaib
# Set num-threads equal to the number of CPU cores on the system.
# Try NOT to use all available cores, example if you have 6 cores, try starting with 3/4
num-threads: 4

### Tweaks and optimizations
# Number of slabs to use (Must be a multiple of num-threads (cpu cores) value)
# Set below *-slabs options, value of num-threads x 2. Example 4 cpu x 2 = 8
msg-cache-slabs: 8
rrset-cache-slabs: 8
infra-cache-slabs: 8
key-cache-slabs: 8
# Cache and buffer size (in mb)
#Increase the memory size of the cache. Use roughly twice as much rrset cache memory as
#you use msg cache memory. For example, rrset-cache-size: 100m / msg-cache-size: 50m
#Due to malloc overhead, the total memory usage is likely to rise to double (or 2.5x) the total cache memory that is entered into the config.
rrset-cache-size: 100m
msg-cache-size: 50m
so-rcvbuf: 10m

# Make sure your DNS Server treat your local network requests
#private-address: 101.0.0.0/8

# Add an unwanted reply threshold to clean the cache and avoid when possible a DNS Poisoning
unwanted-reply-threshold: 10000

# Authorize or not the localhost requests
do-not-query-localhost: no

# Use the root.key file for DNSSEC
#auto-trust-anchor-file: "/var/lib/unbound/root.key"
val-clean-additional: yes
# Older version of unbound doesnt support *.conf, use specific filename instead. [zaib]
# This line caused me much issue therefore I hardcoded file name instead of *.conf
include: "/etc/unbound/unbound.conf.d/*.conf"
Example of /etc/unbound/myrecords.conf
You can use this file to add your custom DNS records
Create new file at (Make sure to include it in unbound.conf file (include: paramter)
nano /etc/unbound/unbound.conf.d/myrecords.conf
Now adding an ‘A’ Record
Assuming we want to add an A record for ‘zaib.com’ which has an IP of 1.2.3.4
local-data: "zaib.com A 1.2.3.4"
Adding a PTR Record
A PTR record (sometimes known as a reverse DNS record) allows you to request the hostname used by an IP (i.e. rather than running a DNS query for zaib.com, you’re asking for the hostname of the machine at 1.2.3.4)
local-data-ptr: "1.2.3.4 zaib.com"
Every time you make any changes to Unbound Config, make sure to restart or reload the configuration
unbound-control reload
Test if UNBOUND service is started successfully.
unbound-control status
OR
service unbound status
Result:
â unbound.service - Unbound DNS server
Loaded: loaded (/lib/systemd/system/unbound.service; enabled; vendor preset: enabled)
Active: active (running) since Tue 2019-12-10 12:28:59 PKT; 2s ago
Docs: man:unbound(8)
Process: 1588 ExecStartPre=/usr/lib/unbound/package-helper root_trust_anchor_update (code=exited, status=0/SUCCESS)
Process: 1576 ExecStartPre=/usr/lib/unbound/package-helper chroot_setup (code=exited, status=0/SUCCESS)
Main PID: 1610 (unbound)
Tasks: 4 (limit: 2290)
CGroup: /system.slice/unbound.service
ââ1610 /usr/sbin/unbound -d

Dec 10 12:28:58 u18 systemd[1]: Starting Unbound DNS server...
Dec 10 12:28:59 u18 package-helper[1588]: /var/lib/unbound/root.key has content
Dec 10 12:28:59 u18 package-helper[1588]: success: the anchor is ok
Dec 10 12:28:59 u18 unbound[1610]: [1575962939] unbound[1610:0] warning: so-rcvbuf 1048576 was not granted. Got 425984. To fix: start with root permissions(linux) or sysctl bigger net.core.rmem_max
Dec 10 12:28:59 u18 unbound[1610]: [1575962939] unbound[1610:0] notice: init module 0: subnet
Dec 10 12:28:59 u18 unbound[1610]: [1575962939] unbound[1610:0] notice: init module 1: validator
Dec 10 12:28:59 u18 unbound[1610]: [1575962939] unbound[1610:0] notice: init module 2: iterator
Dec 10 12:28:59 u18 unbound[1610]: [1575962939] unbound[1610:0] info: start of service (unbound 1.6.7).
Dec 10 12:28:59 u18 systemd[1]: Started Unbound DNS server.
Testing DNS service
Test if DNS server is responding to DNS queries
dig @127.0.0.1 bbc.com
1st Result: [check the Query time]
;  DiG 9.11.3-1ubuntu1.11-Ubuntu  @127.0.0.1 bbc.com
; (1 server found)
;; global options: +cmd
;; Got answer:
;; HEADE;- opcode: QUERY, status: NOERROR, id: 16313
;; flags: qr rd ra; QUERY: 1, ANSWER: 4, AUTHORITY: 0, ADDITIONAL: 1

;; OPT PSEUDOSECTION:
; EDNS: version: 0, flags:; udp: 4096
;; QUESTION SECTION:
;bbc.com. IN A

;; ANSWER SECTION:
bbc.com. 86400 IN A 151.101.192.81
bbc.com. 86400 IN A 151.101.128.81
bbc.com. 86400 IN A 151.101.0.81
bbc.com. 86400 IN A 151.101.64.81

;; Query time: 971 msec
;; SERVER: 127.0.0.1#53(127.0.0.1)
;; WHEN: Tue Dec 10 07:04:21 UTC 2019
;; MSG SIZE rcvd: 100
2nd Result: [check the Query time, it will be much less or zero because it will be added in the unbound dns cache]
root@u18:/etc/unbound/unbound.conf.d# dig @127.0.0.1 bbc.com

;  DiG 9.11.3-1ubuntu1.11-Ubuntu  @127.0.0.1 bbc.com
; (1 server found)
;; global options: +cmd
;; Got answer:
;; HEADER&- opcode: QUERY, status: NOERROR, id: 14171
;; flags: qr rd ra; QUERY: 1, ANSWER: 4, AUTHORITY: 0, ADDITIONAL: 1

;; OPT PSEUDOSECTION:
; EDNS: version: 0, flags:; udp: 4096
;; QUESTION SECTION:
;bbc.com. IN A

;; ANSWER SECTION:
bbc.com. 86398 IN A 151.101.192.81
bbc.com. 86398 IN A 151.101.128.81
bbc.com. 86398 IN A 151.101.0.81
bbc.com. 86398 IN A 151.101.64.81

;; Query time: 0 msec
;; SERVER: 127.0.0.1#53(127.0.0.1)
;; WHEN: Tue Dec 10 07:04:23 UTC 2019
;; MSG SIZE rcvd: 100
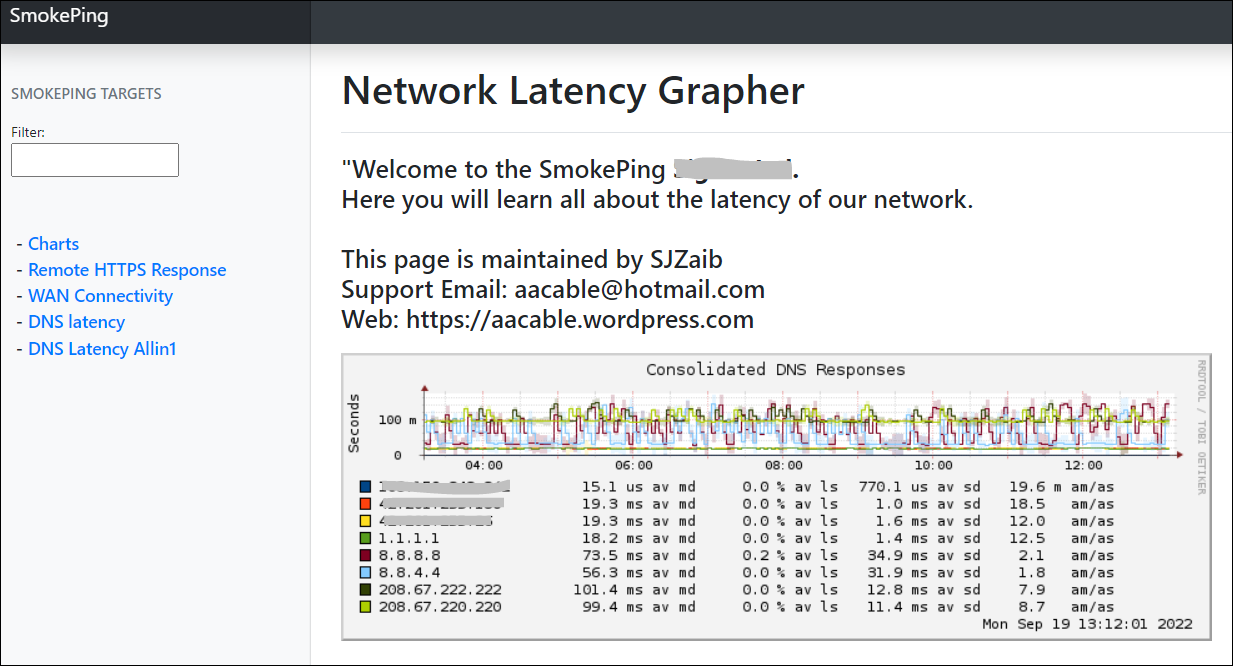
See the difference between 1st & second response which shows that cache is working
Enabling LOG File [*recommended for troubleshoot purposes only*]
Create a Log file and assign rights to write logs:
mkdir /var/log/unbound
touch /var/log/unbound/unbound.log
chmod -R 777  /var/log/unbound/
Now enable it in the unbound config file & reload/restart UNBOUND service . I have commented it in the configuration file.
An example of viewing logs:
sudo tail -f /var/log/unbound/unbound.log
sudo tail -f /var/log/syslog
UNBOUND.LOG
[1575963664] unbound[1962:3] info: 101.11.11.161 bbc.com.agp1. A IN
[1575963664] unbound[1962:3] info: resolving bbc.com.agp1. A IN
[1575963664] unbound[1962:3] info: response for bbc.com.agp1. A IN
[1575963664] unbound[1962:3] info: reply from  193.0.14.129#53
[1575963664] unbound[1962:3] info: query response was NXDOMAIN ANSWER
[1575963664] unbound[1962:3] info: validate(nxdomain): sec_status_secure
[1575963664] unbound[1962:3] info: validation success bbc.com.agp1. A IN
[1575963664] unbound[1962:3] info: 101.11.11.161 bbc.com.agp1. AAAA IN
[1575963664] unbound[1962:3] info: resolving bbc.com.agp1. AAAA IN
[1575963664] unbound[1962:3] info: response for bbc.com.agp1. AAAA IN
[1575963664] unbound[1962:3] info: reply from  199.7.83.42#53
[1575963664] unbound[1962:3] info: query response was NXDOMAIN ANSWER
[1575963664] unbound[1962:3] info: validate(nxdomain): sec_status_secure
[1575963664] unbound[1962:3] info: validation success bbc.com.agp1. AAAA IN
[1575963664] unbound[1962:1] info: 101.11.11.161 bbc.com. A IN
[1575963664] unbound[1962:1] info: resolving bbc.com. A IN
[1575963664] unbound[1962:1] info: resolving bbc.com. DS IN
[1575963664] unbound[1962:1] info: NSEC3s for the referral proved no DS.
[1575963664] unbound[1962:1] info: Verified that unsigned response is INSECURE
[1575963672] unbound[1962:0] info: 101.11.11.161 bbc.com. AAAA IN
# Example of cache export and import:
unbound-control dump_cache > backup
unbound-control load_cache > backup
# Clear one site from cache
unbound-control flush_zone google.com
# View cached DNS contents or count
[sourceocde]unbound-control stats[/sourceocde]
# Count Cache entries
unbound-control dump_cache | wc -l
# Clear DNS Cache
unbound-control flush_zone .
Start UNBOUND in DEBUG mode
unbound -d -vvvv
Query Different DNS server for particular domains
If we want to query particular DNS servers for particular domains, use the forwarders as per below
# Query bbc.com from 1.1.1.1 dns server
forward-zone:
name: "bbc.com"
forward-addr: 1.1.1.1

# Query google.com from 8.8.4.4 dns server
forward-zone:
name: "google.com"
forward-addr: 8.8.4.4

# Forward all other domains queries to 8.8.8.8
forward-zone:
name: "."
forward-addr: 8.8.8.8
Reload unbound Config
service unbound reload
Check UNBOUND service every minute & restart service if required
#!/bin/bash
# Linux BASH Script to check UNBOUND DNS SRV Status, if service not running, it will start it
# Syed Jahanzaib / 14-SEP-2022
#set -x
HOSTNAME=`hostname`
ROLE="DNS"
COMPANY="ZABBO"
DATE=`date`
TMP=temp
ROLE="Unbound-DNS-Service"
SRVNAME="unbound"
# Temporary file holder for host status
LOG="/var/log/dns.log"
SRV_STATUS_HOLDER="/$TMP/$SRVNAME.srv.status.temp.holder.txt"
touch $LOG
touch $TMP
if [ ! -d "/$TMP" ]; then
echo
echo
echo "/$TMP folder not found, Creating it so all ping results should be saved there . . ."
mkdir /$TMP
fi
# Run the script
unbound-control status > $SRV_STATUS_HOLDER
count=`cat $SRV_STATUS_HOLDER | grep "stopped" | wc -l`
if [ $count -eq 1 ]; then
service unbound stop
service unbound start
echo "$DATE - $HOSTNAME - $SRVNAME ($ROLE) found stopped. Script have started it manually."
echo "$DATE - $HOSTNAME - $SRVNAME ($ROLE) found stopped. Script have started it manually." >> $LOG
else
echo "$DATE - $HOSTNAME - $SRVNAME ($ROLE) is running OK."
fi
Schedule it to run every minute by editing crontab -e
*/1 * * * * /temp/chksrv.sh >/dev/null 2>&1
Securing DNS by Firewall
It is a good idea to allow only related ports to your unbound box from trusted/local sources only, and deny all other traffic.
mkdir /temp
touch /temp/fw.sh
chmod +x /temp/fw.sh
nano /temp/fw.sh
& paste following
#!/bin/sh
# ------------------------------------
# Syed Jahanzaib / aacable@hotmail.com
# https://aacable.wordpress.com
# Created: January, 2011
# Last Modified: 7th Jan, 2017
# Last Modified: 19th-SEP-2021 [for GT/KH]
# ------------------------------------

# MODIFY THIS NAME IF REQUIRED
ALLOWED_IP_LIST=/temp/allowed_ip_list.txt

###################################
###################################
###################################
### donot modify below this line ###
###################################
###################################

## Setting default filter policy, Use it with CARE / zaib
# Clear old firewall
clear
echo "1- Clearing existing firewall rules, and allow all traffic for the time being ..."
iptables -P INPUT ACCEPT
iptables -P FORWARD ACCEPT
iptables -P OUTPUT ACCEPT
iptables -t nat -F
iptables -t nat -X
iptables -t mangle -F
iptables -t mangle -X
iptables -F
iptables -X

# LOG everything, not recommended as it can put load on storage, make sure to do proper log rotation if its required
#iptables -A INPUT -j LOG
iptables -A INPUT -m state --state RELATED,ESTABLISHED -j ACCEPT

#Allow ICMP
echo "2- Allowing ICMP packet rules ..."
iptables -A INPUT -p icmp --icmp-type 8 -s 0/0 -m state --state NEW,ESTABLISHED,RELATED -j ACCEPT
iptables -A OUTPUT -p icmp --icmp-type 0 -s 0/0 -d 0/0 -m state --state ESTABLISHED,RELATED -j ACCEPT

## Unlimited access to loop back
iptables -A INPUT -i lo -j ACCEPT
iptables -A OUTPUT -o lo -j ACCEPT

echo "3- Enforcing Firewalling, allowing only particular ports 22,53 to below specific IP pool only ..."
echo "
TCP/UDP PORTS  53,22
.
ALLOWED IP POOL  ... "
cat $ALLOWED_IP_LIST
echo "..."
for x in $(cat $ALLOWED_IP_LIST)
do
# Allow ip range to allow port range access on all interfaces , duplicate this rule as needed
iptables -A INPUT -s $x -p tcp --match multiport --dports 22,53 -j ACCEPT
iptables -A OUTPUT -s $x -p tcp --match multiport --dports 22,53 -j ACCEPT
iptables -A INPUT -s $x -p udp --match multiport --dports 22,53 -j ACCEPT
iptables -A OUTPUT -s $x -p udp --match multiport --dports 22,53 -j ACCEPT

# Allow single IP Address to access port 53
# iptables -A INPUT --src 1.2.3.4 -p tcp --dport 53 -j ACCEPT
done
###################################
## Drop Everything else, use it at your own.
###################################
iptables -A INPUT -j DROP
# script ends here

echo "
Done"
Save & Exit.
Now create a IP pool file in which you will add trusted/local lan/wan ip’s
touch /temp/allowed_ip_list.txt
nano /temp/allowed_ip_list.txt
& add the lan ip’s
10.0.0.0/8
172.16.0.0/16
192.168.0.0/16
Save & Exit. & reload the UNBOUND service
unbound-control reload
unbound-control status
#service unbound restart
#service unbound status
Don’t forget to add the fw.sh it in /etc/rc.local (before exit 0) line so that it can start on every system reboot.
Clearing Firewall
To clear firewall you can use following CMD or make a bash file for convenience.
mkdir /temp
touch /temp/clear_fw.sh
chmod +x /temp/clear_fw.sh
nano /temp/clear_fw.sh
& paste following
#!/bin/sh
# ------------------------------------
# Syed Jahanzaib / aacable@hotmail.com
# https://aacable.wordpress.com
# Created: January, 2011
# Last Modified: 7th Jan, 2017
# Last Modified: 27th-Aug-2021 [for galaxy tech khi/pk]
# ------------------------------------
## Setting default filter policy, Use it with CARE / zaib
# Clear old firewall
iptables -P INPUT ACCEPT
iptables -P FORWARD ACCEPT
iptables -P OUTPUT ACCEPT
iptables -t nat -F
iptables -t nat -X
iptables -t mangle -F
iptables -t mangle -X
iptables -F
iptables -X
Save & Exit.
to execute use below
- /temp/fw.sh
Regard’s
Syed Jahanzaib
