Syed Jahanzaib – Personal Blog to Share Knowledge !

December 23, 2016

Single Script to Create All Storage CFG file in MRTG

Filed under: Linux Related — Tags: , — Syed Jahanzaib / Pinochio~:) @ 9:07 AM

auto

Reference Post:

It’s a headache if you want to create configuration file in bulk for all the storage available in remote servers, that includes disks/memory. To make life a little easier, I made following script which simply query the storage indexes and create CFG file in /cfg folder.

#!/bin/bash
# Script to query snmp enabled host to create storage CFG file for MRTG
# Created: December 23, 2016
# Modified: March 21, 2019
# Syed Jahanzaib / aacable @ hotmail dot com
# https://aacable . wordpress . com
#set -x
# Colors Config . . . [[ JZ . . . ]]
ESC_SEQ="\x1b["
COL_RESET=$ESC_SEQ"39;49;00m"
COL_RED=$ESC_SEQ"31;01m"
COL_GREEN=$ESC_SEQ"32;01m"

MIB_NAME="HOST-RESOURCES-MIB"
MIB_CHECK=`locate $MIB_NAME > /tmp/miblocate.txt`
MIB_CHECK_RESULT=`cat /tmp/miblocate.txt`
if [ -z "$MIB_CHECK_RESULT" ]; then
echo -e "$COL_RED MRTG ERROR MNF1: HOST-RESOURCES-MIB not found, cannot continue without it. Download them first ... $COL_RESET"
#exit 1
fi

HOST="$1"
# Temporary Folder where all CFG will be placed . . . [[ JZ . . . ]]
CFGDIR="cfg"
# Checking if $CFGDIR folder is previously present or not . . .
{
if [ ! -d "/$CFGDIR" ]; then
echo
echo -e "$COL_RED /$CFGDIR folder not found, Creating it so all cfg will be placed here . . . $COL_RESET"
mkdir /temp
else
echo
echo -e "$COL_GREEN /$CFGDIR folder is already present , so no need to create it, Proceeding further . . . $COL_RESET"
echo
fi
}

CFG_FILE_NAME="/$CFGDIR/storage.$1.cfg"
SNMP_STRING="agp"
snmpwalk -Os -c $SNMP_STRING -v 2c -m "/cfg/mibs/HOST-RESOURCES-MIB" $HOST hrStorageDescr |
sed -nre 's,hrStorageDescr.([0-9]*) = STRING: (.*),\1 \2,p' |
grep -Ev ' /(proc|sys)($|/)' |
while read NM DESC; do
STORAGE_SIZE=`snmpwalk -Onqv -Os -c $SNMP_STRING -v 2c -m "/cfg/mibs/HOST-RESOURCES-MIB" $HOST hrStorageSize.${NM}`
ALLOCATION_UNIT=`snmpwalk -Onqv -Os -c $SNMP_STRING -v 2c -m "/cfg/mibs/HOST-RESOURCES-MIB" $HOST hrStorageAllocationUnits.${NM} | awk '{print $1}'`
MAXSIZE_BITS=`echo $(($STORAGE_SIZE*$ALLOCATION_UNIT*8))`
MAXSIZE_MB=`echo $(($STORAGE_SIZE*$ALLOCATION_UNIT/1024/1024))`
MAXSIZE_GB=`echo $(($STORAGE_SIZE*$ALLOCATION_UNIT/1024/1024/1024))`
MAXSIZE_TB=`echo $(($STORAGE_SIZE*$ALLOCATION_UNIT/1024/1024/1024/1024))`

MAXSIZE_MB_T=`echo "scale=2; $STORAGE_SIZE*$ALLOCATION_UNIT / 1024 / 1024" | bc -l`
MAXSIZE_GB_T=`echo "scale=2; $STORAGE_SIZE*$ALLOCATION_UNIT/1024/1024/1024" | bc -l`
MAXSIZE_TB_T=`echo "scale=2; $MAXSIZE_GB/1000" | bc -l`

if [ $MAXSIZE_BITS -eq 0 ]; then
MAXSIZE_BITS="1"
fi
# Under 1GB TITLE
if [ $MAXSIZE_MB -lt 1024 ]; then
#echo "$hrStorageSize.${NM} = MAX Size in MB = $MAXSIZE_MB_T"
MAXSIZE_TITLE="MAX Size in MB = $MAXSIZE_MB_T"
fi
# ABOVE 1GB TITLE
if [ $MAXSIZE_MB -gt 1024 ]; then
#echo "$hrStorageSize.${NM} = MAX Size in GB = $MAXSIZE_GB_T"
MAXSIZE_TITLE="MAX Size in GB = $MAXSIZE_GB_T"
fi
# ABOVE 1 TB TITLE
if [ $MAXSIZE_MB -gt 1048576 ]; then
#echo "$hrStorageSize.${NM} = MAX Size in TB = $MAXSIZE_TB_T"
MAXSIZE_TITLE="MAX Size in TB = $MAXSIZE_TB_T"
fi

# IDENTX="stor_$(echo "${DESC}" | tr '[A-Z]/ ' '[a-z]_' | sed 's/\:/-/g')"
IDENTX="stor_$(echo "${DESC}" | sed -e 's/\///' | sed -e 's/\\//'| tr '[A-Z]/ ' '[a-z]_' | sed 's/\:/-/g')"
IDENT="$1.$IDENTX"
echo "Target[${IDENT}]: hrStorageUsed.${NM}&hrStorageSize.${NM}:$SNMP_STRING@$HOST * hrStorageAllocationUnits.${NM}&hrStorageAllocationUnits.${NM}:$SNMP_STRING@$HOST"
echo "Title[${IDENT}]: $HOST - Storage: ${DESC} : / $MAXSIZE_TITLE"
echo "PageTop[${IDENT}]:
<h1>$HOST - Storage: ${DESC} Report / $MAXSIZE_TITLE</h1>
"
echo "Kilo[${IDENT}]: 1024"
echo "MaxBytes[${IDENT}]: $MAXSIZE_BITS"
echo "ShortLegend[${IDENT}]: iB"
echo "YLegend[${IDENT}]: Bytes"
echo "Legend1[${IDENT}]: Used"
echo "Legend2[${IDENT}]: Total"
echo "LegendI[${IDENT}]: Used:"
echo "LegendO[${IDENT}]: Total:"
echo "Options[${IDENT}]: gauge,growright,nobanner,nopercent"
done &gt; $CFG_FILE_NAME

if [ -f $CFG_FILE_NAME ];
then
echo -e "$COL_GREEN MRTG CFG file name $CFG_FILE_NAME for $HOST is created ... $COL_RESET"
else
echo -e "$COL_RED ERROR: Unable to create CFG FILEs, check script errors ... $COL_RESET"
fi

echo -e "$COL_GREEN
SCRIPT ENDS HERE ... $COL_RESET"

Run Method:

./querystorage.sh 10.0.0.1

1


CFG Files Example:


Target[stor_c-_label-os__serial_number_b6ff670d]: hrStorageUsed.1&amp;hrStorageSize.1:PUBLIC@10.0.0.1 * hrStorageAllocationUnits.1&amp;hrStorageAllocationUnits.1:PUBLIC@10.0.0.1
Title[stor_c-_label-os__serial_number_b6ff670d]: 10.0.0.1 - Storage: C: Label:OS Serial Number b6ff670d : / MAX Size in GB = 278.14
PageTop[stor_c-_label-os__serial_number_b6ff670d]:
<h1>10.0.0.1 - Storage: C: Label:OS Serial Number b6ff670d Report / MAX Size in GB = 278.14</h1>
Kilo[stor_c-_label-os__serial_number_b6ff670d]: 1024
MaxBytes[stor_c-_label-os__serial_number_b6ff670d]: 2389226520576
ShortLegend[stor_c-_label-os__serial_number_b6ff670d]: iB
YLegend[stor_c-_label-os__serial_number_b6ff670d]: Bytes
Legend1[stor_c-_label-os__serial_number_b6ff670d]: Used
Legend2[stor_c-_label-os__serial_number_b6ff670d]: Total
LegendI[stor_c-_label-os__serial_number_b6ff670d]: Used:
LegendO[stor_c-_label-os__serial_number_b6ff670d]: Total:
Options[stor_c-_label-os__serial_number_b6ff670d]: gauge,growright,nobanner,nopercent

Target[stor_d-_label-Data__serial_number_f40779eb]: hrStorageUsed.2&amp;hrStorageSize.2:PUBLIC@10.0.0.1 * hrStorageAllocationUnits.2&amp;hrStorageAllocationUnits.2:PUBLIC@10.0.0.1
Title[stor_d-_label-Data__serial_number_f40779eb]: 10.0.0.1 - Storage: D: Label:Data Serial Number f40779eb : / MAX Size in TB = 1.11
PageTop[stor_d-_label-Data__serial_number_f40779eb]:
<h1>10.0.0.1 - Storage: D: Label:Data Serial Number f40779eb Report / MAX Size in TB = 1.11</h1>
Kilo[stor_d-_label-Data__serial_number_f40779eb]: 1024
MaxBytes[stor_d-_label-Data__serial_number_f40779eb]: 9566888624128
ShortLegend[stor_d-_label-Data__serial_number_f40779eb]: iB
YLegend[stor_d-_label-Data__serial_number_f40779eb]: Bytes
Legend1[stor_d-_label-Data__serial_number_f40779eb]: Used
Legend2[stor_d-_label-Data__serial_number_f40779eb]: Total
LegendI[stor_d-_label-Data__serial_number_f40779eb]: Used:
LegendO[stor_d-_label-Data__serial_number_f40779eb]: Total:
Options[stor_d-_label-Data__serial_number_f40779eb]: gauge,growright,nobanner,nopercent

Target[stor_physical_memory]: hrStorageUsed.5&amp;hrStorageSize.5:PUBLIC@10.0.0.1 * hrStorageAllocationUnits.5&amp;hrStorageAllocationUnits.5:PUBLIC@10.0.0.1
Title[stor_physical_memory]: 10.0.0.1 - Storage: Physical Memory : / MAX Size in GB = 31.81
PageTop[stor_physical_memory]:
<h1>10.0.0.1 - Storage: Physical Memory Report / MAX Size in GB = 31.81</h1>
Kilo[stor_physical_memory]: 1024
MaxBytes[stor_physical_memory]: 273308712960
ShortLegend[stor_physical_memory]: iB
YLegend[stor_physical_memory]: Bytes
Legend1[stor_physical_memory]: Used
Legend2[stor_physical_memory]: Total
LegendI[stor_physical_memory]: Used:
LegendO[stor_physical_memory]: Total:
Options[stor_physical_memory]: gauge,growright,nobanner,nopercent


Graph Examples:

2

Jz!

April 1, 2015

Howto display combined values of two interfaces in single MRTG graph

Filed under: Linux Related, Mikrotik Related — Tags: , — Syed Jahanzaib / Pinochio~:) @ 9:16 AM

mrtgmrtg-for-combo-wan


If you want to view combined value for two or more interfaces in single mrtg graph, here is the simple way to go…
[thanks to MRTG which supports simple math formulas as well 🙂  ]

Example:

On your router you have two wan interfaces (You’re not limited to just two) with the names of WAN1 and WAN2 (in load balancing mode or whatever) and you want to display single graph which should displays combined value for both interfaces so that you can have an idea how much WAN bandwidth is consuming (good to make average historical based graphs) , use following cfg


# combinedwan.cfg
Target[192.168.0.1_combowan]: #WAN1:publicsnmp@192.168.0.1: + #WAN2:publicsnmp@192.168.0.1:
MaxBytes[192.168.0.1_combowan]: 12500000
Title[192.168.0.1_combowan]: Traffic Analysis for BOTH DSL WAN Links WAN1+WAN2 -- MikroTik
PageTop[192.168.0.1_combowan]: <h1>Traffic Analysis for BOTH DSL WAN Links WAN1+WAN2  -- MikroTik</h1>
<div id="sysdetails">
<table>
<tr>
<td>System:</td>
<td>MikroTik Routerboard with Load Balacning</td>
</tr>
<tr>
<td>Maintainer:</td>
<td>aacable@hotmail.com</td>
</tr>
<tr>
<td>Description:</td>
<td>WAN1 + WAN2 Combined</td>
</tr>
<tr>
<td>ifType:</td>
<td>ethernetCsmacd (6)</td>
</tr>
<tr>
<td>ifName:</td>
<td>WAN1+WAN2</td>
</tr>
<tr>
<td>Max Speed:</td>
<td>100 Mbits/s</td>
</tr>
<tr>
<td>Ip: DYNAMIC</td>
<td>No Ip (No DNS name)</td>
</tr>
</table>
</div>


Note: Change the Interfaces names, SNMP string and IP according to your network setup. You can get interface numbers/names from the individual mrtg.cfg / router.cfg entries. cfgmaker can help you in this regard example

cfgmaker snmp@192.168.0.1 > router.cfg


Happy Graphing 🙂

Regard’s

Syed Jahanzaib


September 24, 2011

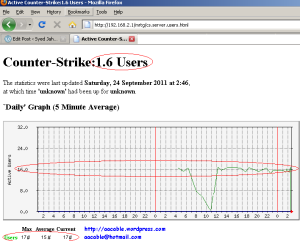
HOWTO CREATE MRTG STATS GRAPHS FOR FOR COUNTER STRIKE SERVER USER USAGE


This slideshow requires JavaScript.

As I am obsessed with MRTG, I have also found a way to graph Counter strike users. To graphs Counter Strike users via  MRTG, we will need a script name kkcron.pl , you can download it from http://kkrcon.sourceforge.net/
Untar it inany folder.

Now set the rcon password on your cs server by using this command on CS Server console.

rcon_password 12345678

Now test the kkcron.pl by following command to make sure its giving us the required data before going furhter.

/temp/kk/kkrcon.pl -a 192.168.2.5 -p 27015 -t new 12345678 status |grep players | cut -c12

Result woule be some thing like below (If the users are playing on  the server, if no user is connected you will surely get 0 )

17

(Which means 17 usesr are connected with your CS Server)

Now everything is ready, use the Use the following cs.cfg example , that you can use to graph the C.S users with the help of kkcron.pl

#cs.cfg
# Total CS Users
Target[cs.users]: '/temp/kk/kkrcon.pl -a 192.168.2.5 -p 27015 -t new 12345678 status |grep players | cut -c12'
Title[cs.users]: CS Logged in Users
PageTop[cs.users]: <H1> CS Logged in Users </H1>
MaxBytes[cs.users]: 300
Colours[cs.users]: B#8888ff,B#8888ff,B#5398ff,B#5398ff
Options[cs.users]: gauge,nopercent,noo,integer,growright
LegendI[cs.users]: CS Logged in Users
LegendO[cs.users]:
YLegend[cs.users]: CS Logged in Users
Legend1[cs.users]: CS Logged in Users
Legend2[cs.users]:
Unscaled[cs.users]: ymwd
Counter Strike MRTG Graphs / aacable@hotmail.com
Regard's
SYED JAHANZAIB

September 21, 2011

Howto Monitor Linux using MRTG !


INSTALLATION OF MRTG IN UBUNTU AND MONITOR LINUX DISK MEMORY AND PING GRAPHS

[Advance Monitoring]

~!~ Article By Syed Jahanzaib ~!~

mrtg-1
mrtg-2
mrtg-3
mrtg-4

The Multi Router Traffic Grapher (MRTG) is a tool to monitor the traffic load on network links. MRTG generates HTML pages containing PNG images which provide a LIVE visual representation of this traffic.MRTG is not limited to monitoring traffic, though. It is possible to monitor any SNMP variable you choose. You can even use an external program to gather the data which should be monitored via MRTG. People are using MRTG, to monitor things such as System Load, Login Sessions, and about anything . MRTG even allows you to accumulate two or more data sources into a single graph. I have used MRTG to monitor everything on my network, whether its a switch, router, ports, isa server counters, windows counters, linux counters, harddrive space monitoring, etc etc.


I HAVE PASTED THE SAMPLE WORKING CFG FILES AT THE END. JUST FOR REFERENCE.

Now we will move on to howto install MRTG. If you have Freshly installed UBUNTU , You need to install Web Server (apache2)

apt-get install apache2

Now we will install MRTG

apt-get install mrtg

(Choose Yes to continue)

Now we will install SNMP Server and other SNMP utilities so that web can collect information for localhost and remote pcs via snmp.

apt-get install snmp snmpd

Now set your community string in /etc/snmp/snmpd.conf , Remove all Lines and add the following line only.

nano /etc/snmp/snmpd.conf

rocommunity public
syslocation "Karachi NOC, Paksitan"
syscontact  aacable@hotmail.com

Save and exit.

now edit /etc/default/snmpd

nano /etc/default/snmpd

and change following

# snmpd options (use syslog, close stdin/out/err).
SNMPDOPTS='-Lsd -Lf /dev/null -u snmp -I -smux -p /var/run/snmpd.pid'

To THIS:

# snmpd options (use syslog, close stdin/out/err).
# SNMPDOPTS='-Lsd -Lf /dev/null -u snmp -I -smux -p /var/run/snmpd.pid '
SNMPDOPTS='-Lsd -Lf /dev/null -u snmp -I -smux -p /var/run/snmpd.pid -c /etc/snmp/snmpd.conf'

and restart snmpd

/etc/init.d/snmpd restart

OR

service snmpd restart

If you want to have MIBS, use following

Now download MIBs (which will be used to query counters by name)

sudo apt-get install snmp-mibs-downloader

Copy all mibs in any single folder like /cfg/mibs/

mkdir /cfg
mkdir /cfg/mibs
cp /var/lib/mibs/ietf/* /cfg/mibs

NOTE: Make sure you remove .txt or add .txt in every mib , and use the name in mrtg.cfg accordingly. This is required if you want to use names instead of numeric values 😀

This was the issue for which I was stuck for many hours 😦

E.g:
#LoadMIBs: /cfg/mibs/UCD-SNMP-MIB

OR following if files are in .txt, then use following
#LoadMIBs: /cfg/mibs/HOST-RESOURCES-MIB.txt

↓

Testing SNMP Service for localhost.

Now snmp service have been installed, its better to do a snmpwalk test from localhost or another remote host to verify our new configuration is responding correctly. issue the following command from localhost terminal.

snmpwalk -v 1 -c public 127.0.0.1


and you will see lot of oids and information which confirms that snmp service is installed and responding OK.

Adding MRTG to crontab to run after very 5 minutes

If already not added in /etc/cron.d/ folder, then you can add it manually in crontab

crontab -e

(if it asks for preferred text editor, go with nano, its much easier)

now add following line (Make sure to adjust /etc/mrtg.cfg location,

*/5 * * * * env LANG=C mrtg /etc/mrtg.cfg --logging /var/log/mrtg.log


Some tips for INDEX MAKER and running MRTG manually …

Following is the command to create CFG file for remote pc.

cfgmaker public@192.168.100.1 > test.cfg

Following is the command to check remote pc snmp info

snmpwalk -v 1 -c public 192.168.100.1

Following is the command to create index page for your cfg file.

indexmaker /etc/mrtg.cfg -output /var/www/mrtg/index.html -columns=2

Following is the command to run MRTG to create your graph file.

env LANG=C mrtg /etc/mrtg.cfg


MIKROTIK WORKING CFG EXAMPLES FOR MRTG , JUST FOR REFERENCE

You can create graphs for about any thing you like. Its really powerful and I always prefer MRTG over other easy applications like CACTI or others. You can modify it as you like.

I will add more MRTG details on howto monitor linux / Microsoft / MIKROTIK soon.
MRTG WORKING CFG EXAMPLES, JUST FOR REFERENCE

#########################
# START OF /etc/mrtg.cfg#
#########################
# AUthor: Syed Jahanzaib
# Email : aacable@hotmail.com
# Web : https://aacable.wordpress.com

WorkDir:/var/www/mrtg
Options[_]: growright,nobanner,logscale,pngdate,bits
Options[^]: growright,nobanner,logscale,pngdate,bits
XSize[_]: 600
YSize[_]: 200
EnableIPv6: no
RunAsDaemon: no
Interval: 5
#Logformat: rrdtool
#Use MIBS as per your local config
LoadMIBs: /cfg/mibs/HOST-RESOURCES-MIB /cfg/mibs/IF-MIB /cfg/mibs/UCD-SNMP-MIB
PageFoot[^]: Page managed by SYED JAHANZAIB
AddHead[_]:   
Background[_]: #F6F1EE

# Change it as required , it means mrtg will read following file and will create graphs based on its contents

Include: /cfg/lanwan.cfg
Include: /cfg/mt.cfg
Include: /cfg/radius.cfg
Include: /cfg/ping.cfg
Include: /cfg/vlan.cfg

#########################
# END OF /etc/mrtg.cfg #
#########################


Following cfg will query memory and disk space by MIB name, its easier to query via mib name, rather then long OID number.


to get the last number of OID (which nee to be replace for almost every different system, use following command)

To get DISK LAST OID number

snmpwalk -v1 -c public 192.168.100.1 -m /cfg/mibs/HOST-RESOURCES-MIB |grep hrStorageDescr

HOST-RESOURCES-MIB::hrStorageDescr.1 = STRING: Physical memory
HOST-RESOURCES-MIB::hrStorageDescr.3 = STRING: Virtual memory
HOST-RESOURCES-MIB::hrStorageDescr.6 = STRING: Memory buffers
HOST-RESOURCES-MIB::hrStorageDescr.7 = STRING: Cached memory
HOST-RESOURCES-MIB::hrStorageDescr.8 = STRING: Shared memory
HOST-RESOURCES-MIB::hrStorageDescr.10 = STRING: Swap space
HOST-RESOURCES-MIB::hrStorageDescr.31 = STRING: /
HOST-RESOURCES-MIB::hrStorageDescr.32 = STRING: /sys/fs/fuse/connections
HOST-RESOURCES-MIB::hrStorageDescr.33 = STRING: /dev
HOST-RESOURCES-MIB::hrSWRunParameters.29273 = STRING: "--color=auto hrStorageDescr"
root@ubuntu:/cfg#

Now look for / , which have hrStorageDescr.31 , so the disk oid  we need to query is .31

and for memory use following

snmpwalk -v1 -c gt 192.168.100.1 -m /cfg/mibs/HOST-RESOURCES-MIB |grep memory

# and you will get following results...

HOST-RESOURCES-MIB::hrStorageDescr.1 = STRING: Physical memory

as can see .1 is the memory index key that you need to use in thw following


# Start of other CFG files


# disk space monitoring for / partition. you can query it via snmpwalk
Target[linux_server]: ( hrStorageUsed.31&amp;hrStorageUsed.31:public@192.168.100.1 ) * 100 / ( hrStorageSize.31&amp;hrStorageSize.31:public@192.168.100.1 )
Title[linux_server]: Disk usage for Radius Manager Linux Server
PageTop[linux_server]: <H1> Disk usage for Radius Manager Linux Server </H1>
MaxBytes[linux_server]: 100
ShortLegend[linux_server]: %
YLegend[linux_server]: % of RM_DISK
Legend1[linux_server]: Used RM_DISK
LegendI[linux_server]: Used :
LegendO[linux_server]:
Options[linux_server]: nopercent, gauge, integer
Unscaled[linux_server]: ymwd

#Percent of memory used
Target[radius_server_mem_ram]: ( hrStorageUsed.1&amp;hrStorageUsed.1:public@192.168.100.1) * 100 / ( hrStorageSize.1&amp;hrStorageSize.1:public@192.168.100.1)
Title[radius_server_mem_ram]: Memory usage for Radius Server
PageTop[radius_server_mem_ram]: <H1> Memory usage for Radius Server </H1>
MaxBytes[radius_server_mem_ram]: 100
ShortLegend[radius_server_mem_ram]: %
YLegend[radius_server_mem_ram]: % of Memory
Legend1[radius_server_mem_ram]: Used Memory
LegendI[radius_server_mem_ram]: Used :
LegendO[radius_server_mem_ram]:
Options[radius_server_mem_ram]: nopercent, gauge, integer, growright
Unscaled[radius_server_mem_ram]: ymwd

PING GRAPHS SCRIPTS

### ping.cfg
# 192.168.100.2 MIKROTIK NAS SERVERPING GRAPH
Title[mikrotik.ping]: MIKROTIK NAS SERVER PING RTT / Pkt LOSS Report
PageTop[mikrotik.ping]: <H1>MIKROTIK NAS SERVER PING RTT / Pkt LOSS Report</H1>
Target[mikrotik.ping]: `/cfg/norping.sh 192.168.100.2`
Colours[mikrotik.ping]: R#f75712,G#04bf27,G#70ff53,R#70ff53
MaxBytes[mikrotik.ping]: 100
AbsMax[mikrotik.ping]: 100
Options[mikrotik.ping]: growright,nopercent,gauge
LegendI[mikrotik.ping]: Pkt LOSS
LegendO[mikrotik.ping]: Active Round Trip Time
YLegend[mikrotik.ping]: RTT
Legend1[mikrotik.ping]: Pkt LOSS
Legend2[mikrotik.ping]: Active RTT

# Google PING GRAPH
Title[google.ping]: GOOGLE.COM PING RTT / Pkt LOSS Report
PageTop[google.ping]: <H1>GOOGLE.COM PING RTT / Pkt LOSS Report</H1>
Target[google.ping]: `/cfg/norping.sh google.com`
Colours[google.ping]: R#f75712,G#04bf27,G#70ff53,R#70ff53
MaxBytes[google.ping]: 1000
AbsMax[google.ping]: 1000
Options[google.ping]: growright,nopercent,gauge
LegendI[google.ping]: Pkt LOSS
LegendO[google.ping]: Active Round Trip Time
YLegend[google.ping]: RTT
Legend1[google.ping]: Pkt LOSS
Legend2[google.ping]: Active RTT

### ping.cfg
# 192.168.100.10 GT MAIN SWITCH PING GRAPH
Title[gtsw-core.ping]: GT CORE SWITCH PING GRAPH PING RTT / Pkt LOSS Report
PageTop[gtsw-core.ping]: <H1>GT CORE SWITCH PING RTT / Pkt LOSS Report</H1>
Target[gtsw-core.ping]: `/cfg/norping.sh 192.168.100.10`
Colours[gtsw-core.ping]: R#f75712,G#04bf27,G#70ff53,R#70ff53
MaxBytes[gtsw-core.ping]: 100
AbsMax[gtsw-core.ping]: 100
Options[gtsw-core.ping]: growright,nopercent,gauge
LegendI[gtsw-core.ping]: Pkt LOSS
LegendO[gtsw-core.ping]: Active Round Trip Time
YLegend[gtsw-core.ping]: RTT
Legend1[gtsw-core.ping]: Pkt LOSS
Legend2[gtsw-core.ping]: Active RTT


scripts for ping

norping.cfg (for normal ping for wan)

#!/bin/bash
HOST=$1
ping -c 3 $HOST > /dev/null
DATA=`ping -c 3 $1 -q `
if [ $? -eq 0 ]
then
echo "0"
echo $DATA | awk -F/ '{print $6 }'
else
echo "100
0"
fi

MYSQL Database size monitoring in MRTG using bash script

1# Bash file to output DB Size for mysql hosted locally on same server.

#!/bin/bash
# Script to query mysql stats
#set -x
HOST="127.0.0.1"
USER="root"
PASS="MYSQLPASS"
DB="radius"
CMD=`mysql -u$USER -pMYSQLPASS --skip-column-names -e "SELECT table_schema "radius", sum(data_length + index_length) FROM information_schema.TABLES WHERE table_schema='radius' GROUP BY table_schema;"`
F=`echo $CMD | cut -f1 -d"." | sed 's/[^0-9]*//g'`
echo $F
echo $F

2# Bash file to output DB Size for mysql hosted locally on REMOTE server using SSH key method.

#!/bin/bash
# Script to query mysql stats
#set -x
HOST="192.168.0.1"
USER="root"
PASS="PASS"
DB="radius"
PORT="55511"
CMD=`ssh -p $PORT $HOST mysql -uroot '-pMYSQLPASS' --skip-column-names -e '"SELECT' table_schema '"radius",' 'sum(data_length' + 'index_length)' FROM information_schema.TABLES WHERE 'table_schema='\''radius'\''' GROUP BY 'table_schema;"' | cut -f1 -d"." | sed 's/[^0-9]*//g'`
echo $CMD
echo $CMD


CFG Example:

Title[0.1_radius_db_size]: 192.168.0.1 - MYSQL RADIUS DB SIZE
Target[0.1_radius_db_size]: `/temp/qmysql.0.1.sh`
PageTop[0.1_radius_db_size]:
<h1>192.168.0.1 - MYSQL RADIUS DB SIZE</h1>
Kilo[0.1_radius_db_size]: 1024
MaxBytes[0.1_radius_db_size]: 10737418240
ShortLegend[0.1_radius_db_size]: B
YLegend[0.1_radius_db_size]: MB-or-GB
Legend1[0.1_radius_db_size]: Used
#Legend2[0.1_radius_db_size]: Total
LegendI[0.1_radius_db_size]: Used:
LegendO[0.1_radius_db_size]: Used:
Options[0.1_radius_db_size]: gauge,growright,nobanner,nopercent,integer,transparent,noo

Graph Example:

radius db


July 5, 2011

A Success story with Mikrotik and DMASoftlab RADIUS MANAGER [Glass Line Pvt Ltd.] June, 2011


Article by Syed Jahanzaib !

Recently I was contacted by a friend who was really passionate in starting a mini-ISP type network setup for about 3000 users in the interior area of city. (soon it may expand up to 5000+ users). He asked my help to setup a scratch card base fully automatic system where user purchase scratch card, & using User self care portal web site, user may create his new ID or refresh his previous ID or change the service package according to the card package offers. I had previously setup this kind of scenario in a cable.net environment using Mikrotik built-in radius server called ‘User Manager’, but it have very limited basic features and all it can offer was a pre-paid type option and it doesn’t have many accounting features. So I thought I should give a try to more rich feature radius server and after a lot of googling i decided to go with  (FREERADIUS base ) DMASOFTLAB RADIUS MANAGER. A very famous radius server with all the option that a mini-ISP would required at unbelievably low price.

The hardware that I have used for this setup.

*Main Mikrotik = v4.17 x86 / Xeon 3.6Ghz Dual / 2 GB Ram / WD 500 GB Sata Hdd , This MT is serving as a PPPoE Server + NAT + bandwidth shaping. It also redirects HTTP traffic to Proxy server.

* Mikrotik RB750 = Just for HOTSPOT to redirect users to self care portal.
(This can be done on Main MT also, but I prefer it this way)

* Radius Server = DMASoftlab RM v3.9 installed on Fedora v10 / Xeon 3.6Ghz Dual / 4 GB Ram / WD 500 GB x2 Sata Hdd

* SQUID PROXY GW = SQUID v2.7 on UBUNTU Karmic Koala v9.10 / Xeon 3.6Ghz Dual / 8 GB Ram / WD 500 GB x3 SATA HDD (2 HDD reserved for Cache), This server acts as a proxy + Gateway machine for the Mikrotik, It also do URL Filtering blocking ads, it also have ZPH enabled so content available in squid cache should be downloaded at full speed (without package limitation) at user end. It also cache youtube videos using VIDEOCACHE.

* Linux Transparent BRIDGE firewall + DHCP + DNS + MRTG + WEB Server on FEDORA V10 / Xeon 3.6Ghz Dual / 4 GB Ram / WD 500 GB SATA HDD, This server sits between Mikrotik and Users , filtering unwanted traffic, ports and do some other stuff like lightweight DNSMASQ DNS Server,  DHCP server providing ips to users , Web Site with MRTG , Psychostats ranking system for Counter Strike Game, Server Monitoring Scripts and Alerts, PHPBB Forums for Users, and some other cool stuff. DNS+DHCP is hosted on this server to minimize load on main mikrotik machine, alos this machine filters unwanted traffic from passing by to main mikrotik.

In this setup , I have configured HOTSPOT on extra RB750 only to redirect user to my advertisement page, where he is informed that he is not logged in via dialer, either create / refresh his ID from RM User Self Care Portal, or if he already have an id, connect it via dialer. I don’t prefer HotSpot authentication due to various security reasons, mainly due to I had a very bad experience having HOTSPOT hit by ARP-POISONING and many virus flooder that requires default gateway.

When user first login , his PC MAC address is binded with his ID to prevent accessing it from different pcs. Multiple session of same ID is NOT allowed , I provide user with scratch card (with refill code) , which he can use to refill his account according to card amount/package from RM User self care portal. RM demo can be viewed at http://www.dmasoftlab.com/cont/radman

When users with pppoe dialer tries to connect to main Mikrotik, MT verifies its credentials by asking Radius Server for the account validity, if the ID is valid, user connects okay and can use internet , otherwise he gets disconnected. When the User account is expired, he still can login via dialer, but then he is redirect to my local web server page where he is informed that his account is expired and he should visit billing.local page to renew his account using the card.

Please find along with attachment is my Network Diagram (This was initially designed, I made few changes afterward, I removed FTP from MT DMZ to user subnet lan to avoid load on MT , I moved ftp OS from windows to Linux and integrate it with radius authentication using APACHE.

Some other entertainment services that I setup here were:
2 FTP Media Sharing Servers ( 4 TB of data )
2 Live TV Channel streaming over LAN using VLC Media Player Broadcasting
1 Counter Strike 1.6 Dedicated Server with Psychostats Ranking System and adminmod/amxmod
1 Web Server (Ubunut) hosting site u-dear . com , an entertainment portal and hosting other features. It also features monitoring system with MRTG / SMS Alerts via attached Mobile.

About RM: Radius Manager uses a nice web interface for administering the users and the whole system (traffic accounting, tracking of online users, display statistics, maintenance ,account management etc.).

and to add that DMASoftlab customer support guys (specially Mr. Viktor.K) have excellent support and respond instantly even to the dumbest of questions. It is real value for money especially for those who do not have big wallet$.

Network Diagram Layout : (Complete setup guide can found at
https://aacable.wordpress.com/2011/07/19/mikrotik-squid-zph-complete-guide-incomplete-post-i-will-edit-it-later/

GLASSLINE-Network-Presentation-by-zaib Update 03/08/2001