Syed Jahanzaib – Personal Blog to Share Knowledge !

December 7, 2011

Mikrotik Howto Add Schedule to Run the Script


To add schedule to run any specific script at specific scheduled time, Follow the steps Below.

1) First create the script
2) Schedule it to run it at desired time.

SCENARIO # 1 | Allow user JOHN access to internet in Lunch Timings Only . . .

You have created a rule that blocks user John internet access all the time (In this example, we disable user id JOHN, it can also be done via creating firewall rule to block access, but for this example we will use disable strategy), but you want him to use internet from 1:00pm til 2:00pm. You have to create two scripts, first that will disable the “Block user john rule” at 1 pm and the second script that will enable the “Block user john rule” at 2 pm.

Here is the “Block user john rule

/ppp secret add caller-id="" comment="" disabled=no limit-bytes-in=0 limit-bytes-out=0 local-address=10.10.0.1 name=john password=123 profile=default routes="Testing ID" service=any

Here are the Scripts examples in following screenshots.


Now ADD the following Scheduler to Execute both scripts at desired timing.

# Enable-User-John-Script at 1PM (Interval 1d so it may run every day)
# Disable-User-John-Script at 2PM (Interval 1d so it may run every day)

C.L.I  VERSION:

[admin@MikroTik] > /system script export
/system script
add name=disable-user-john-script policy=ftp,reboot,read,write,policy,test,winbox,password,sniff,sensitive source="/ppp secret disable john"
add name=enable-user-john-script policy=ftp,reboot,read,write,policy,test,winbox,password,sniff,sensitive source="/ppp secret enable john"


[admin@MikroTik] > /system scheduler export
/system scheduler
add comment="" disabled=no interval=1d name="Enable User JOHN at 1pm" on-event=Enable-user-john-script policy=reboot,read,write,policy,test,password,sniff,sensitive start-date=dec/07/2011 start-time=13:00:00
add comment="" disabled=no interval=1d name="Disable User JOHN at 2pm" on-event=Disable-user-john-script policy=reboot,read,write,policy,test,password,sniff,sensitive start-date=dec/07/2011 start-time=14:00:00

Another example on howto disable Web Proxy Access Rule.

SCENARIO # 2 | Block Access to Facebook, and Allow only in Lunch Timings

You have blocked access to social networking web sites Facebook and you want that users can access it only in Lunch timings, which is from 1:00pm till 2:00pm. I assume you are using Mikrotik web proxy [transparent mode], (If not, you can block the access via ip pool + firewall filter, adjust it accordingly, its only an example)

For example you have created an rule in web.proxy to block Facebook, (BLOCK-FB rule) which blocks Face-book site , example below

/ip proxy access
add action=deny comment=fb disabled=no dst-host=www.facebook.com

(Don’t forget the ‘comments’ in rule) and Now you want to Allow access to FB from 1:00 pm till 2:00 pm,
You have to create two Scripts, one that will disable the BLOCK-FB rule,
and second that will enable the BLOCK-FB rule.

Disable-fb-rule Script

/ip proxy access disable [find comment="fb"]

Enable-fb-rule Script

/ip proxy access enable [find comment="fb"]

OR you can Add scripts via following code in TERMINAL.

/system script
add name=disable-fb-rule-script policy=ftp,reboot,read,write,policy,test,winbox,password,sniff,sensitive source="/ip proxy access disable [find comment=\"fb\"]"
add name=enable-fb-rule-script policy=ftp,reboot,read,write,policy,test,winbox,password,sniff,sensitive source="/ip proxy access enable [find comment=\"fb\"]"

Now add schedule to Run “disable-fb-rule-script” to run at 1:00 pm Daily,
Add another schedule to Run “enable-fb-rule-script” to run at 2:00 pm Daily,

/system scheduler
add comment="" disabled=no interval=1d name="Disable fb rule schedule" on-event="disable-fb-rule-script"  start-date=dec/08/2010 start-time=01:00:00
add comment="" disabled=no interval=1d name="Enable fb rule schedule" on-event="enable-fb-rule-script"  start-date=dec/08/2010 start-time=02:00:00

SCENARIO # 3 | Reboot RB daily in  night

Following script will create a schedule, which will reboot RB daily in night at 1:00am.

/system scheduler
add comment="Reboot every 1 day" disabled=no interval=1d name=Reboot1d on-event="/system reboot" policy=ftp,reboot,read,write,policy,test,winbox,password,sniff,sensitive start-date=Nov/14/2012 start-time=01:00:00

October 28, 2011

Webmin / PHP base Mikrotik Control Panel

Filed under: Mikrotik Related — Tags: , , , , , — Syed Jahanzaib / Pinochio~:) @ 12:31 PM

Following are two good .simple and basic ways to control your Mikrotik Box via your browser as fronted using WEBMIN or PHP base pane at backend. Both are good in there own ways.

Easy to setup and quick to manage , using these method, you don’t have to login via winbox to access your mikrotik for basic management :)~
Just install them on any Linux base system, it can be your proxy or whatever Linux base pc on LAN you have.


WEMIN BASE CONTROL PANEL

Simply install WEBMIN from http://www.webmin.com and then follow the guide below.

http://wiki.mikrotik.com/wiki/Useful_Bash_Scripts

[By Mr. Mudassir Mirza @ http://www.diglinux.com/%5D

Snapshot of webmin configured with the mikrotik scripts functions.

(My Modified OnlineUsers.sh, for my personnel reference,
idea was taken from  Mr. Mudassir Mirza @ http://www.diglinux.com/%5D)

#!/bin/bash
# set -x
# for (( ; ; ))
# do
USER="admin"
MTIP="10.10.0.1"
PORT="22"
FPATH="/zaib"
DRL=zaib
FILE=$DRL
rm -fr $FPATH/$DRL.txt
ssh $USER@$MTIP -p $PORT / ppp active print file=$DRL
scp -P 22 $USER@$MTIP:$DRL.txt $FPATH/$DRL.txt
sed -i 's/MEJM-BFQK/secret/g' /zaib/zaib.txt
cat $FPATH/$DRL.txt
echo
echo
TTL=`cat $FPATH/$DRL.txt |sed '1,5d' | wc -l`
echo -e "\t\t\n Total Number of Active Users $TTL"

PHP BASE PANEL

Snapshot of PHP panel configured with the mikrotik scripts functions.

[By Mr. Mudassir Mirza @ http://www.diglinux.com/%5D


You must have LAMP base installation on your nix box. then follow the below guide.
[Note: it have some minor bugs, For example, when you tri to import mysql db via using manual command

mysql#\. /var/www/mtpanel/mtpanel.sql;

You may get following error.

ERROR:
Failed to open file '/var/www/mtpanel/mtpanel.sql;', error: 2

Use the following command instead.

mysql -u root -p123 --database mtpanel < mtpanel.sql

There is also an bug in live monitoring of specific user page, that can be corrected by editing it and remove refresh interval.

Warning: This page is accessible by every user, To password protect it, use the following guide to protect it with password.
https://aacable.wordpress.com/2011/11/05/howto-protect-a-web-folder-on-apache-with-password/

You can also remove some of its funcitons, for example i provided this panel for support personnel which have only specific functions available, Live Monitoring , Connected Users, Password Change.

Some information and instructions regarding this panel is well described and discussed at following links

http://wiki.mikrotik.com/wiki/Basic_php_ppp_scripts
http://forum.mikrotik.com/viewtopic.php?f=2&t=54948

October 27, 2011

MIKROTIK Policy Routing based on Client IP Address


 ~!!!~   Article  By  Syed Jahanzaib   ~!!!~

Recently at a local cable.network setup @ gulzar-e-hijri, an OP asked told me that he wanted to add an extra DSL line just for some specific users (VIP users who are paying some extra money for better speed, as the current single dsl is getting clogged by over subscribed users. He wanted to manage all users / link via single Mikrotik router-board.
I accomplished this task by adding 2nd DSL line with the Mikrotik BOX and few rules, and Alhamdolillah it worked fine :). I am just sharing basic logic on how i achieved it.

You can take this idea and modify it according to your requirement, either use this logic and mix it with hotspot or pppoe base setup. In this example, user MAC-IP was binded.

Let us assume that we have 2 Users lists.

DSL1_USERS_LIST = 192.168.2.6
DSL2_USERS_LIST = 192.168.2.7


DSL1 Router GW IP = 192.168.5.2
DSL2 Router GW IP = 192.168.6.2

Now we will route users through DSL-1 OR DSL-2 wan links based on there ip addresses.

To accomplish this task, the simple logic is …

  1. STEP#1: First we will create ADDRESS-LIST, and add our users in the list,
  2. STEP#2: Then We have to add two IP Firewall Mangle rules to mark the packets originated from user 1 and user2.
  3. STEP#3: Then we should specify two default routes (destination 0.0.0.0/0) with appropriate routing marks and gateways.
  4. STEP#4: Then simple add one NAT rule for local ip series and Action masquerade.

Code:

# Adding IP Address on interfaces like lan/wan
# IP for LAN User Network Connectivity

/ip address
add address=192.168.2.1/24 disabled=no interface=LAN network=192.168.2.0
# IP for WAN DSL Connectivity

add address=192.168.5.1/24 disabled=no interface=WAN1 network=192.168.5.0
add address=192.168.6.1/24 disabled=no interface=WAN2 network=192.168.6.0

# Create 2 Address lists and add ip as per required, you can add Range as well.
# I am adding just 2 ips only

/ip firewall address-list
add address=192.168.2.6 disabled=no list=DSL1_USERS_LIST
add address=192.168.2.7 disabled=no list=DSL2_USERS_LIST
# Marking Users connection coming from specific address lists
/ip firewall mangle
add action=mark-routing chain=prerouting disabled=no new-routing-mark=wan1_user passthrough=no src-address-list=DSL1_USERS_LIST
add action=mark-routing chain=prerouting disabled=no new-routing-mark=wan2_user passthrough=no src-address-list=DSL2_USERS_LIST
# Create Routes for above marked packets so each marked packets goes via specific wan link only
/ip route
add disabled=no distance=1 dst-address=0.0.0.0/0 gateway=192.168.5.2 routing-mark=wan1_user scope=30 target-scope=10
add disabled=no distance=2 dst-address=0.0.0.0/0 gateway=192.168.6.2 routing-mark=wan2_user scope=30 target-scope=10
# Finally create NAT rule so that users (ip range) internet can work
/ip firewall nat
add action=masquerade chain=srcnat disabled=no src-address=192.168.2.0/24

TESTING

From Client PC # 1 whose ip address is 192.168.2.6, run TRACEROUTE command

For example traceroute yahoo.com


Results


TESTING FROM DSL1_USERS_LIST = 192.168.2.6

Ethernet adapter Local Area Connection:

Connection-specific DNS Suffix  . :
Description . . . . . . . . . . . : Realtek RTL8139 Family PCI Fast Ethernet NIC
Physical Address. . . . . . . . . : 00-xx-xx-xx-xx-xx
Dhcp Enabled. . . . . . . . . . . : No
IP Address. . . . . . . . . . . . : 192.168.2.6
Subnet Mask . . . . . . . . . . . : 255.255.255.0
Default Gateway . . . . . . . . . : 192.168.2.1
DNS Servers . . . . . . . . . . . : 192.168.2.1

C:\Documents and Settings\zaib>tracert yahoo.com

Tracing route to yahoo.com [209.191.122.70]
over a maximum of 30 hops

1     <1 ms     <1 ms     2 ms  192.168.2.1
2      2 ms      2 ms     3 ms  192.168.5.2
.
.


TESTING FROM DSL2_USERS_LIST = 192.168.2.7

Ethernet adapter Local Area Connection:
Connection-specific DNS Suffix  . :
Description . . . . . . . . . . . : Realtek RTL8139 Family PCI Fast Ethernet NIC
Physical Address. . . . . . . . . : 00-xx-xx-xx-xx-xx
Dhcp Enabled. . . . . . . . . . . : No
IP Address. . . . . . . . . . . . : 192.168.2.7
Subnet Mask . . . . . . . . . . . : 255.255.255.0
Default Gateway . . . . . . . . . : 192.168.2.1
DNS Servers . . . . . . . . . . . : 192.168.2.1

C:\Documents and Settings\zaib>tracert yahoo.com

Tracing route to yahoo.com [209.191.122.70]
over a maximum of 30 hops

1     <1 ms     <1 ms     2 ms  192.168.2.1
2      2 ms      2 ms     3 ms  192.168.6.2
.
.


Regard’s
SYED JAHANZAIB

September 29, 2011

Howto Create HTTP File Sharing Server with Freeradius Backend + [Daloradius Frontend Optional]

Filed under: Linux Related, Mikrotik Related — Tags: , , , , , — Syed Jahanzaib / Pinochio~:) @ 2:06 PM


Following is a complete guide on howto setup Apache to use FreeRadius authentication module along with DALORADIUS as a front-end. You can also use this guide to create full featured RADIUS server for your MIKROTIK or any other NAS which have external RADIUS authentication support in it.
Also this guide will illustrate you howto configure DALORADIUS. which is an advanced RADIUS web management application aimed at managing hotspots and general-purpose ISP deployments. It features user management, graphical reporting, accounting, a billing engine. It  is basically an nice GUI Frontend to control FREERADIUS. Using DR, you can create single/batch users, hotspot tickets, create plans n packages etc etc.

In the end I will show you howto create a APACHE base file sharing server which will use FREERADIUS for authentication 🙂

Few months back , @ my friend’s cable.network , I installed  Mikrotik along with DMASOFTLAB RADIUS MANAGER which also uses FREERADIUS as backend authentication mechanism. They also had a 4 TB of windows IIS base FTP sharing server for Videos, Mp3, Games and etc for LAN users. All network was running on private ips, so setting authentication on sharing server so only valid users can access FTP was a headache, so for the time being I placed FTP server behind Mikrotik DMZ so that only pppoe dialer connected users can access them, BUT this topology had a negative impact on overall Mikrotik performance because huge amount of (JUNK FTP) irrelevant traffic was going through the router which was increasing overall load on MT, so I decided to overcome this problem by changing the sharing server operating system from Microsoft Windows to UBUNTU Linux, and then I placed  it on users subnet and then link this sharing server [apache] authentication with freeradius. This way I managed to solve the problem. This guide will show you how I exactly did this.

Here we go . . .

We will divide this article in two categories.

1) FREERADIUS + MYSQL + DALORADIUS

2) How to authenticate Apache 2 with Radius

[Please note that I am using UBUNTU 10.4 and ip address is 192.168.2.1, all packages are installed in this single box for testing purpose,  you can separate them as per your requirements]

1) Installing FREERADIUS Server along with MYSQL+DALORADIUS :

I prefer installing the whole pre-requisite LAMP package (lamp-server stands for Linux-Apache-MySQL-PHP server). First We install lamp-server using the command below:

sudo tasksel install lamp-server

(you will need to enter root password, which is “123”  in my case , to continue the installation)

Now Install freeradius package

sudo apt-get install freeradius

Install freeradius ldap authentication

sudo apt-get install freeradius-ldap

Install freeradius to run with mysql

sudo apt-get install freeradius-mysql

After finishing the above installations, restart the FreeRADIUS service

sudo /etc/init.d/freeradius restart

If you are using Ubuntu, remove /commend the IPV6 entry from /etc/hosts

nano /etc/hosts
# The following lines are desirable for IPv6 capable hosts
# ::1     localhost ip6-localhost ip6-loopback

Now, you can test the Radius Server using radtest package, the command will be as below:

radtest radius 123 localhost 1812 123
(you will see its result something like below)
Sending Access-Request of id 198 to 127.0.0.1 port 1812
User-Name = "radius"  User-Password = "123" NAS-IP-Address = 127.0.1.1
NAS-Port = 1812 rad_recv: Access-Accept packet from host 127.0.0.1 port 1812, id=198, length=20
Which shows your RADIUS Server is in working condition. 

Now Download DALORADIUS which is hosted on sourceforge at the address of http://sourceforge.net/projects/daloradius/ and you may get the latest release from there ( I used 0.9.9) or use the wget command to download in any temp folder e.g /temp

mkdir /temp
cd /temp
wget http://citylan.dl.sourceforge.net/project/daloradius/daloradius/daloradius0.9-9/daloradius-0.9-9.tar.gz
tar -zxvf daloradius-0.9-9.tar.gz
mv daloradius-0.9-9.tar.gz daloradius
cp daloradius/ /var/www -R
chown www-data:www-data /var/www/daloradius -R chmod 644 /var/www/daloradius/library/daloradius.conf.php

MYSQL Database Setup

Now, we create the database for FreeRADIUS and an user account which will be used by FreeRADIUS to access into database. then import both freeradius and daloradius tables using this schema:
We will run the following command to Login MySQL Database

mysql -u root -p123
CREATE DATABASE radius;
grant all privileges on radius.* to 'radius'@'localhost';
quit

Now Import Daloradius mysql tables . . .

cd /var/www/daloradius/contrib/db/
mysql -u root -p radius < fr2-mysql-daloradius-and-freeradius.sql
mysql -u root -p radius < mysql-daloradius.sql

Database Connection SetupNow, simply adjust the MySQL database information in daloRADIUS’s config file.

cd /var/www/daloradius/library/
nano -w daloradius.conf.php
$configValues['FREERADIUS_VERSION'] = '2';
$configValues['CONFIG_DB_PASS'] = '123';
$configValues['CONFIG_DB_TBL_RADUSERGROUP'] = 'radusergroup';

Freeradius + mysql + daloradius Installation Complete.
Point your browser to

http://192.168.2.1/daloradius

Login to the management:

username: administrator
password: radius

Here you can add users / plans etc etc. Please see daloraidus web site for more support info. Add some test users so that you test it later when apache ask authentication.
You can also test this user with radtest.

radtest testuser testpassword localhost 1812 123

How to authenticate Apache 2 with RADIUS.

First we will install Apache radius module :

apt-get install libapache2-mod-auth-radius
a2enmod auth_radius

Now open /etc/apache2/apache2.conf and add the following lines to end of file,

AddRadiusAuth localhost:1812 123 5:3
AddRadiusCookieValid 1

Now For example we have mounted our 1 TB sharing Harddisk in /mnt/test and we want that if user try to open http://192.168.2.1/test in there browser , an Authentication Popup must appear to force user enter there valid radius user id password to further proceed, then Add the following lines in /etc/apache2/apache2.conf  in the end.

Alias /test /mnt/test
<Directory /mnt/test>
Options Indexes FollowSymlinks
AuthType Basic
AuthName "AA File Server Authentication"
AuthBasicAuthoritative Off
AuthBasicProvider radius
AuthRadiusAuthoritative on
AuthRadiusActive On
Require valid-user </Directory>


Now Point your browser to http://192.168.2.1/test and you will see authentication popup window , something like below image.


If the user supply wrong id password, he will see


If user enters valid id password, he will see the content of test folder.

Alhamdolillah 🙂
Allah Hafiz,

Regard’s
SYED JAHANZAIB

September 21, 2011

Howto Monitor Linux using MRTG !


INSTALLATION OF MRTG IN UBUNTU AND MONITOR LINUX DISK MEMORY AND PING GRAPHS

[Advance Monitoring]

~!~ Article By Syed Jahanzaib ~!~

mrtg-1
mrtg-2
mrtg-3
mrtg-4

The Multi Router Traffic Grapher (MRTG) is a tool to monitor the traffic load on network links. MRTG generates HTML pages containing PNG images which provide a LIVE visual representation of this traffic.MRTG is not limited to monitoring traffic, though. It is possible to monitor any SNMP variable you choose. You can even use an external program to gather the data which should be monitored via MRTG. People are using MRTG, to monitor things such as System Load, Login Sessions, and about anything . MRTG even allows you to accumulate two or more data sources into a single graph. I have used MRTG to monitor everything on my network, whether its a switch, router, ports, isa server counters, windows counters, linux counters, harddrive space monitoring, etc etc.


I HAVE PASTED THE SAMPLE WORKING CFG FILES AT THE END. JUST FOR REFERENCE.

Now we will move on to howto install MRTG. If you have Freshly installed UBUNTU , You need to install Web Server (apache2)

apt-get install apache2

Now we will install MRTG

apt-get install mrtg

(Choose Yes to continue)

Now we will install SNMP Server and other SNMP utilities so that web can collect information for localhost and remote pcs via snmp.

apt-get install snmp snmpd

Now set your community string in /etc/snmp/snmpd.conf , Remove all Lines and add the following line only.

nano /etc/snmp/snmpd.conf

rocommunity public
syslocation "Karachi NOC, Paksitan"
syscontact  aacable@hotmail.com

Save and exit.

now edit /etc/default/snmpd

nano /etc/default/snmpd

and change following

# snmpd options (use syslog, close stdin/out/err).
SNMPDOPTS='-Lsd -Lf /dev/null -u snmp -I -smux -p /var/run/snmpd.pid'

To THIS:

# snmpd options (use syslog, close stdin/out/err).
# SNMPDOPTS='-Lsd -Lf /dev/null -u snmp -I -smux -p /var/run/snmpd.pid '
SNMPDOPTS='-Lsd -Lf /dev/null -u snmp -I -smux -p /var/run/snmpd.pid -c /etc/snmp/snmpd.conf'

and restart snmpd

/etc/init.d/snmpd restart

OR

service snmpd restart

If you want to have MIBS, use following

Now download MIBs (which will be used to query counters by name)

sudo apt-get install snmp-mibs-downloader

Copy all mibs in any single folder like /cfg/mibs/

mkdir /cfg
mkdir /cfg/mibs
cp /var/lib/mibs/ietf/* /cfg/mibs

NOTE: Make sure you remove .txt or add .txt in every mib , and use the name in mrtg.cfg accordingly. This is required if you want to use names instead of numeric values 😀

This was the issue for which I was stuck for many hours 😦

E.g:
#LoadMIBs: /cfg/mibs/UCD-SNMP-MIB

OR following if files are in .txt, then use following
#LoadMIBs: /cfg/mibs/HOST-RESOURCES-MIB.txt

Testing SNMP Service for localhost.

Now snmp service have been installed, its better to do a snmpwalk test from localhost or another remote host to verify our new configuration is responding correctly. issue the following command from localhost terminal.

snmpwalk -v 1 -c public 127.0.0.1


and you will see lot of oids and information which confirms that snmp service is installed and responding OK.

Adding MRTG to crontab to run after very 5 minutes

If already not added in /etc/cron.d/ folder, then you can add it manually in crontab

crontab -e

(if it asks for preferred text editor, go with nano, its much easier)

now add following line (Make sure to adjust /etc/mrtg.cfg location,

*/5 * * * * env LANG=C mrtg /etc/mrtg.cfg --logging /var/log/mrtg.log


Some tips for INDEX MAKER and running MRTG manually …

Following is the command to create CFG file for remote pc.

cfgmaker public@192.168.100.1 > test.cfg

Following is the command to check remote pc snmp info

snmpwalk -v 1 -c public 192.168.100.1

Following is the command to create index page for your cfg file.

indexmaker /etc/mrtg.cfg -output /var/www/mrtg/index.html -columns=2

Following is the command to run MRTG to create your graph file.

env LANG=C mrtg /etc/mrtg.cfg


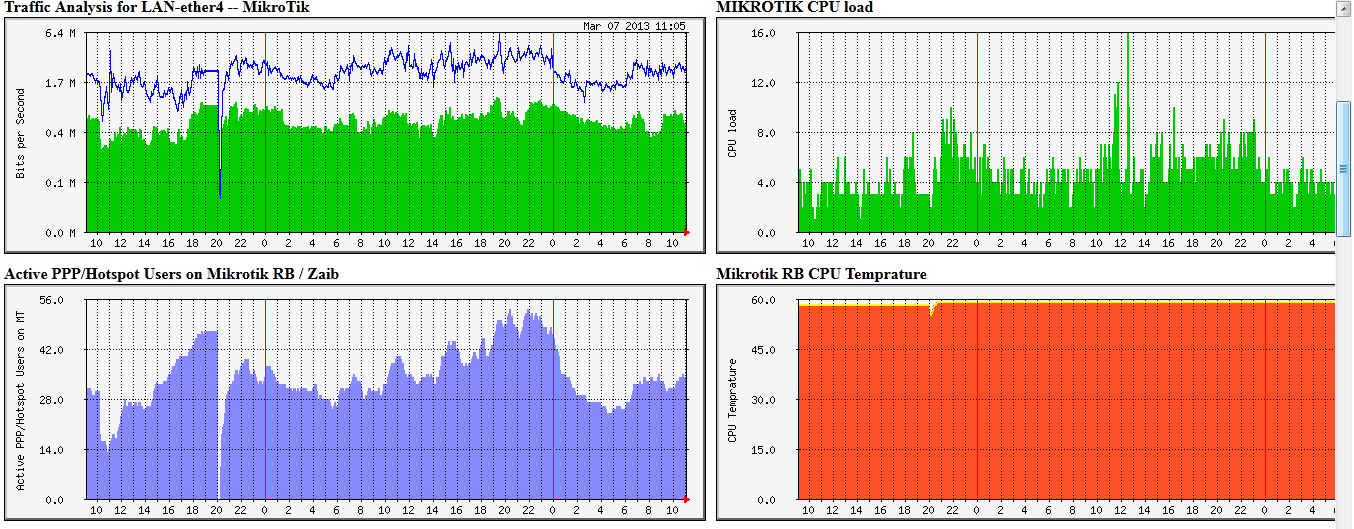
MIKROTIK WORKING CFG EXAMPLES FOR MRTG , JUST FOR REFERENCE

You can create graphs for about any thing you like. Its really powerful and I always prefer MRTG over other easy applications like CACTI or others. You can modify it as you like.

I will add more MRTG details on howto monitor linux / Microsoft / MIKROTIK soon.
MRTG WORKING CFG EXAMPLES, JUST FOR REFERENCE

#########################
# START OF /etc/mrtg.cfg#
#########################
# AUthor: Syed Jahanzaib
# Email : aacable@hotmail.com
# Web : https://aacable.wordpress.com

WorkDir:/var/www/mrtg
Options[_]: growright,nobanner,logscale,pngdate,bits
Options[^]: growright,nobanner,logscale,pngdate,bits
XSize[_]: 600
YSize[_]: 200
EnableIPv6: no
RunAsDaemon: no
Interval: 5
#Logformat: rrdtool
#Use MIBS as per your local config
LoadMIBs: /cfg/mibs/HOST-RESOURCES-MIB /cfg/mibs/IF-MIB /cfg/mibs/UCD-SNMP-MIB
PageFoot[^]: Page managed by SYED JAHANZAIB
AddHead[_]:   
Background[_]: #F6F1EE

# Change it as required , it means mrtg will read following file and will create graphs based on its contents

Include: /cfg/lanwan.cfg
Include: /cfg/mt.cfg
Include: /cfg/radius.cfg
Include: /cfg/ping.cfg
Include: /cfg/vlan.cfg

#########################
# END OF /etc/mrtg.cfg #
#########################


Following cfg will query memory and disk space by MIB name, its easier to query via mib name, rather then long OID number.


to get the last number of OID (which nee to be replace for almost every different system, use following command)

To get DISK LAST OID number

snmpwalk -v1 -c public 192.168.100.1 -m /cfg/mibs/HOST-RESOURCES-MIB |grep hrStorageDescr

HOST-RESOURCES-MIB::hrStorageDescr.1 = STRING: Physical memory
HOST-RESOURCES-MIB::hrStorageDescr.3 = STRING: Virtual memory
HOST-RESOURCES-MIB::hrStorageDescr.6 = STRING: Memory buffers
HOST-RESOURCES-MIB::hrStorageDescr.7 = STRING: Cached memory
HOST-RESOURCES-MIB::hrStorageDescr.8 = STRING: Shared memory
HOST-RESOURCES-MIB::hrStorageDescr.10 = STRING: Swap space
HOST-RESOURCES-MIB::hrStorageDescr.31 = STRING: /
HOST-RESOURCES-MIB::hrStorageDescr.32 = STRING: /sys/fs/fuse/connections
HOST-RESOURCES-MIB::hrStorageDescr.33 = STRING: /dev
HOST-RESOURCES-MIB::hrSWRunParameters.29273 = STRING: "--color=auto hrStorageDescr"
root@ubuntu:/cfg#

Now look for / , which have hrStorageDescr.31 , so the disk oid  we need to query is .31

and for memory use following

snmpwalk -v1 -c gt 192.168.100.1 -m /cfg/mibs/HOST-RESOURCES-MIB |grep memory

# and you will get following results...

HOST-RESOURCES-MIB::hrStorageDescr.1 = STRING: Physical memory

as can see .1 is the memory index key that you need to use in thw following


# Start of other CFG files


# disk space monitoring for / partition. you can query it via snmpwalk
Target[linux_server]: ( hrStorageUsed.31&amp;hrStorageUsed.31:public@192.168.100.1 ) * 100 / ( hrStorageSize.31&amp;hrStorageSize.31:public@192.168.100.1 )
Title[linux_server]: Disk usage for Radius Manager Linux Server
PageTop[linux_server]: <H1> Disk usage for Radius Manager Linux Server </H1>
MaxBytes[linux_server]: 100
ShortLegend[linux_server]: %
YLegend[linux_server]: % of RM_DISK
Legend1[linux_server]: Used RM_DISK
LegendI[linux_server]: Used :
LegendO[linux_server]:
Options[linux_server]: nopercent, gauge, integer
Unscaled[linux_server]: ymwd

#Percent of memory used
Target[radius_server_mem_ram]: ( hrStorageUsed.1&amp;hrStorageUsed.1:public@192.168.100.1) * 100 / ( hrStorageSize.1&amp;hrStorageSize.1:public@192.168.100.1)
Title[radius_server_mem_ram]: Memory usage for Radius Server
PageTop[radius_server_mem_ram]: <H1> Memory usage for Radius Server </H1>
MaxBytes[radius_server_mem_ram]: 100
ShortLegend[radius_server_mem_ram]: %
YLegend[radius_server_mem_ram]: % of Memory
Legend1[radius_server_mem_ram]: Used Memory
LegendI[radius_server_mem_ram]: Used :
LegendO[radius_server_mem_ram]:
Options[radius_server_mem_ram]: nopercent, gauge, integer, growright
Unscaled[radius_server_mem_ram]: ymwd

PING GRAPHS SCRIPTS

### ping.cfg
# 192.168.100.2 MIKROTIK NAS SERVERPING GRAPH
Title[mikrotik.ping]: MIKROTIK NAS SERVER PING RTT / Pkt LOSS Report
PageTop[mikrotik.ping]: <H1>MIKROTIK NAS SERVER PING RTT / Pkt LOSS Report</H1>
Target[mikrotik.ping]: `/cfg/norping.sh 192.168.100.2`
Colours[mikrotik.ping]: R#f75712,G#04bf27,G#70ff53,R#70ff53
MaxBytes[mikrotik.ping]: 100
AbsMax[mikrotik.ping]: 100
Options[mikrotik.ping]: growright,nopercent,gauge
LegendI[mikrotik.ping]: Pkt LOSS
LegendO[mikrotik.ping]: Active Round Trip Time
YLegend[mikrotik.ping]: RTT
Legend1[mikrotik.ping]: Pkt LOSS
Legend2[mikrotik.ping]: Active RTT

# Google PING GRAPH
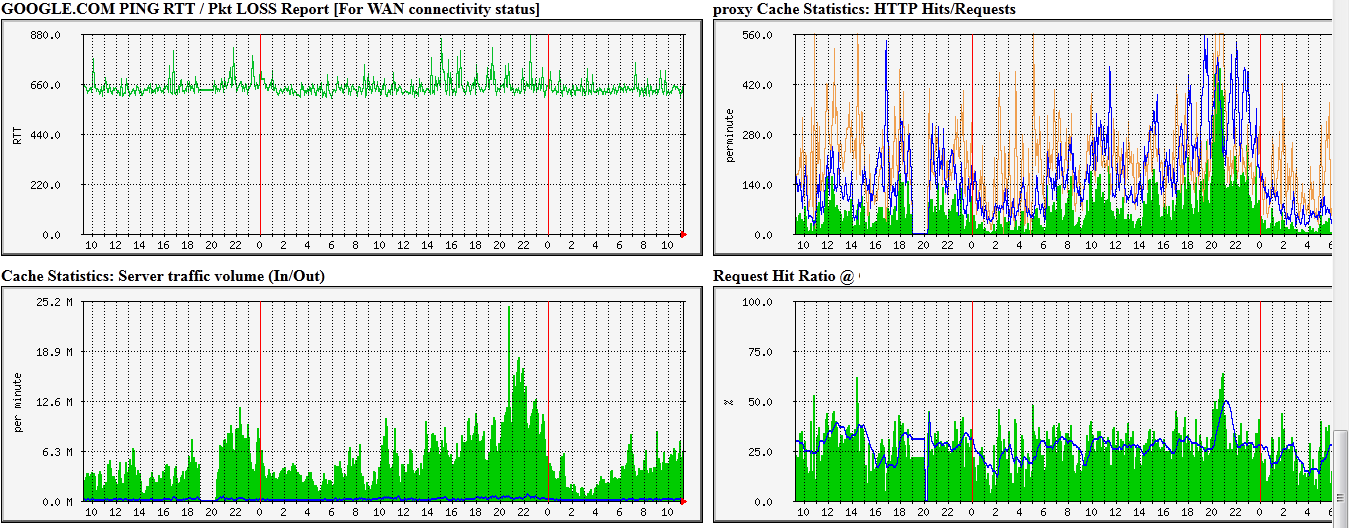
Title[google.ping]: GOOGLE.COM PING RTT / Pkt LOSS Report
PageTop[google.ping]: <H1>GOOGLE.COM PING RTT / Pkt LOSS Report</H1>
Target[google.ping]: `/cfg/norping.sh google.com`
Colours[google.ping]: R#f75712,G#04bf27,G#70ff53,R#70ff53
MaxBytes[google.ping]: 1000
AbsMax[google.ping]: 1000
Options[google.ping]: growright,nopercent,gauge
LegendI[google.ping]: Pkt LOSS
LegendO[google.ping]: Active Round Trip Time
YLegend[google.ping]: RTT
Legend1[google.ping]: Pkt LOSS
Legend2[google.ping]: Active RTT

### ping.cfg
# 192.168.100.10 GT MAIN SWITCH PING GRAPH
Title[gtsw-core.ping]: GT CORE SWITCH PING GRAPH PING RTT / Pkt LOSS Report
PageTop[gtsw-core.ping]: <H1>GT CORE SWITCH PING RTT / Pkt LOSS Report</H1>
Target[gtsw-core.ping]: `/cfg/norping.sh 192.168.100.10`
Colours[gtsw-core.ping]: R#f75712,G#04bf27,G#70ff53,R#70ff53
MaxBytes[gtsw-core.ping]: 100
AbsMax[gtsw-core.ping]: 100
Options[gtsw-core.ping]: growright,nopercent,gauge
LegendI[gtsw-core.ping]: Pkt LOSS
LegendO[gtsw-core.ping]: Active Round Trip Time
YLegend[gtsw-core.ping]: RTT
Legend1[gtsw-core.ping]: Pkt LOSS
Legend2[gtsw-core.ping]: Active RTT


scripts for ping

norping.cfg (for normal ping for wan)

#!/bin/bash
HOST=$1
ping -c 3 $HOST > /dev/null
DATA=`ping -c 3 $1 -q `
if [ $? -eq 0 ]
then
echo "0"
echo $DATA | awk -F/ '{print $6 }'
else
echo "100
0"
fi

MYSQL Database size monitoring in MRTG using bash script

1# Bash file to output DB Size for mysql hosted locally on same server.

#!/bin/bash
# Script to query mysql stats
#set -x
HOST="127.0.0.1"
USER="root"
PASS="MYSQLPASS"
DB="radius"
CMD=`mysql -u$USER -pMYSQLPASS --skip-column-names -e "SELECT table_schema "radius", sum(data_length + index_length) FROM information_schema.TABLES WHERE table_schema='radius' GROUP BY table_schema;"`
F=`echo $CMD | cut -f1 -d"." | sed 's/[^0-9]*//g'`
echo $F
echo $F

2# Bash file to output DB Size for mysql hosted locally on REMOTE server using SSH key method.

#!/bin/bash
# Script to query mysql stats
#set -x
HOST="192.168.0.1"
USER="root"
PASS="PASS"
DB="radius"
PORT="55511"
CMD=`ssh -p $PORT $HOST mysql -uroot '-pMYSQLPASS' --skip-column-names -e '"SELECT' table_schema '"radius",' 'sum(data_length' + 'index_length)' FROM information_schema.TABLES WHERE 'table_schema='\''radius'\''' GROUP BY 'table_schema;"' | cut -f1 -d"." | sed 's/[^0-9]*//g'`
echo $CMD
echo $CMD


CFG Example:

Title[0.1_radius_db_size]: 192.168.0.1 - MYSQL RADIUS DB SIZE
Target[0.1_radius_db_size]: `/temp/qmysql.0.1.sh`
PageTop[0.1_radius_db_size]:
<h1>192.168.0.1 - MYSQL RADIUS DB SIZE</h1>
Kilo[0.1_radius_db_size]: 1024
MaxBytes[0.1_radius_db_size]: 10737418240
ShortLegend[0.1_radius_db_size]: B
YLegend[0.1_radius_db_size]: MB-or-GB
Legend1[0.1_radius_db_size]: Used
#Legend2[0.1_radius_db_size]: Total
LegendI[0.1_radius_db_size]: Used:
LegendO[0.1_radius_db_size]: Used:
Options[0.1_radius_db_size]: gauge,growright,nobanner,nopercent,integer,transparent,noo

Graph Example:

radius db


September 12, 2011

September 6, 2011

Mikrotik Voucher Template !

Filed under: Mikrotik Related — Tags: , , , , , , , — Syed Jahanzaib / Pinochio~:) @ 1:57 PM

It would be great If MIKROTIK adds feature in USER MANAGER (UM) of adding serial numbers with each ID, So that we can print voucher with serial numbers, and can search ids by corresponding serial number.

I have customized the following vouchers but unable to add serial number.
I am working on MS ACCESS program to import ids passwds from .CSV file ,
then print it using my customized templates and add serial number to each id and store it in its database to prevent Duplication, and also add search function by serial. I will publish it soon.

Voucher Display Sample I am currently using

Mikrotik Voucher Sample

HOWTO Use this template to Print Vouchers for Single or Batch Users !!

First login to your user manager e.g http://192.168.2.1/userman
Now to use the template, goto Settings / Templates and in ROW section box, select all and delete , now paste the complete template in this box. and click on SAVE button.

Now we will add Batch Users (Add Users in Bulk).
Goto Users / Add / Batch Users. Select your desired options and click on ADD.

Now we will Generate Voucher file to print. (html format)
(See Following Image)

Click on DOWNLOAD AS FILE and click Generate. It will then download the vouchers.html file and you can print it.

Following is the Template Code:

<html>
<head>
<meta http-equiv="Content-Language" content="en-us">
<meta http-equiv="Content-Type" content="text/html; charset=windows-1252">
<title>User Manager Voucher Page - By Syed Jahanzaib aacable@hotmail.com</title>
<meta name="description" content="User Manager Voucher Page - By Syed Jahanzaib aacable@hotmail.com">
<meta name="Microsoft Theme" content="none, default">
</head>

<body background="http://192.168.2.3/background_compass.gif" topmargin="5" leftmargin="5" style="background-attachment: fixed">

<table style="color: black; font-size: 11px;" border="2" align="left" width="286" height="300" cellspacing="0" cellpadding="0" id="table1"> <tr>
<td colspan="2" height="69">
<p align="center">
<font size="1">
<img border="0" src="http://192.168.2.3/nae.jpg" width="107" height="67"></font></p>
</td> </tr> <tr height="5px">
<td colspan="2">
<p align="center"><u><b><font color="#0000FF" size="3">Package:
%u_actualProfileName%</font></b></u></td></tr>
<tr>
<font size="2" face="Arial">
<td>
<p align="center"><font size="2" face="Arial Black">Price</font></td>   </font>   <td>
<p align="center"><font size="2" face="Arial Black" color="#FF0000">%u_moneyPaid%</font></td>
</tr>
<tr>
<td>
<font size="2" face="Arial Black">
<p align="center">Prepaid time:</td>   <td>
<p align="center"><font color="#FF0000" face="Arial Black" size="2"><b>%u_timeLeft%</b></font></td>
</tr>
<tr>   <td>
<font size="2" face="Arial Black">
<p align="center">Login:</td>   <td>
<p align="center"><font color="#FF0000"><b>
<font size="2" face="Arial Black">%u_username%</font></b></font></td>   </tr>
<tr>
<font size="2" face="Arial">
<td>
<p align="center"><font size="2" face="Arial Black">Password:</font></td>   <td>
<p align="center">
<font face="Arial Black" color="#FF0000"><b><font size="2">%u_password%</font></b></font></td>
</font>
</tr>
<tr height="20px">
<td colspan="2">
<p align="center"><b><u><font size="2" color="#0000FF">~ Howto Use
This Voucher ~</font></u><font color="#008000" size="2"><u><br>
</u></font></b><font size="2" color="#008000">Please open
<a href="http://ftp.local">http://ftp.local</a> and download <br>
aa-dialer.exe &amp; install it. After installation its icon will appear
on Desktop. Double click on it, and use the above mentioned ID and
Password&nbsp; to connect to the internet .<br>
</font><font size="2" face="Arial Black" color="#FF0000">This ID will
expire in 30 days after its first usage.</font><font size="2" color="#008000"><br>
</font><b><font size="2">Thank You For Choosing AA~Services</font></b></td></tr> <tr>
<td colspan="2" align="right" height="50">
<p align="center"><b><font size="1">AA Network Services</font></b><font size="1"><br>
Support : 92.333.3021909<br>
Email aacable@hotmail.com<br>
Web <a href="http://aacable.com">https://aacable.wordpress.com</a> </font></td> </tr> </table>

</body>
</html>

Note: I used 2 images, one is logo, second is background image, Both files are residing on the Local web server. You have to modify these links and files name to match according to your structure.

Regard’s

SYED JAHANZAIB

September 1, 2011

Howto create PPPoE Dialer Installer Package using Auto-iT !


~!~ Article by Syed Jahanzaib ~!~

UPDATED: March, 2017

https://aacable.wordpress.com/2017/03/20/c-pppoe-dialer-program-code/

OLD METHOD of autoit, may not work proeprly so use above mentioned link.

From past few months, I was searching for a method to create a pppoe dialer package installer which can automatically create a new pppoe connection for user,  but I was unable to find any simple method all over the internet. Like the one we can create VPN Dialer Installer Package using Windows 2003 utility called CMAK (Connection management administration kit to

I am basically a Networking type guy who is heavily involved in Microsoft / Linux + Mikrotik Environment and I have no background experience in any programming language , that’s why I asked many people for assistance , but none of any knew about it, and those who knew, didn’t wanted to share the code with general public.

So Finally I decided to do it in my old fashioned style using MS-DOS concepts and logic’s. Today after doing some goggling and thinking about possible solutions in my head, I was able to found a way on how-to do it with the help of a Application name ‘AUTO-IT ‘

Following is a guide on howto to do it in very simple few steps (xp/2000/2003 supported Only at a moment). Being a Linux Lover, I am publishing these codes under GPL (General Public License). You can modify it as per your requirements, redistribute it. Don’t forget to give credit if it helps you :~)

Remember it’s not a standard, neat and clean way but It’s very simple and it does the job nicely:)
[This script was made for Windows 2003/xp Only, I will post Windows Vista/Windows 7 script soon]

Here we go . . .

First of all you have to download ‘Auto-it‘ software from its website at

http://www.autoitscript.com/cgi-bin/getfile.pl?autoit3/autoit-v3-setup.exe

I used Latest version: v3.3.6.1, Do full installation of AutoiT.

After installation, launch it by  Goto Start / Programs / Autoit v3  and select SciTE Script Editor

Now an advance Notepad type windows will open, Just paste the following code in it.

(Note: FOR SOME REASONS, Sometimes CODE Does not displayed PROPERLY IN THIS BLOG, IF you face syntax errors,  you can copy the raw code from following location) http://pastebin.com/jSu5mHmg

#cs ----------------------------------------------------------------------------
AutoIt Version: 3.3.6.1
 Author:         SYED JAHANZAIB
 Email:          aacable@hotmail.com
 Web:            https://aacable.wordpress.com
 OS Supported:   Windows XP
 Script Function:
 Template AutoIt script. for PPPoE Dialer Installer
#ce ----------------------------------------------------------------------------
; Script Start - Add your code below here
#NoTrayIcon
 #compiler_icon=itlifesaver.ico
 #include <GUIConstants.au3>
$COMPANY_NAME = "AACABLE - DIALER SERVICE" ; name of the pppoe icon, friendly description
 $SERVICE_NAME = "aa" ; name of the pppoe service configured in NAS/Mikrotik
$DELAY = 200
 ; change this DELAY value to speedup or slow down the process,
 ;any range between 200-300 is better in my view, too fast will shatter things
;This is for showing your logo for 2 secs
 ;$destination = "C:\Program Files\AutoIt3\Examples\GUI\mslogo.jpg"
 ;SplashImageOn("Splash Screen", $destination,250,50)
 ;Sleep(2000)
 ;SplashOff()
$answer = MsgBox(4, "PPPOE Connection", "This script will create a PPPOE DIALER connection to " & $COMPANY_NAME & ", Ready?")
 If $answer = 7 Then
 Exit
 EndIf
; Prompt user for PPPOE login info
 $frmInformation = GUICreate("Enter Information", 287, 194, 193, 115)
 $lblUserName = GUICtrlCreateLabel("User Name:", 16, 40, 60, 17)
 $lblPassword = GUICtrlCreateLabel("Password:", 16, 80, 53, 17)
 $txtUserName = GUICtrlCreateInput("", 112, 40, 153, 21)
 Dim $ES_PASSWORD,$ES_AUTOHSCROLL
 $txtPassword = GUICtrlCreateInput("", 112, 80, 153, 21, BitOR($ES_PASSWORD,$ES_AUTOHSCROLL))
 $lblPassword2 = GUICtrlCreateLabel("Confirm Password:", 16, 120, 91, 17)
 $txtPassword2 = GUICtrlCreateInput("", 112, 120, 153, 21, BitOR($ES_PASSWORD,$ES_AUTOHSCROLL))
 $btnOK = GUICtrlCreateButton("&OK", 200, 160, 75, 25, 0)
 $lblInfo = GUICtrlCreateLabel("Enter your pppoe Login Information Below!", 48, 8, 196, 17)
 GUISetState(@SW_SHOW)
While 1
 $nMsg = GUIGetMsg()
 Switch $nMsg
 Case $btnOK
 If GUICtrlRead($txtPassword) <> GUICtrlRead($txtPassword2) Then
 MsgBox (16, "Error", "Passwords do not match! Try again.")
 Else
 $Username = GUICtrlRead($txtUsername)
 $Password = GUICtrlRead($txtPassword)
 ExitLoop
 EndIf
 Case $GUI_EVENT_CLOSE
 Exit
EndSwitch
 WEnd
 GUISetState(@SW_HIDE)
; Run Network Setup
 Run("control ncpa.cpl")
 WinWaitActive("Network Connections")
; Check if PPPOE dialer by same name already exists, since it'll break script later if Windows add's a number at the end of the name...
 $ControlID = ControlListView("Network Connections", "", "SysListView321", "FindItem", $COMPANY_NAME, "AACABLE - DIALER SERVICE")
 If $ControlID <> -1 Then
 $answer = MsgBox(4404, "Error", "Connection to " & $COMPANY_NAME & " already exists! Remove it and recreate it?")
 If $answer = 6 Then
 ControlListView("Network Connections", "", "SysListView321", "Select", $ControlID)
 Send("{DEL}")
 WinWaitActive("Confirm Connection Delete")
 Send("!y")
 Sleep($DELAY)
 Else
 MsgBox(16, "Exit", "Script stopped by user")
 Exit
 EndIf
 EndIf
; open new connection wizard from file menu
 Send("!f")
 Send("n")
 Sleep($DELAY)
; New Connection Wizard
 Sleep($DELAY)
 Send("!n")
 Sleep($DELAY)
; Choose Conncetion type
 Sleep($DELAY)
 Send("!n")
 Sleep($DELAY)
; setup connectoin manuall
 Send("!m")
 Sleep($DELAY)
 Send("!n")
 Sleep($DELAY)
; Connect using broadband connection with user name n passwd
 Send("!u")
 Sleep($DELAY)
 Send("!n")
 Sleep($DELAY)
; Send Your ISP Name
 Send($COMPANY_NAME)
 Send("!n")
 Sleep($DELAY)
;Donot send id password here, we will set it in End
 Send("!n")
 Sleep($DELAY)
; Wizard Complete, do we want a desktop shortcut?
 Send("!s")
 Sleep($DELAY)
 Send("{ENTER}")
WinWaitClose("New Connection Wizard")
WinWaitActive("Connect " & $COMPANY_NAME)
Send($Username)
 Send("{TAB}")
 Send($Password)
Sleep($DELAY)
Send("!s") ; save password...
Send("!a") ; for anyone who uses this computer, use "!n" for 'Me only'
Sleep($DELAY)
WinClose("Network Connections")
MsgBox(0, "Setup Complete", "Your Dialer have been installed , Click Connect to initiate dialing . . .")

Now Open File / Save and name it ‘aa-dialer-installer’

Now your script with source code is ready to be compiled in .EXE executable format so any user can install it like any other normal application.

Now Open Tools and click on ‘Compile’ and it will compile the script in .exe format and it will save it to the Desktop or whatever Path You have selected.

Now click on ‘aa-dialer-install.exe’ and it will install the pppoe dialer and place its shortcut on Desktop.

Any suggestions on improvements and enhancements / advancements are most welcome  and will be appreciable 🙂
Regrd’s
Syed Jahanzaib

August 29, 2011

Mikrotik 4 WAN Load Balancing using PCC with PPPoE Server / Complete Script !


3

Following is a complete script for Mikrotik to combine/load balance 4 DSL lines. This server is also acting as a PPPoE Server, therefore I have made some modifications in PCC Script.

For normal LB, read my article at https://aacable.wordpress.com/2011/06/04/mikrotik-4-wan-load-balance-pcc-complete-script-by-zaib/

In this example I used MikrotikT RB750 5 ports router. 4 ports were connected with four DSL Routers, and 5th port was connected with User LAN. Also don’t forget to rename the interface names accordingly. This script will also add pppoe server , one pppoe user, dhcp server, dns server and pcc.

In my personnel experience , If users request are directly hitting Mikrotik configured with PCC , then you will get good load balancing. Use src-address as classifier, this way you will get rid of problems like https/broken link, streaming issues etc. Load balancing using this PCC technique (src-address) will be effective and balanced approach when more and more connections (from clients) that occurred. I also recommend to use SQUID proxy server along with mikrotik , either parallel or in front or backend , for better response time and it will also increase good browsing experience to users.

If somehow you are not satisfied with the src-address approach,play with the PCC-Classifier, Try both addresses and ports as the classifier. While this will randomize things the most and in theory give you the most fair allocation of bandwidth, BUT there is also a good chance that it will break certain things like banking web sites and some forums. This is because often times a HTTP requests will generate several connections, so there is a chance that some requests may go out a different route than the initial one, and that will break secure web sites. For that reason I usually stick with src-address  for PCC load balancing.

Regard’s
Syed Jahanzaib
x-x-x-x-x-x-x-x-x-x–x-x-x-x-x-x-x-x-x-x–x-x-x-x-x-x-x-x-x-x–x-x-x-x-x-x-


/ip address
 add address=172.16.0.1/16 broadcast=172.16.255.255 comment="" disabled=no interface=Local network=172.16.0.0
 add address=192.168.1.2/24 broadcast=192.168.1.255 comment="" disabled=no interface=WAN1 network=192.168.1.0
 add address=192.168.2.2/24 broadcast=192.168.2.255 comment="" disabled=no interface=WAN2 network=192.168.2.0
 add address=192.168.3.2/24 broadcast=192.168.3.255 comment="" disabled=no interface=WAN3 network=192.168.3.0
 add address=192.168.4.2/24 broadcast=192.168.4.255 comment="" disabled=no interface=WAN4 network=192.168.4.0

/ip pool
 add name=dhcp_pool1 ranges=172.16.0.70-172.16.0.254
 add name=pppoe-users-pool ranges=10.0.0.1-10.0.0.255

/ip dhcp-server add address-pool=dhcp_pool1 authoritative=after-2sec-delay bootp-support=static disabled=no interface=Local lease-time=12h name="My DHCP Server"

/ip dhcp-server config
 set store-leases-disk=5m

/ip dhcp-server network
 add address=172.16.0.0/16 comment="" dns-server=172.16.0.1,221.132.112.8

/interface pppoe-server server
 add authentication=pap default-profile=default disabled=no interface=Local keepalive-timeout=10 max-mru=1480 max-mtu=1480 max-sessions=1 mrru=disabled one-session-per-host=yes service-name=aacable

/ppp profile add change-tcp-mss=default dns-server=172.16.0.1 local-address=172.16.0.1 name=pppoe-profile only-one=default remote-address=pppoe-users-pool use-compression=default use-encryption=default use-vj-compression=default

/ppp secret add caller-id=”" disabled=no limit-bytes-in=0 limit-bytes-out=0 name=zaib password=1234 profile=pppoe-profile routes=”" service=pppoe

/ip dns set allow-remote-requests=yes cache-max-ttl=1w cache-size=10000KiB max-udp-packet-size=512 servers=221.132.112.8,221.132.112.9

/ip firewall mangle
 add action=mark-connection chain=input comment="" disabled=no in-interface=WAN1 new-connection-mark=WAN1_conn passthrough=yes
 add action=mark-connection chain=input comment="" disabled=no in-interface=WAN2 new-connection-mark=WAN2_conn passthrough=yes
 add action=mark-connection chain=input comment="" disabled=no in-interface=WAN3 new-connection-mark=WAN3_conn passthrough=yes
 add action=mark-connection chain=input comment="" disabled=no in-interface=WAN4 new-connection-mark=WAN4_conn passthrough=yes

add action=mark-routing chain=output comment="" connection-mark=WAN1_conn disabled=no new-routing-mark=to_WAN1 passthrough=yes
 add action=mark-routing chain=output comment="" connection-mark=WAN2_conn disabled=no new-routing-mark=to_WAN2 passthrough=yes
 add action=mark-routing chain=output comment="" connection-mark=WAN3_conn disabled=no new-routing-mark=to_WAN3 passthrough=yes
 add action=mark-routing chain=output comment="" connection-mark=WAN4_conn disabled=no new-routing-mark=to_WAN4 passthrough=yes

add action=accept chain=prerouting comment="" disabled=no dst-address=192.168.1.0/24
 add action=accept chain=prerouting comment="" disabled=no dst-address=192.168.2.0/24
 add action=accept chain=prerouting comment="" disabled=no dst-address=192.168.3.0/24
 add action=accept chain=prerouting comment="" disabled=no dst-address=192.168.4.0/24

add action=mark-connection chain=prerouting comment="" disabled=no dst-address-type=!local new-connection-mark=WAN1_conn passthrough=yes per-connection-classifier=both-addresses-and-ports:4/0 src-address=10.0.0.1-10.0.0.255

add action=mark-connection chain=prerouting comment="" disabled=no dst-address-type=!local new-connection-mark=WAN2_conn passthrough=yes per-connection-classifier=both-addresses-and-ports:4/1 src-address=10.0.0.1-10.0.0.255

add action=mark-connection chain=prerouting comment="" disabled=no dst-address-type=!local new-connection-mark=WAN3_conn passthrough=yes per-connection-classifier=both-addresses-and-ports:4/2 src-address=10.0.0.1-10.0.0.255

add action=mark-connection chain=prerouting comment="" disabled=no dst-address-type=!local new-connection-mark=WAN4_conn passthrough=yes per-connection-classifier=both-addresses-and-ports:4/3 src-address=10.0.0.1-10.0.0.255

add action=mark-routing chain=prerouting comment="" connection-mark=WAN1_conn disabled=no new-routing-mark=to_WAN1 passthrough=yes
 add action=mark-routing chain=prerouting comment="" connection-mark=WAN2_conn disabled=no new-routing-mark=to_WAN2 passthrough=yes
 add action=mark-routing chain=prerouting comment="" connection-mark=WAN3_conn disabled=no new-routing-mark=to_WAN3 passthrough=yes
 add action=mark-routing chain=prerouting comment="" connection-mark=WAN4_conn disabled=no new-routing-mark=to_WAN4 passthrough=yes

/ip firewall nat
 add action=masquerade chain=srcnat comment="" disabled=no out-interface=WAN1 src-address=10.0.0.1-10.0.0.255
 add action=masquerade chain=srcnat comment="" disabled=no out-interface=WAN2 src-address=10.0.0.1-10.0.0.255
 add action=masquerade chain=srcnat comment="" disabled=no out-interface=WAN3 src-address=10.0.0.1-10.0.0.255
 add action=masquerade chain=srcnat comment="" disabled=no out-interface=WAN4 src-address=10.0.0.1-10.0.0.255

/ip route
 add check-gateway=ping disabled=no distance=1 dst-address=0.0.0.0/0 gateway=192.168.1.1 routing-mark=to_WAN1 scope=30 target-scope=10

add check-gateway=ping disabled=no distance=2 dst-address=0.0.0.0/0 gateway=192.168.2.1 routing-mark=to_WAN2 scope=30 target-scope=10

add check-gateway=ping disabled=no distance=3 dst-address=0.0.0.0/0 gateway=192.168.3.1 routing-mark=to_WAN3 scope=30 target-scope=10

add check-gateway=ping disabled=no distance=4 dst-address=0.0.0.0/0 gateway=192.168.4.1 routing-mark=to_WAN4 scope=30 target-scope=10

add check-gateway=ping disabled=no distance=1 dst-address=0.0.0.0/0 gateway=192.168.1.1 scope=30 target-scope=10

add check-gateway=ping comment="" disabled=no distance=2 dst-address=0.0.0.0/0 gateway=192.168.2.1 scope=30 target-scope=10

add check-gateway=ping comment="" disabled=no distance=3 dst-address=0.0.0.0/0 gateway=192.168.3.1 scope=30 target-scope=10

add check-gateway=ping comment="" disabled=no distance=4 dst-address=0.0.0.0/0 gateway=192.168.4.1 scope=30 target-scope=10

All Done ! Now Test the link by putting user load, the more multiple users load you put on it, the better Load Balance result you will get 🙂

PCC WITH HOTSPOT

If you wanna run PCC with HOTSPOT on same Mikrotik Server, Put this rule in place to stop the hotspot from processing people after they have signed into the network.

/ip firewall nat add action=accept chain=pre-hotspot disabled=no dst-address-type=!local hotspot=auth

PCC WITH UN-EQUAL WAN LINKS

If you have Un-Equal WAN Links, for example WAN,1,2,3 are of 4MB and WAN,4 is of 8 Mb, and you want to force MT to use WAN4 link more then other because of its capacity, Then you have to Add more PCC rules assigning the same two marks to a specific link i.e WAN4 , something like

Code:

add chain=prerouting dst-address-type=!local in-interface=Local per-connection-classifier=both-addresses-and-ports:4/0 action=mark-connection new-connection-mark=WAN1_conn passthrough=yes
add chain=prerouting dst-address-type=!local in-interface=Local per-connection-classifier=both-addresses-and-ports:4/1 action=mark-connection new-connection-mark=WAN2_conn passthrough=yes
add chain=prerouting dst-address-type=!local in-interface=Local per-connection-classifier=both-addresses-and-ports:4/2 action=mark-connection new-connection-mark=WAN3_conn passthrough=yes
add chain=prerouting dst-address-type=!local in-interface=Local per-connection-classifier=both-addresses-and-ports:4/3 action=mark-connection new-connection-mark=WAN4_conn passthrough=yes
add chain=prerouting dst-address-type=!local in-interface=Local per-connection-classifier=both-addresses-and-ports:4/4 action=mark-connection new-connection-mark=WAN4_conn passthrough=yes

٩(●̮̮̃•̃)۶   ZaiB   ٩(●̮̮̃•̃)۶


Another shortest script for 2 wan load balancing (modems are wan gateway)

Updated: 23-April-2018 on request of Hishami Ali, Syria,
~ by syed.jahanzaib

Scenario:

INTERFACES NAMES:
Local
WAN1
WAN2

IP POOLS:
LAN Pool: 192.168.88.0/24
PPPoE Pool: 172.16.50.0/24
WAN1 Pool: 192.16.1.0/24
WAN2 Pool: 192.168.2.0/24

/ip address
add address=192.168.88.1/24 broadcast=192.168.88.255 comment="" disabled=no interface=Local network=192.168.255.0
add address=192.168.1.2/24 broadcast=192.168.1.255 comment="" disabled=no interface=WAN1 network=192.168.1.0
add address=192.168.2.2/24 broadcast=192.168.2.255 comment="" disabled=no interface=WAN2 network=192.168.2.0

# adding firewall list for ease of use, so that we dont have to further modify all rules, we will just modify this part only- - by zaiB
# Change all as required
/ip firewall address-list
add address=172.16.50.1-172.16.50.255 list=allowed_users
add address=192.168.1.0/24 list=modems_gateway_ips_list
add address=192.168.2.0/24 list=modems_gateway_ips_list

# You may use below pool in pppoe profile, or change it as required
/ip pool
add name=pppoe_pool ranges=172.16.50.1-172.16.50.255

/ip firewall mangle
add action=accept chain=prerouting comment="ACCEPT MODEM DST IPS LIST - BY SYED JAHANZAIB" dst-address-list=modems_gateway_ips_list

# Adding Routing marks for WAN-1
add action=mark-routing chain=prerouting dst-address-type="" new-routing-mark=to_WAN1 passthrough=yes per-connection-classifier=both-addresses-and-ports:2/0 src-address-list=\
allowed_users src-address-type=!local

# Adding Routing marks for WAN-1
add action=mark-routing chain=prerouting dst-address-type="" new-routing-mark=to_WAN2 passthrough=yes per-connection-classifier=both-addresses-and-ports:2/0 src-address-list=\
allowed_users src-address-type=!local

# Default Masquerade / NAT Rule
/ip firewall nat
add action=masquerade chain=srcnat comment="ALLOW ONLY PPPOE INTERNET USERS LIST 172.16.50.1-172.16.50.255 - BY SYED JAHANZAIB" src-address-list=allowed_users

# Adding routes for marked packets
/ip route

add check-gateway=ping distance=1 gateway=192.168.1.1 routing-mark=to_WAN1
add check-gateway=ping distance=1 gateway=192.168.2.1 routing-mark=to_WAN2

# Adding Default Gateway for failed routes
add check-gateway=ping distance=1 gateway=192.168.1.1
add check-gateway=ping distance=2 gateway=192.168.2.1

Regard’s

August 20, 2011

CMAK Howto create VPN Dialer Installer Package Using Windows 2003 utility called CMAK !

Filed under: Microsoft Related, Mikrotik Related — Tags: , , , , , , , , , , , — Syed Jahanzaib / Pinochio~:) @ 3:17 PM

~!~ Howto Create VPN Dialer Installer Package ~!~

Consider if you have a VPN Server and over 100 clients in your area, you certainly do not want to visit every client one just to create dialer in order to connect to internet. Windows 2003 Server have builtin tool called CMAK (connection manager administration kit) , using this tool, you can create a vpn dialer installer package with pre configured settings of your network including your VPN serve IP , Your Customized logo on dialer, Support phone numbers etc, User just have to download it, and run it, it will install itself like any other ordinary program by clikcing on NEXT NEXT NEXT 🙂
simple isn’t it 😉

I have prepared a step by step screenshots guide on howto install CMAK and create dialer using this awesome tool (H) 😀

1) Step by step SLIDE-SHOW of Screenshots are as following

This slideshow requires JavaScript.

2) Step by step [static] Screenshots are as following

Regard’s

SYED JAHANZAIB

Older Posts »