Following is my personnel experience / Guide on Howto configure a mini ISP type Network using following scenario . . . .

.
.

Recently [Year 2010-2011] I was contacted by a friend who was really passionate in starting a mini–ISP type network setup for about 1000 users in the interior area of city. (soon it may expand up to 2000+ users). He asked my help to setup a scratch card base fully automatic system where user purchase scratch card, & using User self care portal web site, user may create his new ID or refresh his previous ID or change the service package according to the card package offers. I had previously setup this kind of scenario in a cable.net environment using Mikrotik built-in radius server called ‘User Manager’, but it have very limited basic features and all it can offer was a pre–paid type option and it doesn’t have many accounting features. So I thought I should give a try to more rich feature radius server and after a lot of googling i decided to go with (FREERADIUS base ) DMASOFTLAB RADIUS MANAGER.
A very famous radius billing linux base server with all the option that a mini-ISP would required at unbelievably low price.
The hardware that I have used for this setup.
*Main Mikrotik = v4.17 x86 / Xeon 3.6Ghz Dual / 2 GB Ram / WD 500 GB Sata Hdd , This MT is serving as a PPPoE Server + NAT + bandwidth shaping. It also redirects HTTP traffic to Proxy server.
* Mikrotik RB750 = Just for HOTSPOT to redirect users to self care portal.
(This can be done on Main MT also, but I prefer it this way)
* Radius Server = DMASoftlab RM v3.9 installed on Fedora v10 / Xeon 3.6Ghz Dual / 4 GB Ram / WD 500 GB x2 Sata Hdd
* SQUID PROXY GW = SQUID v2.7 on UBUNTU Karmic Koala v9.10 / Xeon 3.6Ghz Dual / 8 GB Ram / WD 500 GB x3 SATA HDD (2 HDD reserved for Cache), This server acts as a proxy + Gateway machine for the Mikrotik, It also do URL Filtering blocking ads, it also have ZPH enabled so content available in squid cache should be downloaded at full speed (without package limitation) at user end.
* Linux Transparent BRIDGE firewall + DHCP + DNS + MRTG + WEB Server on FEDORA V10 / Xeon 3.6Ghz Dual / 4 GB Ram / WD 500 GB SATA HDD, This server sits between Mikrotik and Users , filtering unwanted traffic, ports and do some other stuff like lightweight DNSMASQ DNS Server, DHCP server providing ips to users , Web Site with MRTG , Psychostats ranking system for Counter Strike Game, Server Monitoring Scripts and Alerts, PHPBB Forums for Users, and some other cool stuff. DNS+DHCP is hosted on this server to minimize load on main mikrotik machine, alos this machine filters unwanted traffic from passing by to main mikrotik.
In this setup , I have configured HOTSPOT on extra RB750 only to redirect user to my advertisement page, where he is informed that he is not logged in via dialer, either create / refresh his ID from RM User Self Care Portal, or if he already have an id, connect it via dialer. I don’t prefer HotSpot authentication due to various security reasons, mainly due to I had a very bad experience having HOTSPOT hit by ARP-POISONING and many virus flooder that requires default gateway.
When user first login , his PC MAC address is binded with his ID to prevent accessing it from different pcs. Multiple session of same ID is NOT allowed , I provide user with scratch card (with refill code) , which he can use to refill his account according to card amount/package from RM User self care portal. RM demo can be viewed at http://www.dmasoftlab.com/cont/radman
When users with pppoe dialer tries to connect to main Mikrotik, MT verifies its credentials by asking Radius Server for the account validity, if the ID is valid, user connects okay and can use internet , otherwise he gets disconnected. When the User account is expired, he still can login via dialer, but then he is redirect to my local web server page where he is informed that his account is expired and he should visit billing.local page to renew his account using the card.
Please find along with attachment is my Network Diagram (This was initially designed, I made few changes afterward, I removed FTP from MT DMZ to user subnet lan to avoid load on MT , I moved ftp OS from windows to Linux and integrate it with radius authentication using APACHE.
Some other entertainment services that I setup here were:
2 FTP Media Sharing Servers ( 4 TB of data ) based on Linux Apache with radius as back-end authentication
2 Live TV Channel streaming over LAN using VLC Media Player Broadcasting
1 Counter Strike 1.6 Dedicated Server with Psychostats Ranking System and adminmod/amxmod
1 Web Server (Ubunut) hosting site u-dear . com , an entertainment portal and hosting other features. It also features monitoring system with MRTG / SMS Alerts via attached Mobile.
About RM: Radius Manager uses a nice web interface for administering the users and the whole system (traffic accounting, tracking of online users, display statistics, maintenance ,account management etc.) and to add that DMASoftlab customer support guys (specially Mr. Viktor.K) have excellent support and respond instantly even to the dumbest of questions. It is real value for money especially for those who do not have big budgets.
We will distribute this article in following sections.
1) MIKROTIK ROUTEROS CONFIGURATION [x86 v4.17]
2) SQUID SERVER CONFIGURATION [using UBUNTU 9.1]
3) RADIUS MANGER CONFIGURATION [using FEDORA 10] + Adding Service Plans & Generating Refill Cards
4) LINUX TRANSPARENT FIREWALL BRIDGE CONFIGURATION [using FEDORA 10]
5) USER / CLIENT SIDE CONFIGURATION [using WINXP/WIN7]
I will focus only Radius Manager configuration here because it was a little tricky to setup at the first time, Rest of configs like mikrotik , squid and others are well descriebd in my other articles which i have mentioned in this post)
Now we will start from Mikrotik 🙂
1) MIKROTIK ROUTEROS CONFIGURATION [x86 v4.17]
In this scenario , Mikrotik have FOUR interface card. Description is as follows
1) LAN interface = Connected with user switch
2) WAN interface = Connected with ISP WAN
3) DMZ interface = Connected with FTP Server’s Switch or via Crossover cable if there is only single ftp server.
4) Proxy interface = Connected with SQUID PROXY Server via Crossover cable
For various reasons, I am not sharing exact Mikrotik Configuration. Just a basic modified version.
# apr/01/2006 02:35:02 by RouterOS 4.17
# software id =
#

/interface ethernet
set 0 arp=enabled auto-negotiation=yes cable-settings=default comment="" \
disable-running-check=yes disabled=no full-duplex=yes mac-address=\
00:0E:0C:06:7C:96 mtu=1500 name=lan speed=100Mbps
set 1 arp=enabled auto-negotiation=yes cable-settings=default comment="" \
disable-running-check=yes disabled=no full-duplex=yes mac-address=\
00:0E:0C:06:5B:BE mtu=1500 name=proxy speed=100Mbps
set 2 arp=enabled auto-negotiation=yes cable-settings=default comment="" \
disable-running-check=yes disabled=no full-duplex=yes mac-address=\
00:13:72:93:4B:C0 mtu=1500 name=wan speed=100Mbps
set 3 arp=enabled auto-negotiation=yes cable-settings=default comment="" \
disable-running-check=yes disabled=no full-duplex=yes mac-address=\
00:0E:0C:06:62:54 mtu=1500 name=dmz speed=100Mbps

# Setting IP Addresses for interfaces
/ip address
add address=10.10.0.1/8 broadcast=10.255.255.255 comment="" disabled=no \
interface=lan network=10.0.0.0
add address=111.1111.111.111/29 broadcast=111.1111.111.111 comment="" disabled=no \
interface=wan network=203.101.173.0
add address=192.168.20.1/24 broadcast=192.168.20.255 comment="" disabled=no \
interface=proxy network=192.168.20.0
add address=192.168.2.1/24 broadcast=192.168.2.255 comment="" disabled=no \
interface=dmz network=192.168.2.0

# Adding PPPoE Profile , Change DNS accordingly to your network
/ppp profile
set default change-tcp-mss=default comment="" dns-server=10.10.0.1 name=\
default only-one=default use-compression=default use-encryption=default \
use-vj-compression=default
add change-tcp-mss=default comment="" dns-server=192.168.20.2 local-address=\
10.10.0.1 name=ppoe-profile only-one=default remote-address=256k \
use-compression=default use-encryption=default use-vj-compression=default
set default-encryption change-tcp-mss=yes comment="" name=default-encryption \
only-one=default use-compression=default use-encryption=yes \
use-vj-compression=default

# Setting PPPoE Server configuration
/interface pppoe-server server
add authentication=pap default-profile=ppoe-profile disabled=no interface=lan \
keepalive-timeout=10 max-mru=1480 max-mtu=1480 max-sessions=1 mrru=\
disabled one-session-per-host=yes service-name=glassline1
add authentication=pap,chap,mschap1,mschap2 default-profile=ppoe-profile \
disabled=yes interface=lan keepalive-timeout=10 max-mru=1480 max-mtu=1480 \
max-sessions=1 mrru=disabled one-session-per-host=yes service-name=\
service1

# Setting DNS Server for LOCAL LAN users
/ip dns
set allow-remote-requests=yes cache-max-ttl=1w cache-size=250000KiB \
max-udp-packet-size=512 servers=221.132.112.8,8.8.8.8

# User gets ip from these pools as per there packages, Just to locate and for some record purpose.
/ip pool
add name=256k ranges=172.16.2.1-172.16.4.250
add name=512k ranges=172.16.5.1-172.16.7.250
add name=1mb ranges=172.16.8.1-172.16.9.250
add name=2mb ranges=172.16.10.1-172.16.10.250
add name=expired-pool ranges=172.16.99.1-172.16.101.250

/queue type
set default kind=pfifo name=default pfifo-limit=50
set ethernet-default kind=pfifo name=ethernet-default pfifo-limit=50
set wireless-default kind=sfq name=wireless-default sfq-allot=1514 \
sfq-perturb=5
set synchronous-default kind=red name=synchronous-default red-avg-packet=1000 \
red-burst=20 red-limit=60 red-max-threshold=50 red-min-threshold=10
set hotspot-default kind=sfq name=hotspot-default sfq-allot=1514 sfq-perturb=\
5
add kind=sfq name=exempt sfq-allot=1514 sfq-perturb=5
set default-small kind=pfifo name=default-small pfifo-limit=10

# Unlimited Speed for CACHE content to be delivered to users at LAN speed regardless of there pcakge.
/queue simple
add burst-limit=0/0 burst-threshold=0/0 burst-time=0s/0s comment="" \
direction=both disabled=no dst-address=0.0.0.0/0 interface=all limit-at=\
0/0 max-limit=0/0 name=Proxy-HITTING packet-marks=proxy-hit parent=none \
priority=1 queue=default-small/default-small total-queue=default-small

## Unlimited Speed for CACHE content to be delivered to users at LAN speed regardless of there pcakge.
## Unlimited Speed for FTP SERVER's in DMZ
/queue tree
add burst-limit=0 burst-threshold=0 burst-time=0s disabled=no limit-at=0 \
max-limit=1G name=CACHE-HIT packet-mark=proxy-hit parent=global-out \
priority=1 queue=default
add burst-limit=0 burst-threshold=0 burst-time=0s disabled=no limit-at=0 \
max-limit=1G name=pmark packet-mark=proxy-hit parent=global-out priority=\
1 queue=default
add burst-limit=0 burst-threshold=0 burst-time=0s disabled=no limit-at=0 \
max-limit=1G name=exempt-up packet-mark=exempt-up parent=global-in \
priority=8 queue=exempt
add burst-limit=0 burst-threshold=0 burst-time=0s disabled=no limit-at=0 \
max-limit=1G name=exempt-down packet-mark=exempt-down parent=global-out \
priority=8 queue=exempt

# For SNMP Monitoring
/snmp
set contact=aacable@hotmail.com enabled=yes engine-boots=33 engine-id="" location="Glassline Nawabshah" time-window=15 \
trap-sink=0.0.0.0 trap-version=1
/snmp community
set secret_name address=0.0.0.0/0 authentication-password="" authentication-protocol=MD5 encryption-password="" \
encryption-protocol=DES name=gl read-access=yes security=none write-access=no

# Logging features, I used to have 14 lines, with all necessary info written to DISK for record purpose.
/system logging action
set memory memory-lines=100 memory-stop-on-full=no name=memory target=memory
set disk disk-file-count=14 disk-file-name=GLMT-log disk-lines-per-file=10000 disk-stop-on-full=no name=disk target=disk
set echo name=echo remember=no target=echo

/system logging
add action=memory disabled=no prefix="" topics=info,!firewall
add action=echo disabled=no prefix="" topics=error
add action=echo disabled=no prefix="" topics=warning
add action=echo disabled=no prefix="" topics=critical
add action=remote disabled=no prefix="" topics=firewall
add action=disk disabled=no prefix="" topics=pppoe,ppp,info
add action=disk disabled=no prefix="" topics=critical
add action=disk disabled=no prefix="" topics=system,info
add action=disk disabled=no prefix="" topics=pppoe,info

# Adding rules to block Virus and adding some security
/ip firewall filter
add action=reject chain=forward comment="" disabled=yes dst-address=\
!192.168.20.2 reject-with=icmp-admin-prohibited src-address=\
172.16.99.1-172.16.101.250
add action=accept chain=input comment="Accept established connections" \
connection-state=established disabled=no
add action=accept chain=input comment="Accept related connections" \
connection-state=related disabled=no
add action=drop chain=input comment="Drop invalid connections" \
connection-state=invalid disabled=no
add action=accept chain=input comment=UDP disabled=no protocol=udp
add action=drop chain=virus comment="Drop Blaster Worm" disabled=no dst-port=\
135-139 protocol=tcp
add action=drop chain=virus comment="Drop Messenger Worm" disabled=no \
dst-port=135-139 protocol=udp
add action=drop chain=virus comment="Drop Blaster Worm" disabled=no dst-port=\
445 protocol=tcp
add action=drop chain=virus comment="Drop Blaster Worm" disabled=no dst-port=\
445 protocol=udp
add action=add-src-to-address-list address-list="port scanners" \
address-list-timeout=2w chain=input comment="Port scanners to list " \
disabled=no protocol=tcp psd=21,3s,3,1
add action=add-src-to-address-list address-list="port scanners" \
address-list-timeout=2w chain=input comment="NMAP FIN Stealth scan" \
disabled=no protocol=tcp tcp-flags=fin,!syn,!rst,!psh,!ack,!urg
add action=add-src-to-address-list address-list="port scanners" \
address-list-timeout=2w chain=input comment="SYN/FIN scan" disabled=no \
protocol=tcp tcp-flags=fin,syn
add action=add-src-to-address-list address-list="port scanners" \
address-list-timeout=2w chain=input comment="SYN/RST scan" disabled=no \
protocol=tcp tcp-flags=syn,rst
add action=add-src-to-address-list address-list="port scanners" \
address-list-timeout=2w chain=input comment="FIN/PSH/URG scan" disabled=\
no protocol=tcp tcp-flags=fin,psh,urg,!syn,!rst,!ack
add action=add-src-to-address-list address-list="port scanners" \
address-list-timeout=2w chain=input comment="ALL/ALL scan" disabled=no \
protocol=tcp tcp-flags=fin,syn,rst,psh,ack,urg
add action=add-src-to-address-list address-list="port scanners" \
address-list-timeout=2w chain=input comment="NMAP NULL scan" disabled=no \
protocol=tcp tcp-flags=!fin,!syn,!rst,!psh,!ack,!urg
add action=drop chain=input comment="dropping port scanners" disabled=no \
src-address-list="port scanners"
add action=drop chain=input comment="drop ftp brute forcers" disabled=no \
dst-port=21 protocol=tcp src-address-list=ftp_blacklist
add action=drop chain=input comment="DROP PING REQUEST - SECURITY" disabled=\
no protocol=icmp
add action=accept chain=input comment="" disabled=no dst-port=\
21,22,23,80,443,8291 protocol=tcp src-address-list=management-servers
add action=drop chain=input comment="" disabled=yes dst-port=\
21,22,23,443,8291 protocol=tcp

# Marking various packets like http, cache content, ftp etc . . .
/ip firewall mangle
add action=mark-packet chain=prerouting comment=squid disabled=no dscp=12 \
new-packet-mark=proxy-hit passthrough=no
add action=mark-packet chain=postrouting comment="" disabled=no dscp=12 \
new-packet-mark=proxy-hit passthrough=no
add action=mark-routing chain=prerouting comment="" disabled=no dst-port=80 \
new-routing-mark=http passthrough=yes protocol=tcp
add action=mark-packet chain=prerouting comment="UNLIMITED SPEED FOR FTP" disabled=no dst-address=\
192.168.2.0/24 new-packet-mark=exempt-up passthrough=yes src-address=\
172.16.0.0/16
add action=mark-packet chain=postrouting comment="UNLIMITED SPEED FOR FTP" disabled=no dst-address=\
172.16.0.0/16 new-packet-mark=exempt-down passthrough=yes src-address=\
192.168.2.0/24

# NAT rule for pppoe users pool only
/ip firewall nat
add action=accept chain=srcnat comment="ACCEPT PORT 80 FOR ROUTING" disabled=no dst-port=80 protocol=tcp
add action=masquerade chain=srcnat comment="NAT FOR 172.16.0.0/16 SERIES" disabled=no out-interface=wan src-address=\
172.16.0.0/16

# Adding default route for HTTP to be routred to SQUID and all other traffic to Mikrotik WAN
# Also adding route for DMZ / FTP
/ip route
add comment="" disabled=no distance=1 dst-address=0.0.0.0/0 gateway=\
192.168.20.2 routing-mark=http scope=30 target-scope=10
add comment="" disabled=yes distance=1 dst-address=0.0.0.0/0 gateway=\
192.168.2.1 routing-mark=ftp scope=30 target-scope=10
add comment="" disabled=no distance=1 dst-address=0.0.0.0/0 gateway=\
111.1111.111.111 scope=30 target-scope=10

# Adding RADIUS SUPPORT
/ppp aaa
set accounting=yes interim-update=1m use-radius=yes

/radius
add accounting-backup=no accounting-port=1813 address=10.10.0.2 \
authentication-port=1812 called-id="" comment="" disabled=no domain="" \
realm="" secret=immiarro9 service=ppp timeout=2s

/radius incoming
set accept=yes port=1700
/system logging
add action=memory disabled=no prefix="" topics=info
add action=memory disabled=no prefix="" topics=error
add action=memory disabled=no prefix="" topics=warning
add action=echo disabled=no prefix="" topics=critical
add action=disk disabled=no prefix="" topics=info
add action=disk disabled=no prefix="" topics=warning
For General Mikrotik configuration, Please read the following post.
https://aacable.wordpress.com/2011/08/09/mikrotik-pppoe-server-with-user-manager-pre-paid-billing-system/
For User ip redirection to SQUID configuration in Mikrotik, Please read the following post.
https://aacable.wordpress.com/2011/07/21/mikrotik-howto-redirect-http-traffic-to-squid-with-original-source-client-ip/
For FTP queue exemption in Mikrotik, Please read the following post.
https://aacable.wordpress.com/2011/08/04/howto-exempt-rate-limit-for-ftp-server-behind-mt-dmz-in-placment-of-dynamic-queues/
2) SQUID SERVER CONFIGURATION [using UBUNTU 9.1 Karmic Koala]
SQUID Server have two lan cards.
One is connected with ISP WAN
Other is connected directly with Mikrotik with cross over cable.
I used the following script to share the basic internet. just copy all contents in any file , for example /etc/squid/fw.sh
and paste the following content in it.
#!/bin/sh
# ------------------------------------------------------------------------------------
# See URL: http://www.cyberciti.biz/tips/linux-setup-transparent-proxy-squid-howto.html
# (c) 2006, nixCraft under GNU/GPL v2.0+
# -------------------------------------------------------------------------------------
# squid server IP
SQUID_SERVER="192.168.20.2"
# Interface connected to Internet
INTERNET="eth1"
# Interface connected to LAN
LAN_IN="eth0"
# Squid port
SQUID_PORT="8080"

# DO NOT MODIFY BELOW
# Clean old firewall
iptables -F
iptables -X
iptables -t nat -F
iptables -t nat -X
iptables -t mangle -F
iptables -t mangle -X
# Load IPTABLES modules for NAT and IP conntrack support
modprobe ip_conntrack
modprobe ip_conntrack_ftp
# For win xp ftp client
modprobe ip_nat_ftp
echo 1 > /proc/sys/net/ipv4/ip_forward
# Setting default filter policy
#iptables -P INPUT DROP
iptables -P OUTPUT ACCEPT
# Unlimited access to loop back
iptables -A INPUT -i lo -j ACCEPT
iptables -A OUTPUT -o lo -j ACCEPT
# Allow UDP, DNS and Passive FTP
iptables -A INPUT -i $INTERNET -m state --state ESTABLISHED,RELATED -j ACCEPT
# set this system as a router for Rest of LAN
iptables --table nat --append POSTROUTING --out-interface $INTERNET -j MASQUERADE
iptables --append FORWARD --in-interface $LAN_IN -j ACCEPT
# unlimited access to LAN
iptables -A INPUT -i $LAN_IN -j ACCEPT
iptables -A OUTPUT -o $LAN_IN -j ACCEPT
# DNAT port 80 request comming from LAN systems to squid 8080 ($SQUID_PORT) aka transparent proxy
iptables -t nat -A PREROUTING -i $LAN_IN -p tcp --dport 80 -j DNAT --to $SQUID_SERVER:$SQUID_PORT
# if it is same system
iptables -t nat -A PREROUTING -i $INTERNET -p tcp --dport 80 -j REDIRECT --to-port $SQUID_PORT
# DROP everything and Log it
iptables -A INPUT -j LOG
#iptables -A INPUT -j DROP
route add -net 172.16.0.0 netmask 255.255.0.0 gw 192.168.20.1 dev eth0
route add -net 10.0.0.0 netmask 255.0.0.0 gw 192.168.20.1 dev eth0
The above script will share internet connection on this BOX. add it in /etc/rc.local so it may run every time system restarts.
For fine tunned squid.conf , I used the following modified version.
/etc/squid/squid.conf withe the following data.
# SQUID 2.7 CONFIG FILE
# By - Syed Jahanzaib</pre>
# Email: aacable@hotmail.com
# Web  : https://aacable.wordpress.com

# PORT and Transparent Option
http_port 8080 transparent
server_http11 on
icp_port 0

# Cache Directory , modify it according to your system.
# but first create directory in root by
# mkdir /cache1
# chown proxy:proxy /cache1
# [for ubuntu user is proxy, in Fedora user is SQUID]
# I have set 200 GB for caching, Adjust it according to your need.
# My recommendation is to have one cache_dir per drive. Syed Jahanzaib

store_dir_select_algorithm round-robin
cache_dir aufs /cache1 200000 16 256
#cache_dir ufs /mnt/hdd2/cache2 200000 16 256 # If you have secondary HDD
memory_replacement_policy heap GDSF
cache_replacement_policy heap GDSF

# If you want to enable DATE time n SQUID Logs,use following
emulate_httpd_log on
logformat squid %tl %6tr %>a %Ss/%03Hs %<st %rm %ru %un %Sh/%<A %mt
log_fqdn off

# How much days to keep users access web logs
# You need to rotate your log files with a cron job. For example:
# 0 0 * * * /usr/local/squid/bin/squid -k rotate
logfile_rotate 14
debug_options ALL,1
cache_access_log /var/log/squid/access.log
cache_log none
cache_store_log none

#acl adsites dstdomain url_regex "/etc/squid/adslist.txt"
#http_access deny adsites
#deny_info http://192.168.6.1/psb.htm adsites

#I used DNSAMSQ service for fast dns resolving
#so install by using "apt-get install dnsmasq" first
dns_nameservers 127.0.0.1 221.132.112.8
ftp_user anonymous@
ftp_list_width 32
ftp_passive on
ftp_sanitycheck on

#ACL Section mylan myacl
acl all src 0.0.0.0/0.0.0.0
#acl all src 192.168.50.0/255.255.255.0
#acl all2 src 10.0.0.0/255.0.0.0
acl manager proto cache_object
acl localhost src 127.0.0.1/255.255.255.255
acl to_localhost dst 127.0.0.0/8
acl SSL_ports port 443 563 # https, snews
acl SSL_ports port 873 # rsync
acl Safe_ports port 80 # http
acl Safe_ports port 21 # ftp
acl Safe_ports port 443 563 # https, snews
acl Safe_ports port 70 # gopher
acl Safe_ports port 210 # wais
acl Safe_ports port 1025-65535 # unregistered ports
acl Safe_ports port 280 # http-mgmt
acl Safe_ports port 488 # gss-http
acl Safe_ports port 591 # filemaker
acl Safe_ports port 777 # multiling http
acl Safe_ports port 631 # cups
acl Safe_ports port 873 # rsync
acl Safe_ports port 901 # SWAT
acl purge method PURGE
acl CONNECT method CONNECT
http_access allow manager all
http_access deny manager
http_access allow purge localhost
http_access deny purge
http_access deny !Safe_ports
http_access deny CONNECT !SSL_ports
http_access allow localhost
http_access allow all
#http_access allow all2
http_reply_access allow all
#http_reply_access allow all2
icp_access allow all

#==========================
# Administrative Parameters
#==========================

# I used UBUNTU so user is proxy, in FEDORA you may use use squid
cache_effective_user proxy
cache_effective_group proxy
cache_mgr SAJID
visible_hostname aacable.wordpress.com
unique_hostname aacable@hotmail.com

# Memory
cache_mem 8 MB
minimum_object_size 0 bytes
maximum_object_size 700 MB
maximum_object_size_in_memory 32 KB

tcp_outgoing_tos 0x30 all
zph_mode tos
zph_local 0x30
zph_parent 0
zph_option 136

acl store_rewrite_list urlpath_regex            \/(get_video|videoplayback\?id|videoplayback.*id)
acl store_rewrite_list urlpath_regex            \.(jp(e?g|e|2)|gif|png|tiff?|bmp|ico|flv|wmv|3gp|mp(4|3)|exe|msi|zip|on2|mar)\?
acl store_rewrite_list_domain url_regex         ^http:\/\/([a-zA-Z-]+[0-9-]+)\.[A-Za-z]*\.[A-Za-z]*
acl store_rewrite_list_domain url_regex         (([a-z]{1,2}[0-9]{1,3})|([0-9]{1,3}[a-z]{1,2}))\.[a-z]*[0-9]?\.[a-z]{3}
acl store_rewrite_list_path urlpath_regex       \.(jp(e?g|e|2)|gif|png|tiff?|bmp|ico|flv|avc|zip|mp3|3gp|rar|on2|mar|exe)$
acl store_rewrite_list_domain_CDN url_regex     \.rapidshare\.com.*\/[0-9]*\/.*\/[^\/]* ^http:\/\/(www\.ziddu\.com.*\.[^\/]{3,4})\/(.*) \.doubleclick\.net.*
acl store_rewrite_list_domain_CDN url_regex     ^http:\/\/[.a-z0-9]*\.photobucket\.com.*\.[a-z]{3}$ quantserve\.com
acl store_rewrite_list_domain_CDN url_regex     ^http:\/\/[a-z]+[0-9]\.google\.co(m|\.id)
acl store_rewrite_list_domain_CDN url_regex     ^http:\/\/\.www[0-9][0-9]\.indowebster\.com\/(.*)(rar|zip|flv|wm(a|v)|3gp|mp(4|3)|exe|msi|avi|(mp(e?g|a|e|1|2|3|4))|cab|exe)
acl dontrewrite url_regex redbot\.org \.php
acl getmethod method GET

storeurl_access deny dontrewrite
storeurl_access deny !getmethod
storeurl_access allow store_rewrite_list_domain_CDN
storeurl_access allow store_rewrite_list
storeurl_access allow store_rewrite_list_domain
storeurl_access allow store_rewrite_list_path
storeurl_access deny all
# First add storeurl.pl to enable below, see my other guides
# e.g: https://aacable.wordpress.com/2012/01/19/youtube-caching-with-squid-2-7-using-storeurl-pl/
#storeurl_rewrite_program /etc/squid/storeurl.pl
#storeurl_rewrite_children 7
#storeurl_rewrite_concurrency 0

##
refresh_pattern -i \.htm 120 50% 10080 reload-into-ims
refresh_pattern -i \.html 120 50% 10080 reload-into-ims
refresh_pattern ^http://*.facebook.com/* 720 100% 4320
refresh_pattern ^http://mail.yahoo.com/.* 720 100% 4320
refresh_pattern ^http://*.yahoo.*/.* 720 100% 4320
refresh_pattern ^http://*.yimg.*/.* 720 100% 4320
refresh_pattern ^http://*.gmail.*/.* 720 100% 4320
refresh_pattern ^http://*.google.*/.* 720 100% 4320
refresh_pattern ^http://*.kaskus.*/.* 720 100% 4320
refresh_pattern ^http://*.googlesyndication.*/.* 720 100% 4320
refresh_pattern ^http://*.plasa.*/.* 720 100% 4320
refresh_pattern ^http://*.telkom.*/.* 720 100% 4320
##

# 1 year = 525600 mins, 1 month = 43800 mins
refresh_pattern imeem.*\.flv  0 0% 0     override-lastmod override-expire
refresh_pattern \.rapidshare.*\/[0-9]*\/.*\/[^\/]*   161280    90%    161280 ignore-reload

refresh_pattern (get_video\?|videoplayback\?|videodownload\?|\.flv?)    10800 80% 10800 ignore-no-cache  ignore-private override-expire override-lastmod reload-into-ims
refresh_pattern (get_video\?|videoplayback\?id|videoplayback.*id|videodownload\?|\.flv?)    10800 80% 10800 ignore-no-cache  ignore-private override-expire override-lastmod reload-into-ims
#refresh_pattern -i (get_video\?|videoplayback\?id|videoplayback.*id||videodownload\?|\.flv?)       10800 80% 10800 ignore-no-cache  ignore-private override-expire override-lastmod reload-into-ims
refresh_pattern \.(ico|video-stats) 10800 80% 10800    override-expire ignore-reload ignore-no-cache  ignore-private ignore-auth override-lastmod  negative-ttl=10080
refresh_pattern \.etology\?                       10800 80% 10800    override-expire ignore-reload ignore-no-cache
refresh_pattern galleries\.video(\?|sz)               10800 80% 10800    override-expire ignore-reload ignore-no-cache
refresh_pattern brazzers\?                       10800 80% 10800    override-expire ignore-reload ignore-no-cache
refresh_pattern \.adtology\?                      10800 80% 10800    override-expire ignore-reload ignore-no-cache
refresh_pattern ^.*(utm\.gif|ads\?|rmxads\.com|ad\.z5x\.net|bh\.contextweb\.com|bstats\.adbrite\.com|a1\.interclick\.com|ad\.trafficmp\.com|ads\.cubics\.com|ad\.xtendmedia\.com|\.googlesyndication\.com|advertising\.com|yieldmanager|game-advertising\.com|pixel\.quantserve\.com|adperium\.com|doubleclick\.net|adserving\.cpxinteractive\.com|syndication\.com|media.fastclick.net).* 10800 20% 10800 ignore-no-cache  ignore-private override-expire ignore-reload ignore-auth   negative-ttl=40320 max-stale=10
refresh_pattern ^.*safebrowsing.*google  10800 80% 10800 override-expire ignore-reload ignore-no-cache ignore-private ignore-auth  negative-ttl=10080
refresh_pattern ^http://((cbk|mt|khm|mlt)[0-9]?)\.google\.co(m|\.uk) 10800 80% 10800 override-expire ignore-reload   ignore-private  negative-ttl=10080
refresh_pattern ytimg\.com.*\.jpg                   10800 80% 10800    override-expire ignore-reload
refresh_pattern images\.friendster\.com.*\.(png|gif)           10800 80% 10800    override-expire ignore-reload
refresh_pattern garena\.com                                   10800 80% 10800     override-expire reload-into-ims
refresh_pattern photobucket.*\.(jp(e?g|e|2)|tiff?|bmp|gif|png)  10800 80% 10800     override-expire ignore-reload
refresh_pattern vid\.akm\.dailymotion\.com.*\.on2\?           10800 80% 10800 ignore-no-cache override-expire override-lastmod
refresh_pattern mediafire.com\/images.*\.(jp(e?g|e|2)|tiff?|bmp|gif|png)    10800 80% 10800 reload-into-ims override-expire ignore-private
refresh_pattern ^http:\/\/images|pics|thumbs[0-9]\.      10800 80% 10800 reload-into-ims ignore-no-cache  ignore-reload override-expire
refresh_pattern ^http:\/\/www.onemanga.com.*\/           10800 80% 10800 reload-into-ims ignore-no-cache  ignore-reload override-expire

# ANTI VIRUS
refresh_pattern guru.avg.com/.*\.(bin)                      10800 80% 10800 ignore-no-cache  ignore-reload  reload-into-ims
refresh_pattern (avgate|avira).*(idx|gz)$                           10800 80% 10800 ignore-no-cache  ignore-reload  reload-into-ims
refresh_pattern kaspersky.*\.avc$                                   10800 80% 10800 ignore-no-cache  ignore-reload  reload-into-ims
refresh_pattern kaspersky                                           10800 80% 10800 ignore-no-cache  ignore-reload  reload-into-ims
refresh_pattern update.nai.com/.*\.(gem|zip|mcs)                    10800 80% 10800 ignore-no-cache  ignore-reload  reload-into-ims
refresh_pattern ^http:\/\/liveupdate.symantecliveupdate.com.*\(zip)     10800 80% 10800 ignore-no-cache  ignore-reload  reload-into-ims

refresh_pattern windowsupdate.com/.*\.(cab|exe)             10800  80%  10800 ignore-no-cache  ignore-reload  reload-into-ims
refresh_pattern update.microsoft.com/.*\.(cab|exe)             10800  80%  10800 ignore-no-cache  ignore-reload  reload-into-ims
refresh_pattern download.microsoft.com/.*\.(cab|exe)             10800  80%  10800 ignore-no-cache  ignore-reload  reload-into-ims

#images facebook
refresh_pattern ((facebook.com)|(85.131.151.39)).*\.(jpg|png|gif)      10800 80% 10800 ignore-reload  override-expire ignore-no-cache
refresh_pattern -i \.fbcdn.net.*\.(jpg|gif|png|swf|mp3)                  10800 80% 10800 ignore-reload  override-expire ignore-no-cache
refresh_pattern  static\.ak\.fbcdn\.net*\.(jpg|gif|png)                  10800 80% 10800 ignore-reload  override-expire ignore-no-cache
refresh_pattern ^http:\/\/profile\.ak\.fbcdn.net*\.(jpg|gif|png)      10800 80% 10800 ignore-reload  override-expire ignore-no-cache

#banner IIX
refresh_pattern ^http:\/\/openx.*\.(jp(e?g|e|2)|gif|pn[pg]|swf|ico|css|tiff?) 10800 99999% 10800 reload-into-ims  ignore-reload override-expire ignore-no-cache
refresh_pattern ^http:\/\/ads(1|2|3).kompas.com.*\/           10800 99999% 10800 reload-into-ims  ignore-reload override-expire ignore-no-cache
refresh_pattern ^http:\/\/img.ads.kompas.com.*\/           10800 99999% 10800 reload-into-ims  ignore-reload override-expire ignore-no-cache
refresh_pattern .kompasimages.com.*\.(jpg|gif|png|swf)       10800 99999% 10800 reload-into-ims  ignore-reload override-expire ignore-no-cache
refresh_pattern ^http:\/\/openx.kompas.com.*\/           10800 99999% 10800 reload-into-ims  ignore-reload override-expire ignore-no-cache
refresh_pattern kaskus.\us.*\.(jp(e?g|e|2)|gif|png|swf)        10800 99999% 10800 reload-into-ims  ignore-reload override-expire ignore-no-cache
refresh_pattern ^http:\/\/img.kaskus.us.*\.(jpg|gif|png|swf)       10800 99999% 10800 reload-into-ims  ignore-reload override-expire ignore-no-cache

#IIX DOWNLOAD
refresh_pattern ^http:\/\/\.www[0-9][0-9]\.indowebster\.com\/(.*)(mp3|rar|zip|flv|wmv|3gp|mp(4|3)|exe|msi|zip) 10800 99999% 10800 reload-into-ims  ignore-reload override-expire ignore-no-cache    ignore-auth

#All File
refresh_pattern -i \.(3gp|7z|ace|asx|avi|bin|cab|dat|deb|divx|dvr-ms)      10800 80% 10800 ignore-no-cache  ignore-private override-expire override-lastmod reload-into-ims
refresh_pattern -i \.(rar|jar|gz|tgz|bz2|iso|m1v|m2(v|p)|mo(d|v))          10800 80% 10800 ignore-no-cache  ignore-private override-expire override-lastmod reload-into-ims
refresh_pattern -i \.(jp(e?g|e|2)|gif|pn[pg]|bm?|tiff?|ico|swf|css|js)     10800 80% 10800 ignore-no-cache  ignore-private override-expire override-lastmod reload-into-ims
refresh_pattern -i \.(mp(e?g|a|e|1|2|3|4)|mk(a|v)|ms(i|u|p)|og(x|v|a|g)|rar|rm|r(a|p)m|snd|vob|wav) 10800 80% 10800 ignore-no-cache ignore-private override-expire override-lastmod reload-into-ims
refresh_pattern -i \.(pp(s|t)|wax|wm(a|v)|wmx|wpl|zip|cb(r|z|t))     10800 80% 10800 ignore-no-cache ignore-private override-expire override-lastmod reload-into-ims

refresh_pattern (cgi-bin|\?)       0      0%      0
refresh_pattern ^gopher:    1440    0%    1440
refresh_pattern ^ftp:         10080     95%     10800 override-lastmod reload-into-ims
refresh_pattern         .     180     95% 10800 override-lastmod reload-into-ims

global_internal_static off
max_stale 10 years
retry_on_error on
buffered_logs on
read_ahead_gap 32 KB

header_access Accept-Encoding deny  all
client_persistent_connections off
server_persistent_connections on
half_closed_clients off
strip_query_terms off
quick_abort_min 0 KB
quick_abort_max 0 KB
quick_abort_pct 100
vary_ignore_expire on
reload_into_ims on
pipeline_prefetch on
read_timeout 30 minutes
client_lifetime 6 hours
negative_ttl 30 seconds
positive_dns_ttl 6 hours
negative_dns_ttl 60 seconds
pconn_timeout 15 seconds
request_timeout 1 minute
store_avg_object_size 13 KB
log_icp_queries off
ipcache_size 16384
ipcache_low 98
ipcache_high 99
log_fqdn off
fqdncache_size 16384
memory_pools off
forwarded_for on
client_db on
max_filedescriptors 8192
For Basic Internet Sharing on Linux , please read the following post.
https://aacable.wordpress.com/2011/06/01/linux-simple-internet-sharing-script/
For basic SQUID configuration , Please read the following post.
https://aacable.wordpress.com/2011/08/08/linux-transparent-squid-proxy-server-guide/
For fine tuned squid.conf, Please read the following post.
https://aacable.wordpress.com/2011/06/01/working-squid-conf-example-fil/
For ZPH configuration in squid, Please read the following post. (To deliver cache content to user in full lan speed, exempt cache content from queue)
https://aacable.wordpress.com/2011/07/21/mikrotik-with-squidzph-unlimited-speed-for-cache-content-traffic/
_______________________________________
3) RADIUS MANGER CONFIGURATION [using FEDORA 10] The Real Giant :p

MANAGER Version 3.9
INSTALLATION MANUAL © DMA Softlab LLC
This RM installation guide is a shorter version, copied from DMASOFTLAB RM original manual. I edited it and cut off all un-necessary paragraphs which are not required for basic installation and added some info of my personnel experience.
For RM Screenshot gallery, please visit following link.
http://www.dmasoftlab.com/cont/screenshots
This document describes the installation procedure of Radius Manager billing system on a Linux host using FEDORA 10. For beginners I recommend the usage of Fedora Core 10. Fedora Core is the easiest and the most comfortable Linux system for RM isntallation (Although I have tested in Ubuntu also, but still FED wins in few aspects) It comes with all required packages to install and run Radius Manager. The packages are available on the installation media and they are also down-loadable from the official online repositories using the Yum tool.
In this document You will also find guidelines on how to set up your NAS (mikrotik) to integrate with Radius Manager system.
To successfully install Radius Manager on your host, You have to complete the following steps:
1. Install ionCube runtime libraries
2. Build and configure FreeRadius server
3. Configure MySQL database and credentials
4. Install Radius Manager WEB components
5. Install Radius Manager binaries
6. Complete the post installation steps and fine tuning
INSTALLATION Prerequisites:
To successfully install and run Radius Manager, You need the following components installed on the Linux host, If they are not isntalled already, dont worrry 😉 we will install them in next step 😀
Software Requirements:
• FreeRadius 2.1.8 DMA mod 2 (downloadable from http://www.dmasoftlab.com)
• PHP 5 or better
• MySQL 5 or better
• MySQL development libraries
• php-mysql
• php-mcrypt
• curl, php-curl
• glibc 2.4 or better
• GNU C/C++ compiler
• IonCube runtime libraries. They are downloadable freely from http://www.ioncube.com and http://www.dmasoftlab.com
• Javascript enabled browser on running on client machines
Preparing the Linux system Fedora 10
Install the necessary components on your Linux host before You begin the installation of Radius Manager.
1. Disable SeLinux in /etc/sysconfig/selinux and reboot your host:
SELINUX=disabled
2. On Fedora Core 10 install the required packages in one step:
yum install make php php-mysql php-mcrypt mysql-devel mysql-server gcc libtool-ltdl
[ Note: This will download and install about 60-70 mb of packages depends on you FED installation. Be patience if you have slow internet connection ]
Installation procedure of ionCube runtime system
Radius Manager requires ionCube runtime libraries. You can download them from: http://www.dmasoftlab.com/downloads
Before installing ionCube, You have to know the following:
1. The architecture of your Linux system (32 or 64 bit) (usually 32bit pc is used in most cases, I will use 32bit only as example)
2. Which PHP version are You using (use php -v to view version info, hopefully you will get v5.2.9)
3. Where is your php.ini file located (On fedora its usually /etc/php.ini)
Example ionCube installation
1. First create a temp folder in root
mkdir /temp
 cd /temp
Now download ionCube by issuing following command
wget http://www.dmasoftlab.com/cont/download/ioncube_loaders_lin_x86.tar.gz
UNTAR the ionCube runtime libraries to /usr/ local/ioncube by using following command
tar zxvf ioncube_loaders_lin_x86.tar.gz
Now copy the ioncube foler to to /usr/ local/ioncube by using following command
cp /temp/ioncube/* /usr/local/ioncube/
2. Add the appropriate ionCube loader to your php.ini. You have to add the following line in /etc/php.ini
zend_extension=/usr/local/ioncube/ioncube_loader_lin_5.2.so
3. Test the ionCube loader from shell:
[root@localhost]# php -v

You have to see the ionCube PHP Loader version displayed correctly.

PHP 5.2.9 (cli) (built: Apr 17 2009 03:29:12)
 Copyright (c) 1997-2009 The PHP Group
 Zend Engine v2.2.0, Copyright (c) 1998-2009 Zend Technologies
 with the ionCube PHP Loader v3.3.14, Copyright (c) 2002-2010, by ionCube Ltd.
4. Restart the web server by following command:
sevice httpd restart
5. Run ifconfig command from shell to determine the MAC address of the network interface card (NIC):
[root@localhost]# ifconfig

eth0    Link encap:Ethernet  HWaddr 00:00:E8:EC:8A:E8
6. Now it’s time to request a license for your server. If this is first time, Ask support@dmasoftlab.com to grant you id passwrod for customer portal. after getting Id, Log on to DMA Softlab customer’s portal (https://customers.dmasoftlab.com) and request a trial license for the hardware address (MAC address) of your network interface card.
Radius Manager will run only on the specified host and the license is binding to the MAC address of the network interface card. You can migrate Radius Manager to another host if You also move the same network interface card with it.
It is strongly recommended to request a license for a removable networking interface to allow migration to new host without loosing the license.
7. When a license file is issued (You will get a notification about it in email), download and copy the lic.txt and mod.txt to radiusmanager web directory (read the “Installation procedure of Radius Manager” chapter of this manual) to enable licensing of your Radius Manager installation.
Troubleshooting the ionCube loader system
If encoded files fail to run, you can test ionCube runtime by using the helper PHP script ioncubeloader-helper.php, which is included in the loader download archive.
1. Copy the ioncube-encoded-file.php PHP script to your http root (on Redhat-based system it is /var/www/html).
2. Try to access the ioncube-encoded-file.php script using your favorite web browser:
http://yourhost/ioncube-encoded-file.php
3. If You can see the message “This file has been successfully decoded. ionCube Loaders are correctly installed”, it means You have successfully installed ionCube runtime on your host and it is ready to use. If You can’t decode the file via a HTTP call, check the php.ini and be sure SeLinux is disabled.
Installation procedure of FreeRadius
Follow the installation steps to successfully build, install and configure FreeRadius RADIUS server on your host. Use only FreeRadius 2.1.8 DMA mod 2 source archive (downloadable from our site). It is prepared and tested by our team and it is 100% compatible with Radius Manager.
Other versions and builds will not function properly with Radius Manager. If your host already has a different FreeRadius version installed, remove it completely including it’s configuration files (/etc/raddb or /usr/local/etc/raddb).
Execute the following actions as super user (root user):
1. Download FreeRadius archive in /temp folder from the following URL: http://www.dmasoftlab.com/downloads by issuing following command
cd /temp
 wget http://www.dmasoftlab.com/cont/download/freeradius-server-2.1.8-dmamod-2.tar.gz
2. Build FreeRadius server from sources. Do it in the following way. Ungzip and untar the FreeRadius archive:
gzip -d freeradius-server-2.1.8-dmamod-2.tar.gz
tar xvf freeradius-server-2.1.8-dmamod-2.tar
Create the makefile:
cd freeradius-server-2.1.8
./configure
 make
 make install
By default, FreeRadius will be installed in /usr/local directory.
3. Now You can test FreeRadius in debug mode. Start it with parameter -X
radiusd -X

Listening on authentication address * port 1812 Listening on accounting address * port 1813
 Listening on command file /usr/local/var/run/radiusd/radiusd.sock Listening on proxy address * port 1814

Ready to process requests.
It must answer with “Ready to process requests”.
If radiusd cannot find the required libraries, issue ldconfig from shell to refresh the ld linker’s cache.
ldconfig
4. Set the correct permissions on FreeRadius configuration files (Fedora):
chown apache /usr/local/etc/raddb
 chown apache /usr/local/etc/raddb/clients.conf
Radius Manager updates the clients.conf automatically, so it is necessary to set the correct permission on it. Do not modify the clients.conf by hand. Don’t forget to define all NASes in ACP with the correct secret and restart FreeRadius (from ACP or from shell) after modifying the NASes in the system.
5. Review and modify (if needed) the MySQL credentials in /usr/local/etc/raddb/sql.conf: by issuing following command
nano /usr/local/etc/raddb/sql.conf

# Connection info:
 server = “localhost” #port = 3306
 login = “radius”
 password = “radius123”
Creating MySQL databases with MySQL command line tool
If You are familiar with MySQL command line tool, You can create databases, users and permissions with it easily and much faster. First start MYSQL daemon via
service mysqld start
Now, Log on to MySQL server as root:
mysql -u root -ppassword
where password is the MySql root password. If there is no password for root, simply change it via
mysqladmin -u root password NEWPASSWORD
or if you want to change old password, issue this command
mysqladmin -u root -p’oldpassword’ password newpass
Execute the following statement from the MySQL command shell:
CREATE DATABASE radius;
 CREATE DATABASE conntrack;
 CREATE USER 'radius'@'localhost’ IDENTIFIED BY 'radius123';
 CREATE USER 'conntrack'@'localhost' IDENTIFIED BY 'conn123'; GRANT ALL ON radius.* TO radius@localhost;
 GRANT ALL ON conntrack.* TO conntrack@localhost;
 exit
Completing this step the databases are ready to use.
Installation procedure of Radius Manager
There are two methods of installation available:
1. Interactive, using the included installer script. (We will focus on this as its easier for newbie)
2. Manual installation, using Unix commands. (We will not discuss it as its already briefly described in RM Manual)
Interactive installation
The easiest way to install Radius Manager is to use the included install.sh script. It is located in Radius Manager tar archive and can be used on Redhat, Debian and (with slight modification of the environment) on other systems. Before You begin, be sure You have prepared the MySQL database tables and credentials. Radius Manager requires two databases:
1. RADIUS – for storing all system data, including users and accounting information.
2. CONNTRACK – for storing connection tracking system (CTS) data.
Create both databases even on a non-CTS enabled system.
Now download RM (radiusmanager-3.9.0.tgz) from dma customer portal in /temp folder. Now decompress the Radius Manager tarball using following command.
tar xf radiusmanager-3.9.0.tgz
 cd radiusmanager-3.9.0-rel-allpatches-1-5/
Now invoke the installer script, but first change its permission to 755. In the examples below we will use the installer script on Redhat / Fedora system.
chmod 755 install.sh

./install.sh

Radius Manager installer
 Copyright 2004-2011, DMA Softlab LLC All right reserved.
 (Use CTRL+C to abort any time)

Select the type of your operating system:
 1. Redhat (Fedora, CentOS etc.)
 2. Debian (Ubuntu etc.)
 Choose an option: [1]
Select the operating system You have. For Redhat, RHEL, CentOS, Fedora select option 1.
Now select the installation method:
Select installation type:

1. New installation
2. Upgrade old system
 Choose an option: [1]
For new installation, use option 1. You can see the default options after every question, so You can just press enter in most cases.
Choose an option: [1]
 Selected installation method: NEW INSTALLATION
 WWW root path: [/var/www/html]
Now define the HTTP root folder. The installer will create radiusmanager subfolder in it automatically. On Redhat You can simply press enter.
Now define the MySQL database credentials:
RADIUS database host: [localhost]
 RADIUS database username: [radius]
 RADIUS database password: [radius123]
 CTS database host: [localhost]
 CTS database username: [conntrack]
 CTS database password: [conn123]
For the default setup simply press enter and use MySQL user “radius” with password “radius123” for RADIUS database, and conntrack / conn123 for CONNTRACK database.
The host is “localhost” by default. If You have different setup, specify proper values. If You are planning to use the system with hundreds of online users, it is recommended to use separate database host for CONNTRACK database.
In the next step You have to define the FreeRadius user. It must be the correct user to set the permission properly on /etc/radiusmanager.cfg. If there are permission problems on /etc/radiusmanager.cfg, Radius Manager binaries will not function at all.
Freeradius UNIX user: [root]
On Fedora it is root, so simply press enter.
Now define the HTTP user (the user name under Apache is running). It is required to set the permission on files in radiusmanager/config directory. On Fedora it is the apache user.
Httpd UNIX user: [apache]
You can now decide to create rmpoller service or not? It is a standard Fedora / Debian compatible service script which invokes rmpoller helper. You can also start rmpoller using alternative ways.
Create rmpoller service: [y]
In most cases simply press enter. When a service has been created, You can use the command (on Fedora)
service rmpoller [start | stop]
to control rmpoller service activity. Also make this service auto starting at boot time together with FreeRadius. Use command chkconfig -add rmpoller on or use Webmin to activate the service at boot time.
In the next step select yes if You want to create the rmconntrack service. It is a standard Linux service, like rmpoller. It is required for Radius Manager CTS only.
Create rmconntrack service: [y]
When a service has been created, You can use the command
service rmconntrack [start | stop]
to control rmconntrack service activity. Also make this service auto starting at boot time.
It is strongly recommended to create a full database backup before You continue. Answer ‘yes’ to the following question:
Back up RADIUS database: [y]
Now the system warns You it will overwrite the existing databases if You continue. Press ‘y’ to continue or ‘n’ to abort the installation process.
WARNING! If You continue You will overwrite the existing RADIUS database!
 Are You sure to start the installation? [n]
 You can press Ctrl+C any time to abort the installation process.

Starting installation process...
 Backing up radiusmanager.cfg Backing up system_cfg.php Backing up netcash_cfg.php Backing up paypal_cfg.php Backing up authorizenet_cfg.php Backing up dps_cfg.php Backing up 2co_cfg.php
 Copying web content to /var/www/html/radiusmanager Copying binaries to /usr/local/bin
 Copying rootexec to /usr/local/sbin Copying radiusmanager.cfg to /etc
 Backing up RADIUS database... Creating mysql tables
 Creating rmpoller service
 Creating rmconntrack service
 Copying logrotate script
 Setting permission on raddb files
 Copying radiusd init script to /etc/init.d

Installation finished!
the installation process is finished, You can begin configuring the system with /etc/radiusmanager.cfg and radiusmanager/config files.
Add the following line to /etc/crontab to execute rmscheduler.php every day after midnight by issuing following command:
crontab -e
Now press i and add the the following entry.
02 0 * * * root /usr/bin/php /var/www/html/radiusmanager/rmscheduler.php 12345
Now press ESC button, now press SHIFT+: , now press wq
it will save the crontab and exit.
12345 is the default password, as it is defined in system_cfg.php. Always specify the full path of the PHP interpreter. If You are not sure, check it’s location before You add the crontab record. The password has to match the predefined one in system_cfg.php.
Now download the the license files (lic.txt and mod.txt) and copy them in in radiusmanager web folder
cp lic.txt /var/www/html/radiusmanager
 cp mod.txt /var/www/html/radiusmanager
Now Try to access the ACP (Administration Control Panel) by pointing your browser to http://localhost/radiusmanager/admin.php.
Reboot your system to check if helper services are starting properly (radiusd, rmpoller and optionally rmconntrack). By default few services donot run at Fed startup, See the last paragraph of this guide on Starting daemons at boot time so that required services automatically starts at boot. You can use the following commands to make sure the services starts at boot time.
chkconfig --add radiusd
 chkconfig --add rmpoller
 chkconfig --add rmconntrack
 chkconfig --add mysqld
 chkconfig --add httpd
 chkconfig --add dnsmasq
To test RADIUS communication, be sure MySQL server is running. Start FreeRadius in debug mode:
radiusd -X

Listening on authentication address * port 1812 Listening on accounting address * port 1813
 Listening on command file /usr/local/var/run/radiusd/radiusd.sock Listening on proxy address * port 1814
 Ready to process requests.
On the second terminal issue the radtest command:
radtest user 1111 localhost 1812 testing123

Sending Access-Request of id 57 to 127.0.0.1 port 1812
 User-Name = “user”
 User-Password = “1111” NAS-IP-Address = 127.0.0.1 NAS-Port = 1812
 rad_recv: Access-Accept packet from host 127.0.0.1 port 1812, id=57, length=50
 WISPr-Bandwidth-Max-Up = 262144
 WISPr-Bandwidth-Max-Down = 262144 Acct-Interim-Interval = 60
You have to see Access-Accept answer. If You see an error message, check the following:
• Is MySQL server running?
• Are MySQL credentials correct? • Are MySQL table permissions correct? • Can FreeRadius connect to MySQL database?
• Have You created the RADIUS and CONNTRACK databases and tables?
• Is the NAS defined in ACP? In this case it is 127.0.0.1 ?( NAS-IP-Address = 127.0.0.1).
• If the hostname is different than localhost, You have to substitute the localhost with the IP address of the Linux server. You have to update the NAS list in RM ACP in this case.
Now access the ACP (Administration Control Panel) by pointing your browser to http://localhost/radiusmanager/admin.php and First add Mikrotik NAS device in ACP.
Enter the ip address of Mikrotik. In Secret , type the secret that you will set in Mikrotik RADIUS (See below section / screenshot)

Also test the functionality of the User Control Panel (UCP):
http://yourhost/radiusmanager/user.php
The initial username and password are:
Username: user
 Password: 1111
To be able to log on to UCP as another user, create the user in ACP first.
System optimization Tips
The performance of the entire Radius Manager system mainly depends on the speed of the hard disks and the MySQL subsystem. If You encounter performance problems, check the following:
1. Check radacct table size. If it is large (> 300-500 MB), delete the old years from it using the deloldyears.sql script (included in the RM tar archive in doc directory).
2. Add more RAM to the system. Adding 2-4 GB of RAM doesn’t mean any problem nowadays.
3. Use RAID 0 or RAID 5 array MySQL db storage devices.
4. Optimize the MySQL server via my.cnf file.
key_buffer=1024M
myisam_sort_buffer_size=512M sort_buffer_size=32M
Set key_buffer = RAM size / 2, myisam_sort_buffer_size = RAM size / 4, sort_buffer_size = RAM size / 64.
Adding more RAM will drastically speed up the MySQL system. Indexes must be fit in the RAM for optimal performance.
Notes
By default, many web servers can list the contents of the directory where Radius Manager files are stored. To prevent this there are several methods available:
1. Use .htaccess file. Enable the Options -Indexes directive In .htaccess file (example file is included in radiusmanager directory in the installation archive). Be sure to enable the htaccess support in order to use this feature (set AllowOverride All directive in httpd.conf).
2. Disable the directory listing in httpd configuration files.
HOWTO REPLACE/MODIFY DMASOFTLAB RM LOGO and TEXT !!!
You can Replace/Edit the default DMASOFTLAB logo files. by default, Images are available where you have installed the radiusmanager. Look into the images folder of radiusmanager.
For example I installed RM in /var/www/html/radiusmanager. There will be a folder name ‘images’ Look for these files.
dmalogo_small.gif
radmanlogo_small.gif
main1_01.gif
main1_02.gif
main1_03.gif
emailheader.gif
Edit Various Text/headings show at UCP/ACP
You can also edit the texts/descriptions in language description files in radiusmanager/lang/english folder.
look for texts.txt and strings.txt
To add logo in prepaid cards
You can modify its base image at radiusmanager/lang/english/card folder.
look for classic_bg.png and refill_bg.png
Some Example:

MIKROTIK NAS CONFIGURATION
Setting up RADIUS authentication and accounting
To send authentication and accounting requests to Radius server, You have to configure your Mikrotik NAS. Use Winbox to view and edit the configuration. Follow these steps:
1. Connect to your Mikrotik router using Winbox.
2. Select Radius from the main menu.
3. Click on the + to create a new RADIUS server description:
(see the attached screenshot)

Description of fields:
• Service:
• PPP: for PPP RADIUS authentication
• Address is your RADIUS server host. eg 192.168.2.1
• Secret is the NAS secret from /usr/local/etc/raddb/clients.conf e.g 12345
• Authentication and Accounting ports are the standard RADIUS ports.
• Timeout defines how much milliseconds can elapse while the answer arrives from the RADIUS server. If You are using slower connection to RADIUS server or the accounting tables are large, set this timeout higher (3000-5000 ms).
Now Set the AAA options of PPP service (PPPoE): Goto PPP / Secrets / click on PPP Authentication & Accounting Button, and see the following.

Turn on RADIUS authentication (Use Radius) and RADIUS accounting (Accounting). Interim update is the time interval when RADIUS client (Mikrotik NAS) sends the accounting information to the RADIUS server. If You have more than 200 online users, use higher values (5-8 minutes) to avoid MySQL overload.
Now Enable incoming RADIUS requests (POD packets). It is required to use the REMOTE disconnection method in Radius Manager: Don’t forget to open the UDP port 1700 in firewall on Mikrotik and Linux server.

To Test the database connectivity: use the following command from RADIUS CLI.
rmauth 192.168.2.9 user 1

Mikrotik-Xmit-Limit=1028,Mikrotik-Rate-Limit=”262144/262144”
(Where 192.168.2.1 is the MT IP) You have to see similar output to this. If there is a MySQL socket error, define the correct socket location in /etc/radiusmanager.cfg. The default socket file on Redhat is /var/lib/mysql/mysql.sock. On Debian systems the proper socket path is /var/run/mysqld/mysqld.sock.
To successfully test rmauth, You have to create NAS entries in ACP. In this example, the NAS IP
You have to restart FreeRadius every time when You modify the NAS devices. Unfortunately FreeRadius doesn’t read the configuration files dynamically.
ADDITIONAL SETUP
Starting daemons at boot time
Radius Manager system supports automatic startup of daemons: radiusd, rmpoller and rmconntrack. The automatic installer copies all the required scripts to /etc/init.d directory and sets the required permissions on them.
The following methods are available to set up automatic service startup:
• Use Webmin to start services at boot time or
• Use command chkconfig –add [service_name] (Fedora only)
A chkconfig example follows:
chkconfig --add radiusd
 chkconfig --add rmpoller
 chkconfig --add rmconntrack
 chkconfig --add mysqld
 chkconfig --add httpd
 chkconfig --add dnsmasq
ADDED SECURITY: (My Suggestion, zaib)
I placed this RADIUS Server on user subnet, which is not suitable, palce it on behind Mikrotik DMZ,
then create a user in Mikrotik For example ‘user’ with restricted ip pool, and using FIREWALL rules,
Restrict this id/ip to access only RADIUS Server , block all other access for this id / pass.
This way user have to first dialin to open RM User Self Care Portal.
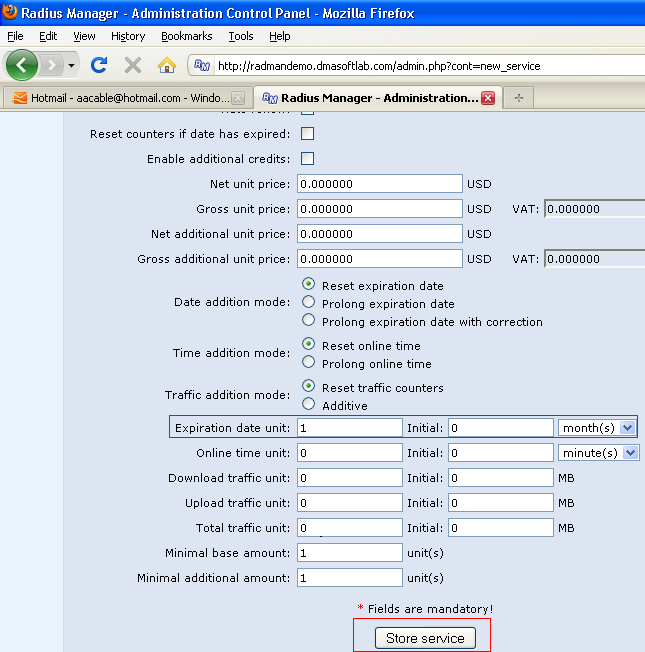
HOWTO ADD Service Plans in RM ACP & Generate Prepaid/Refill Cards:
256Kbps Monthly Service Plan
Following is an example on howto add New Service and assosicate it with new user.
Package = 256Kb
Expiry = 30 Days
Login to RM ACP , Goto Services and click on New Service.
In Service Name* tpye ‘256Kbps Monthly’
Click on ‘Available in UCP‘
Click on ‘Limit Expiration’
on ‘Set data rates’ (DL/UL) type 256 / 256
Now goto Bottom and in ‘Expiration Date Unit’ Select 1 , Initial 0, and
Finally, Click on Store Service Bottom in the End.
Done Your new service is created with 256Kbps Speed Limitation with 1 Month Up-Time Limitaion.
Following are screenshot for the above created Service.


- Add Service – Image 2 aacable@hotmail.com

Now we have created the new service , its time to create new user or generate pre-paid cards and assosciate them with this new service plan.

rm-add-pre-paid-cards / aacable@hotmail.com
Service is ready to be used. 🙂
HOWTO ADD QUOTA BASE SERVICE IN RM:
Now we will Add Quota Base Service Plan. For example User is allowed to use 1GB @ 1mbps per Day, After using his 1 GB Quota, his service plan should auto switch to 256Kbps speed plan for the rest of teh day. . . We have to use DAILY SERVICE option in RM for this purpose. First create Daily service with 256Kbps limitation, and then create the 1Mbps / 1Gb Daily Quota limit service and use the next dail service option in 1mb service plan to point it to 256k.
First we will create 256Kbps service plan. This will be very simple basic plan.
Open RM ACP, Goto Services, and create new service, and name it
256Mbps – Daily Service , rest of options can be set by seeing the image below.

256k-daily-image-1
- 256k-daily-image-2
Click on Store Service. Now 256Kbps daily service is ready, its time to create your regular 1Mbps / 1GB daily Quota Service Plan.
Open RM ACP, Goto Services, and create new service, and name it
256Mbps – Monthly, rest of options can be set by seeing the image below.

1mb-1gb-quota-image-1

1mb-1gb-quota-image-2

1mb-1gb-quota-image-3
All Done. Now Simply generate cards or user ids and associate it with the 1mbps service.
HOWTO SEND EMAIL NOTIFICATIONS / WARNING TO USERS BEFORE THERE ACCOUNT EXPIRE
Goto Home / system settings , here you can set it.

4) LINUX TRANSPARENT FIREWALL BRIDGE CONFIGURATION [using FEDORA 10]


Following is a comprehensive guide on how you can setup Linux base Transparent bridge with advance firewall capabilities like DHCP Server MACto IP binding restriction, Easily add remove clients via single file using text editor or WEBMIN, Also you can Port Filtering to block unwanted traffic from passing through.
A bridge is a way to connect two Ethernet segments together in a protocol independent way. Packets are forwarded based on Ethernet address, rather than IP address (like a router). Since forwarding is done at Layer 2, all protocols can go transparently through a bridge.You can think of a bridge like a advance manageable network switch/firewall/router. We will be using this Linux Transparent bridge according to the network diagram shown at the start of this article.
The job of the bridge is to examine the destination of the data packets one at a time and decide
whether or not to pass the packets to the other side of the Ethernet segment. The result is a faster, quieter
network with less collisions.
You don’t need to change your existing network layout. You just plug in the bridge and you start working. If for some reasons, your Linux bridge box should go down, reconnect the cables from your bridge to your switch, and nobody will even notice that something was not working!
The placement of the bridge would be something like.
Sserver’s >> switch >>eth0>> LINUX BRIDGE with 2 interfaces >>eth1>> User Switch >>User
Pc’s
Now there are few scripts involved in engaging the bridge, If any one requires them, email me and I will send him my script copies, File Name: firewall.rar
SIMPLE STEP BY STEP instructions on howto copy and execute the scripts:
HAWRDWARE REQUIREMENTS:
Any adequate P4 / Xeon Dual Core with at least 1 GB RAM , 2 Lan Cards (preferably Gigabit)
SOFTWARE REQUIREMENTS:
Any Linux flavor, preferably FEDORA CORE 10 or likewise (Full installation with all packages selected at them time of installation, specially bridge utilities)
After successfull installation of FEDORA, copy firewall.rar , unrar them, and copy all scripts in a folder
/firewall/aacable

Now goto /firewall/aacable folder, make all scripts executable by issuing command chmod +x *.*
If required, convert them using dos2unix command, as sometimes copying it from windows generates some problems.
Now copy rc.local to /etc/ (overwrite older one) & restart the system.
Now after booting , rc.local will excute following files . . .
1)
/firewall/aacable/bridge.sh
(It will remove ip address from eth0 n eth1 and create bridge interface br0 with following ip: 10.0.8.1 for remote access and management of local bridge system, also dhcpd will be bind to this interface)
2)
/firewall/aacable/conf
(This is some custom configuration to prevent timeouts / delays, Latency and some other stuff)
3)
/firewall/aacable/start
(This is the main firewall script , It will execute All DHCP n Firewall related Scripts one by one. It will add all mac/ ip foundin macip.allowed file in dhcp configuration file and then bind them using iptables so that user mac ip must be matched with the file accordingly otherwise user access will not be granted. Any user whose entry will not be found in macip.allowed file, will get off subnet ip like 192.168.100.x
You can view the ‘start‘ file and see the related actions defined in there.
Your BRIDGE is ready & Following restrictions will be in place.
1)
If a user MAC n IP is found in /firewall/aacable/macip.allowed file, User will be granted valid ip as you entered in the macip.allowed file, for example
00:19:d1:fd:83:b1 10.10.2.13 # ZAIB-PC
The user with above mac address will always get the 10.10.2.13 ip, if he manually tries to change the ip or mac, he will not be able to pass the bridge. MAC n IP combination matching is required in order to pass the bridge.
If a user MAC n IP is not found in /firewall/aacable/macip.allowed file, User will be granted INVALID ip series from following off subnet 192.168.100.10-192.168.100.200 and thus will be completely isolated from the local valid network.
You can change all ip series in DHCP related files.
To add user , you can manually edit /firewall/aacable/macip.allowed file and add entry in following format
00:16:76:7E:05:7B 10.0.0.1 # SERVER1-ISA
00:06:5b:62:71:0a 10.10.2.12 # JOHN-LAPTOP
and the run start file which will add entry in macip.allowed file and add dhcp entry and run the security script.
OR the easiest way is to setup WEBMIN and link the file with webmin, so you can add/remove files easily via webmin GUI.I have done some advance customization of webmin, I added support user in webmin for support personnel , and grant him only right of editing this file, after the support personnel edit this file and click on save, it automatically execute the start script which add / remove all entries again in firewall. See the below images for example.


This firewall script also blocks few ports which are commonly used in virus flooding. thus saving junk traffic from passing by from one end to other end.
You can do many interesting things using this bridge :~)
BRIDGE SETUP DONE.
x=x=x=x=x=xx=x=x=x=x=x=x=x=x=x=x=x=x=x=x=x=x=x
Note: Later on, I moved FTP servers from Mikrotik DMZ to User Subnet, I also changed FTP operating system from Microsoft Windows 2003 R2 Server to Ubuntu Linux and set all sharing via Apache and linked apache authentication with Radius Manager , This step was done because there was unnecessary junk load of FTP data going through Mikrotik router , so I placed them on user subnet and put radius authenticaiton on it, so only valid account holder can access it. I have also posted an article on my blog website on how I achieved it.
So guys, this is a very shorten version of how I completed this project. It was a very good project for me. I learned many new techniques on howto handle various issues. It took me many days n nights in googling, and I must say GOOGLE was my best friend and I consider google my teacher 🙂
If you need any assistance , Do let me know
Later Updates Year 2012:
https://aacable.wordpress.com/2012/11/26/dmasoftlab-radius-manager-sms-notification-configuration/
https://aacable.wordpress.com/2012/11/22/howto-enable-mikrotik-to-sendreceive-sms-using-gsm-modem/
https://aacable.wordpress.com/2012/11/20/dmasoftlab-rm-email-notifications-for-various-events/
https://aacable.wordpress.com/2012/11/20/mikrotik-radius-manager-quota-base-service/
🙂
Regard’s
SYED JAHANZAIB
Email: aacable [at] hotmail.com
+92.333.xxxxxx
